
Overview
With the Google Spreadsheets Connector, you can utilize FormAssembly's sophisticated features and have your data readily available in Google Spreadsheets (also known as Google Sheets).
This means no more manual exporting, let the connector do it for you!
Requirements
To use the Google Spreadsheets Connector, a FormAssembly user must
- have access to the Google Sheets Connector Add-on for their instance
- This add-on is available for purchase by Essentials plans and up.
- have Content Management user permissions enabled for their login
- Specifically, the Google Sheets permission must be enabled for the user account.
- have a Google account
To use the Google Sheets Connector for Workflow, a FormAssembly user must additionally
- be part of a Team plan or higher
- have at least one spreadsheet available on their Google Drive account
Connector Setup for Forms
1. Add the connector to your form
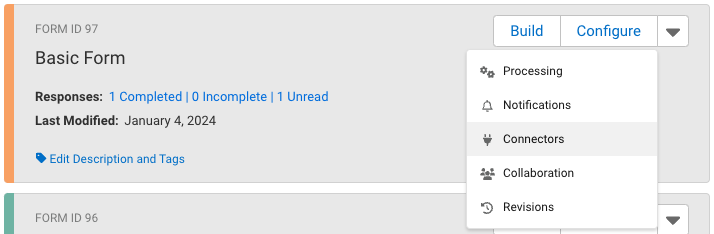
- From the Forms List, hover over the Configure button for your form and select Connectors.
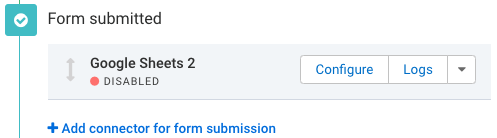
- The Google Spreadsheets Connector can be added to either the Form Submitted or After Form Submitted sections of the timeline.
- Click the appropriate "+ Add connector for... " option, on the timeline.
- Choose Google Sheets 2.
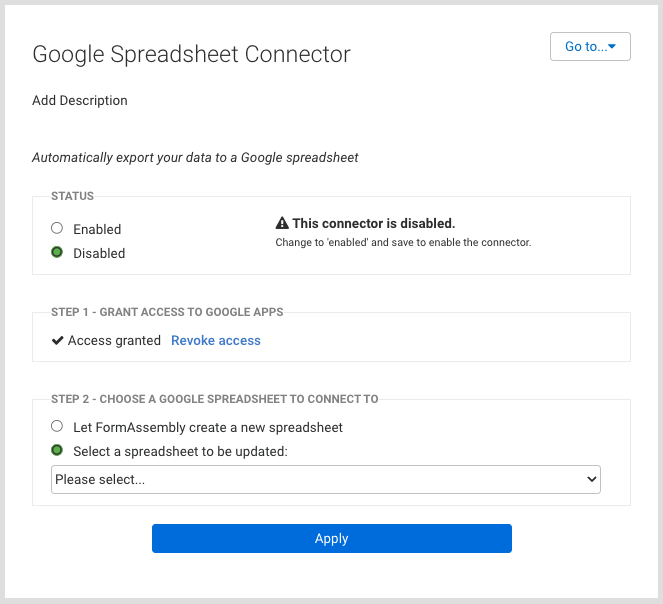
2. Grant the connector access to your Google Drive
- Click Configure to begin setting up the connector.
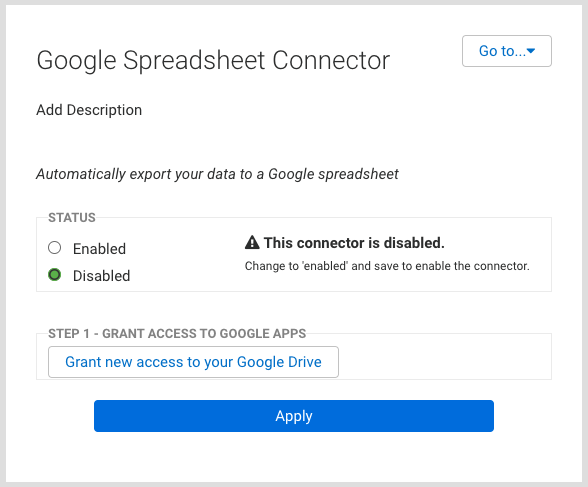
- Click Grant new access to your Google Drive.
- If you have already given access rights to your Google Drive account, select Use existing authorization and move on to step 3.
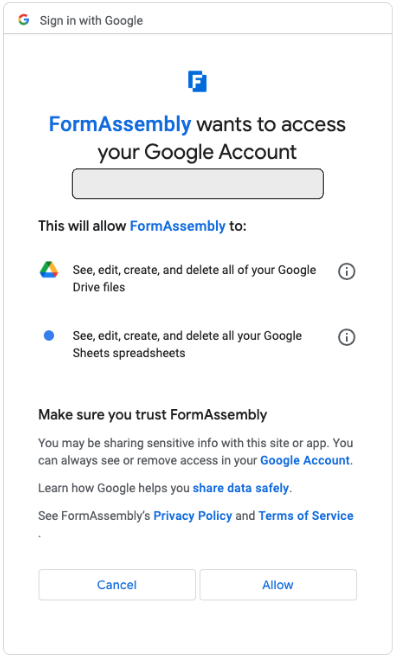
- Sign in with your Google account credentials.
- Complete any additional authentication steps configured for your Google account.
- Accept the permissions requested by the FormAssembly Google Spreadsheets 2 Connector for your Google account.
- If you do not accept the permissions, you will be unable to use the connector.
3. Choose a Google Spreadsheet to connect to
- Choose whether to let FormAssembly create a new spreadsheet for form responses, or select an existing spreadsheet on your Google Drive.
- Set the connector status to Enabled to activate it for your form.
- Click Apply to save your changes.
Connector Setup for Workflows
FormAssembly does not recommend using previous versions of Google Sheets Connectors and the latest version of the Google Sheets Connector in the same Workflow. It is recommended to delete the previous version of the connector and add a new step using the new Sheets Connector setup.
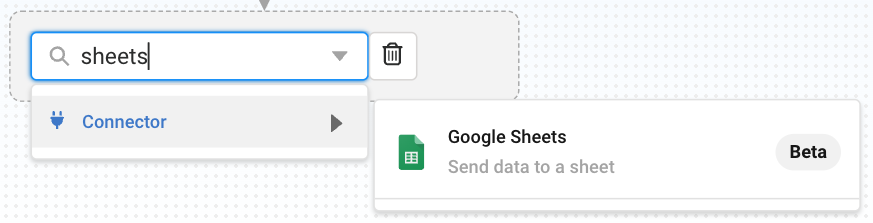
1. Add the Google Sheets connector to your workflow
- Select Add Step and choose Connector
- Select Google Sheets
2. Set up the Connector Properties
Description Tab
Use the Description tab to add a Step Name and Step Description.
Authorization Tab
Grant access to Google Sheets.
- Click the "Grant new access to your Google Drive" button.
- If you have already given access rights to your Google Drive account, select Use existing authorization and move on to the Configuration Tab.
- Sign in with your Google account credentials.
- Complete any additional authentication steps configured for your Google account.
- Accept the permissions requested by the FormAssembly Google Spreadsheets Connector for your Google account.
- If you do not accept the permissions, you will be unable to use the connector.
Configuration Tab
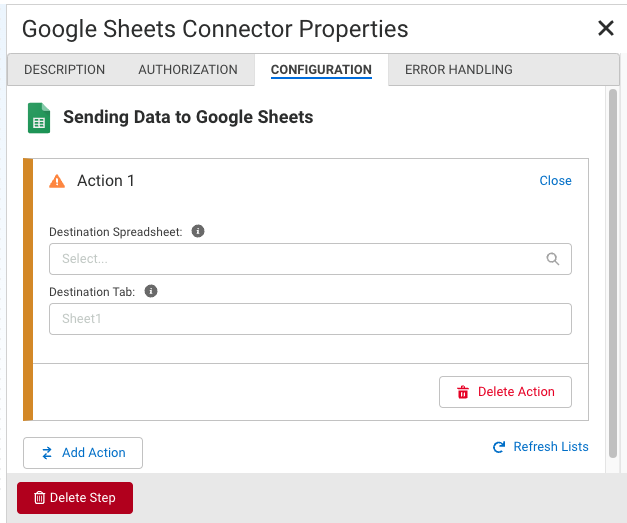
Destination Spreadsheet
Select an existing spreadsheet on your Google Drive. If you do not see your desired spreadsheet in the list, click Refresh Lists at the bottom of the Configuration tab.
Destination Tab
Enter the name of an existing tab from your destination spreadsheet, or leave it empty to automatically assign Sheet1 as the Destination Tab. Alternatively, entering the name of a tab that does not exist in the destination spreadsheet creates a new tab with the name entered.
Field Mapping
Mapping form fields to destination tab columns can be completed automatically and manually.
To quickly map all form fields, click Add all standard fields. This will automatically map form fields in the order that they appear on the form to each column. Note that clicking Add all standard fields leaves out the file upload field metadata.
To manually add a form field or value, click Add Another or adjust an existing field or value mapping.
- Use the dropdown to select whether to map a Field or Value.
- For fields, search for or select an available form field from the list.
- Note: Available form fields are all fields from forms that occur before the Google Sheets Connector in the workflow.
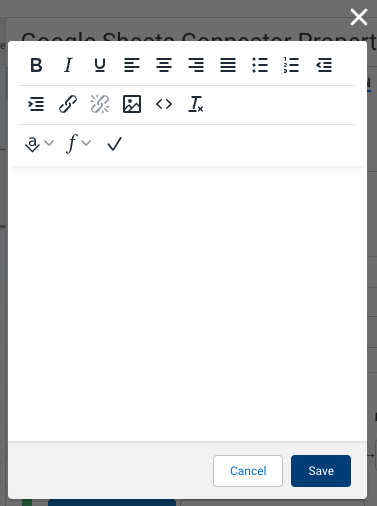
- For values, enter the desired value or formula. Click the formula button to open a WYSIWYG editor for further customizations to your value.

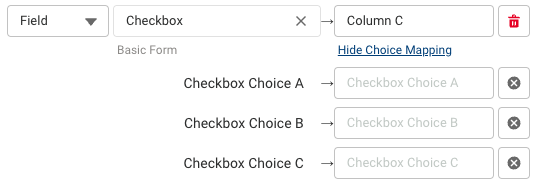
Choice Mapping
When mapping fields with multiple choices (checkboxes, radio buttons, etc.), the Edit Choice Mapping option becomes available. Use this to record custom values in your spreadsheet depending on the choice selected.
Repeatable Fields
When repeatable elements are detected, an option to further configure the behavior of your spreadsheet will appear. Repeatable elements can be added to your spreadsheet as new rows or comma-separated values within a single cell. By default, each submission is contained within a single row and each repeated element is contained within a single cell as comma-separated values. This behavior can be changed to create a new row each time the selected section is repeated.
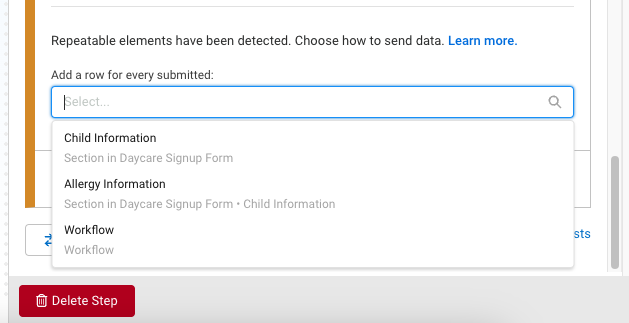
Click the X to clear the default ‘Workflow’ selection, and choose a new option from the menu.

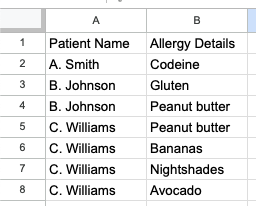
When a repeatable section is selected from the menu, for each instance the repeatable section is submitted, a new row will be created for the workflow response. For example, if the repeatable section ‘Allergy Details’ is selected for a patient intake form, for each allergy that is submitted for a patient a new row will be entered into the spreadsheet. In this patient intake form example, the patient information accompanying each allergy submitted will be copied into the appropriate cells of each line so there will be no empty cells for lines with data. Because the information is duplicated where necessary, information can be sorted with ease within Google Sheets.
Actions and the Add Action Button
The Google Sheets Connector may be configured to send data to more than one destination tab or spreadsheet by using multiple Actions. For each additional destination you want to configure, use the Add Action button to create another Action. Complete the configuration of the destination spreadsheet, destination tab, and field mapping for each Action.
Delete an action by pressing the Delete Action button at the bottom of each action configuration.
Error Handling Tab
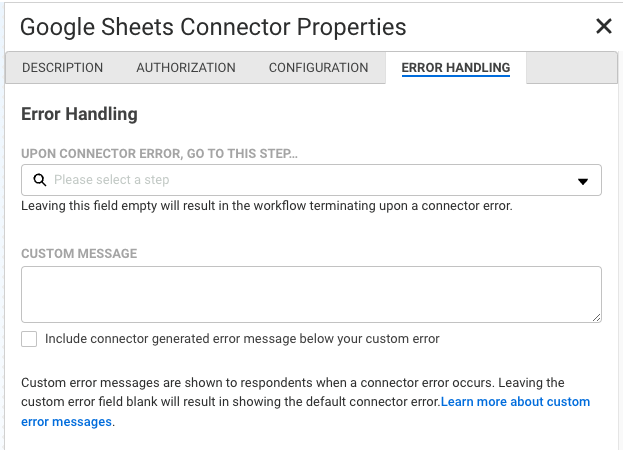
By default, if the connector encounters an error, the workflow terminates. To override this behavior, you can configure the error to redirect the workflow to another step by selecting a step from the Upon Connector Error… dropdown menu.
You may create a custom error message to display to your respondent. If a custom message is not added, the default connector error displays. To include the default message with your custom message, select the checkbox to do so.
View Responses in Your Google Spreadsheet
To see the connector in action, submit a test response.
Log into your Google account and either open the existing spreadsheet where you told the connector to place your data or take a look at the newly created spreadsheet.
Responses are automatically added to the spreadsheet upon submission.
Known Behaviors
Please note the following known behaviors with the Google Sheets Connector:
- The Workflow Architect (the creator of the workflow) must type to input the destination tab name to map data to an existing tab.
- If a value for the destination tab is not entered and there is not a default tab named Sheet1, upon running, the connector will create a new tab called Sheet1.
- The Google Sheets Connector will insert headers to the destination tab only when the tab contents are empty. If the form is changed, or the connector is later configured to include additional fields, any recently added or new field labels will not be reflected in the spreadsheet headers.
- The Manage Authorizations table may not reflect all authorized accounts within workflow connectors. However, revoking authorization revokes accounts on both form and workflow connectors.
- FormAssembly does not recommend using previous versions of Google Sheets Connectors and the latest version of the Google Sheets Connector in the same Workflow. It is recommended to delete the previous version of the connector and add a new step using the new Sheets Connector setup.