
Introduction
Salesforce is currently transitioning to the use of Salesforce Files for their file management system. If you would like to send a form respondent's upload to Salesforce Files, please follow the steps below. This will allow you to send a file to the new "Files" tab in Salesforce Lightning.
This can be useful for having centrally managed files on your Salesforce Instance, that can also be shared out with others in your organization. You can read our recent blog post for more information and additional guidance.
You can also use the Quick Reference Mapping section below for an overview of the fields you will need to map in your connector.
Please Note: If you add a ContentVersion step in your connector, an error will appear if there is no file uploaded to the form and mapped to the step. If your file upload field is not required then we recommend adding a skip-if formula to the step so that the step is skipped if no file is uploaded. If you have any questions you can reach out to our Support team for assistance.
Configuring your Salesforce Connector
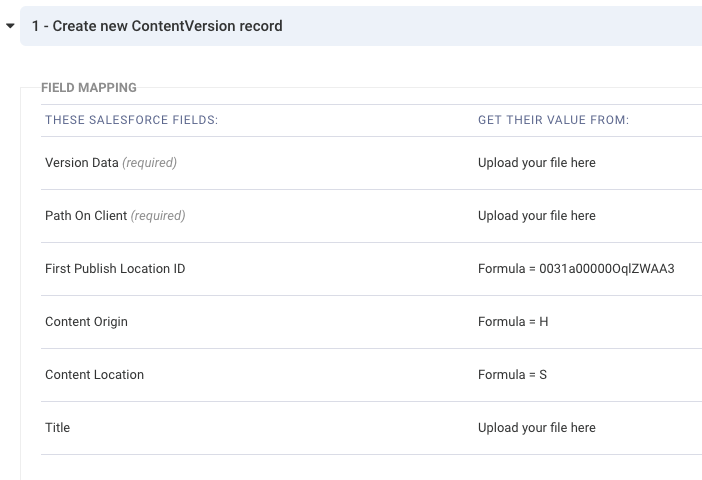
1. In your Salesforce Connector, begin by creating a new "ContentVersion" record.
2. You should map the Version Data field and the Path on Client field to the upload field in your form.
3. Next, for the First Publish Location ID, you will want to map that to the ID of the object you want to associate this file with.
For example, if you were going to associate this file with a contact, the contact creation step would need to come before the ContentVersion connector step, so that its ID could be referenced here.
4. You can map the Title field to the upload field on your form. Alternatively, you can map this as a formula with a custom value for the title. This will rename your file when it is sent to Salesforce.
5. You will also need to map the Content Origin field. Mapping a formula with a value of "C" will mean that the Content is from a library (or an external source). Mapping an "H" will mean the file is to be stored in a chatter post (chatter must be enabled). For this setup, we recommend using an "H".
6. Finally, for the Content Location, you can map an "S" for the file being within Salesforce, and an "E" for the file being external to Salesforce. For this setup, we recommend mapping an "S".
Please see the image below for an example of these mappings:
Quick Reference Mappings
- Create a new ContentVersion step in your connector.
- "Version Data" field is mapped to the FormAssembly file upload field.
- "Path on Client" field is mapped to the FormAssembly file upload field.
- "First Publish Location ID" is mapped to the ID of the record you want the file associated with.
- "Content Origin" is set to a formula with the value "H" (Chatter must be enabled).
- "Content Location" is set to a formula with the value "S".
- "Title" is mapped to the FormAssembly file upload field or set to a formula with a custom title.
Additional Notes and Troubleshooting
- The maximum file size you can upload via the SOAP API must be less than 50 MB.
- When a document is uploaded or downloaded via the API, it is converted to base64 and stored in VersionData.
- This conversion increases the document size by approximately 37%. You must account for the base64 conversion increase so that the file you plan to upload is less than 50 MB.
Technically, the “ContentDocumentID” field is a required mapping in the connector. However, you do not need to map this field. If you do map the “ContentDocumentID” it will likely result in an error.
You can choose to map the Title field as a formula if you would like to rename the file that is being uploaded by the form respondent.
If no file is uploaded to the form, you may receive an error on the Title field when the Content Version step runs. We recommend using a skip-if formula to skip the ContentVersion step if the file upload field is empty.
File Limits
Currently, there is a limit to the number of file upload fields that can be used within one form. Each form has a limit of 20 file upload fields, to collect 20 files. In addition, each form has a limit of 35MB per response.
There is no limit across all forms, however. This means that there are no limits in regards to total number of file upload fields in an account, or total number of files collected. The limits are only per form/response.