Overview
The purpose of input validation is to help your respondents provide the desired answers in the expected format. It is an aid, and it is not designed to be foolproof. There are ways one can bypass the validation and, although rare in a normal use case, invalid responses should not be unexpected.
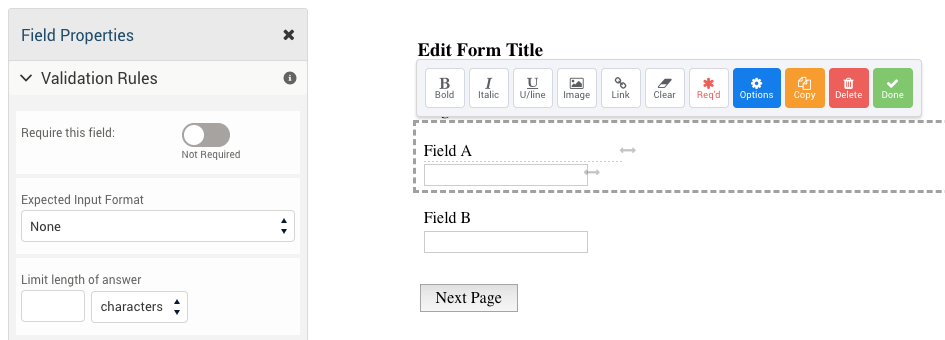
All validation rules can be accessed by clicking on a field, selecting Options, and selecting Validation Rules from the Field Properties menu.
- Validation Rules may not work as expected on the form if JavaScript is disabled on the respondent's web browser.
- Validation Rules are not available for the Question type: Hidden Field. Instead, set the question type to "text input", and edit the field Options for Access Control to "Hidden".
Limit Length of Input
This option allows you to set the maximum number of characters or words to be allowed in a text field and text area. You can only define a limit for characters or words - not for both.
Required Fields
Users can be required to fill out a given field before submitting or proceeding to a form's next page.
To set a field as required:
- Select your question and click the Options button to open the Field Properties menu.
- Select Validation Rules.
- Check the corresponding box for "This is a required field".
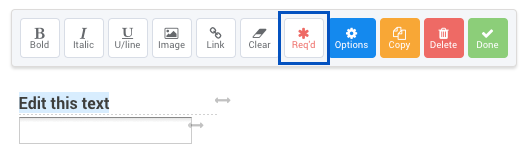
This can also be accomplished by clicking the Req'd button after clicking on a field in your form.
Require an Email Address
To require a valid email address:
- Select a text input question and click the Options button to open the Field Properties menu.
- Select Validation Rules.
- In the Expected Input Format menu, select Email.
- FormAssembly's email validation will allow an underscore in the domain of an email to pass validation settings on a form, but Salesforce will not accept an underscore in the domain of an email.
- FormAssembly's email validation will allow multiple email addresses separated by commas, but Salesforce will throw an error if it is pushed to Salesforce. Salesforce expects only one email address per email field.
Require Numbers Only
To require numbers only:
- Select a text input question and click the Options button to open the Field Properties menu.
- Select Validation Rules.
- In the Expected Input Format menu, select Number [0-9].
Require a Number Within a Range
Numbers can be limited within a range by doing the following:
- Select a text input question and click the Options button to open the Field Properties menu.
- Select Validation Rules.
- In the Expected Input Format menu, select Number [0-9].
- Enter the lower number in the From field and the higher number in the To field.
Require a Date and/or Time
To require a field to accept only a date:
- Select a text input field and click the Options button to open the Field Properties menu.
- Select Validation Rules.
- In the Expected Input Format menu, select Date, Time, or Date and Time.
Select the Date (with calendar) option if you'd like to allow respondents to use a calendar to select the date.
Require a Date and/or Time Within a Range
Date inputs can be limited to a specific date range. To enter your range:
- Select a text input field and click the Options button to open the Field Properties menu.
- Select Validation Rules.
- In the Expected Input Format menu, select Date, Time, or Date and Time.
- Enter your beginning date in the From field and your ending date in the To field.
Require a Custom Format
Create your own formatting rules by using regular expressions, creating an automatic format, or limiting the number of characters that can be entered into a field.
- Select your question and click the Options button to open the Field Properties menu.
- Select Validation Rules.
- In the Expected Input Format menu, select Custom...
- Create your rules in the corresponding fields.
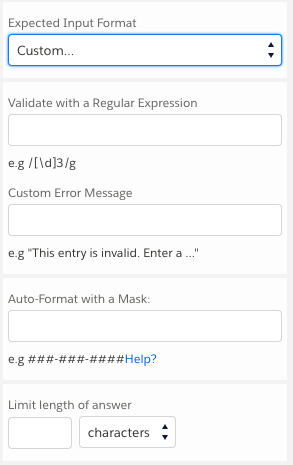
Auto-Format with a Mask
Auto-formatting can be used for simple patterns, such as a phone number or serial number.
For instance, let's say you have a serial number field, and all of the serial numbers expected to be entered on your form start with "M4K", and then have 4 numbers and 2 letters. The mask would be M4K####$$, with # = numbers and $ = alphanumeric characters (letters or numbers).
Characters like commas, slashes, and dashes will all act like M4K and only function as placeholders. The expected format will be visible once the field is selected.
- If you have enabled auto-mask and limit character length for the same field, the auto-mask configuration will take priority and override the limit length of characters. We recommend that the auto-mask and character length configurations match the same number of characters when using auto-mask and limit character length together.
Validate with a Regular Expression
- This works: /[\d]3/g/
- This doesn't: [\d]3/g
Regular expressions can help you define an expected pattern. Crafting regular expressions can be difficult. It is usually best to copy & paste an existing expression than try to come up with your own.
While we'd like to provide as much support as we can, we are unable to support expressions as they can break in ways we cannot predict such as when updates are made.
Please reference the links below for information and assistance on expressions: