Overview
Central Authentication Service, or CAS, is a single sign-on (SSO) protocol used by many organizations. In general, CAS allows users to log in once within an organization and then become authenticated everywhere within the organization. With FormAssembly, this means your forms would only be submitted by respondents who have authenticated through CAS. In combination with the CAS Prefill Connector, you can easily import attribute data directly into your forms.
The following instructions will show you how to set up your FormAssembly form so that only form respondents authenticated by a specific CAS provider (such as your enterprise or educational institution) can access the form.
When using CAS authentication, form respondents will be taken to your standard CAS login screen when trying to access a form that is behind CAS authentication.
Getting Started
The CAS integration is available on FormAssembly Team plans or above.
The CAS system is complex and has several variations that your institution may employ. Because of this, there are a few items you'll need before you begin this process:
- The contact information for your institution's CAS administrator. Several of the changes below will need to be made on the CAS server-side, or will need information specific to your organization's CAS setup that only the administrator can provide.
- An already created FormAssembly form. If you haven't set up an outline of your form yet, do that first before continuing with these instructions.
- Credentials in the CAS system for a test user of the same type who will be completing the form. Often, this will be at a lower access level than you, so you'll want to make sure you have appropriate test credentials.
Configuration Steps
Before enabling and setting up the CAS Prefill Connector, you will need to authenticate the CAS Connector to make sure that you are properly connected. You can do this by following these steps:
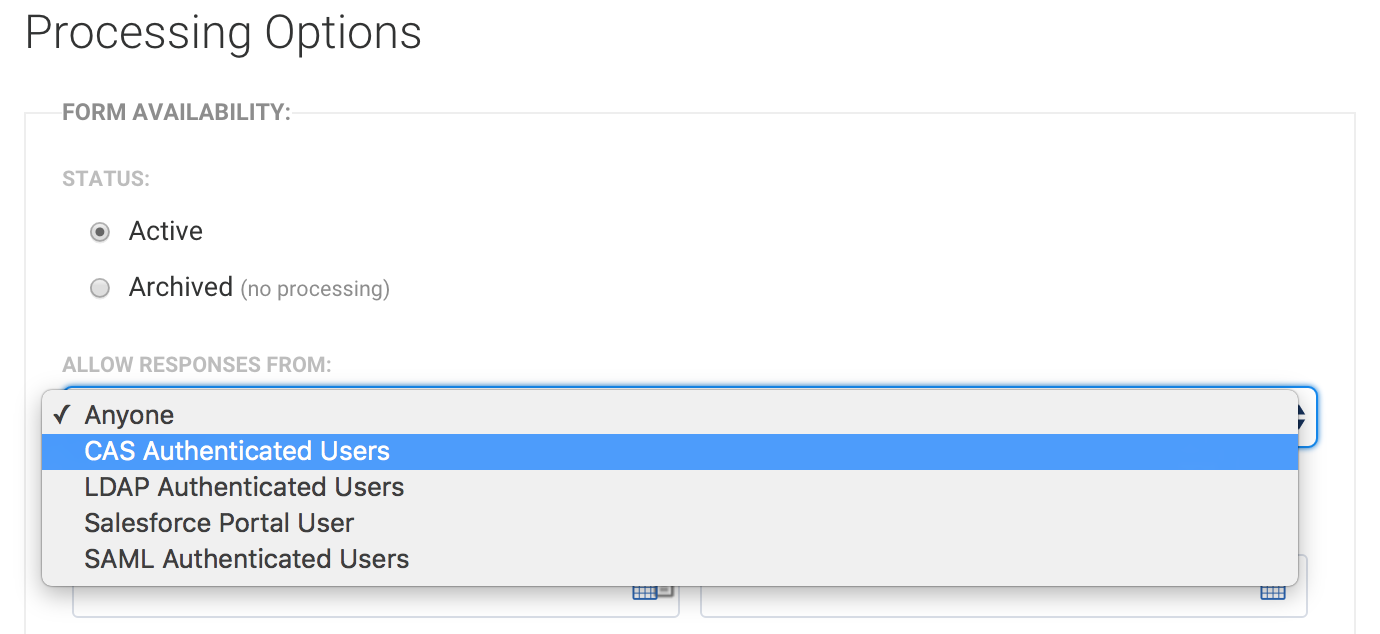
- In the Processing page for your form, change Allow Responses from: from Anyone to CAS Authenticated Users.
- Click the Configure button that appears below the setting you just changed.
- In the CAS Authentication screen, scroll to Step 1 of 3.
- In URL of CAS Endpoint, enter the URL of your CAS endpoint, including its port number.
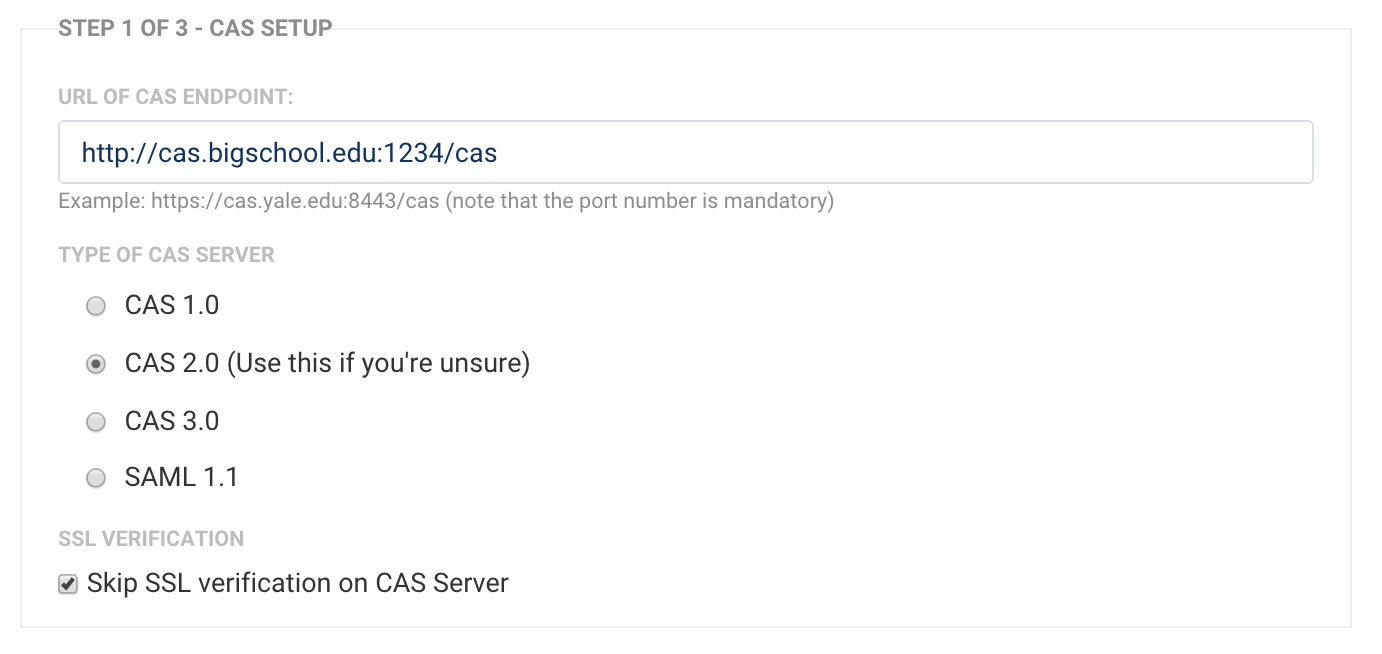
- Under Type of CAS Server, leave the default setting of 2.0 unless you were told otherwise by your CAS administrator.
- Leave Skip SSL Verification on CAS Server checked unless told otherwise by your CAS administrator (as shown above).
- Under Step 2 of 3: Test Connection, click Test.
- If you're not already logged into your CAS system, this will open a pop-up window for you to authenticate into your CAS instance. Once that authentication is complete, the window will close.
- Step 3 of 3: Select CAS Attributes will now populate with options.
- Choose the CAS attributes you'd like to be available on the FormAssembly instance, as it authenticates your users. Be sure to select only the options that you'll need access to in your form to reduce the time and memory footprint of the CAS communication.

- Under Access Control (Optional), add an optional @IF statement to further control which CAS-authenticated respondents can access your form.
- If the formula evaluates to TRUE, the respondent can access the form.
- If it evaluates to FALSE, the respondent will be directed to an access denied page.
- Save the authenticator configuration and attempt to view your form. You should not be able to access the form without being logged into your CAS system.
CAS Prefill Connector
In addition to allowing only authenticated users to access your forms, you can use the CAS Prefill Connector to fill in data on your forms automatically. You can visit our CAS Prefill Connector setup page in our knowledge base for more information on this process.
CAS in Workflow
Forms configured with CAS can leverage their CAS settings within FormAssembly Workflows. Once CAS is set up on the form, using the same steps as detailed above, add the form to a Workflow.
CAS in Workflow Considerations
- Access Control formulas within the CAS configuration do not work in Workflows
- Save and Resume is simplified, only requiring an email for CAS forms.
- Users can't resume forms saved by different CAS users, protecting against cross-user resumes.