Introduction
In situations where you are processing payments in your form, it may be beneficial to have the ability to accept discount codes from respondents. This post will discuss how you can add in the most common types of discount codes:
- Percentage-based: Discount a certain percentage amount from the total.
- Dollar-based: Discount a certain dollar amount from the total.
Before adding discount codes to your form, it is important to have a basic understanding of form building and form calculations. You will also need to use basic JavaScript during this process, but we will provide you with the needed code.
Setting Up Discount Codes
Before these steps, you will need to have a form that is already calculating the total cost for what respondents are purchasing in your form. If you are having difficulties with this, please reach out to our support team.
The steps below should be followed for both percentage-based and dollar-based discount scenarios. You will define the amounts of your discount codes at the end of these steps when adding in the JavaScript under Step 5.
1. Creating a Pre-Discount Total
- To begin, find the current field that is showing the total purchase amount in your form, and open the options menu for that field.
- Select Calculations and mark This is a variable. For this example, we will define this variable as prediscountTotal.
- In the end, this field will be hidden, but we recommend leaving it visible until you have tested your form.
- Please note that this field will likely already be marked as a calculated field, as it determines the total cost of items purchased.

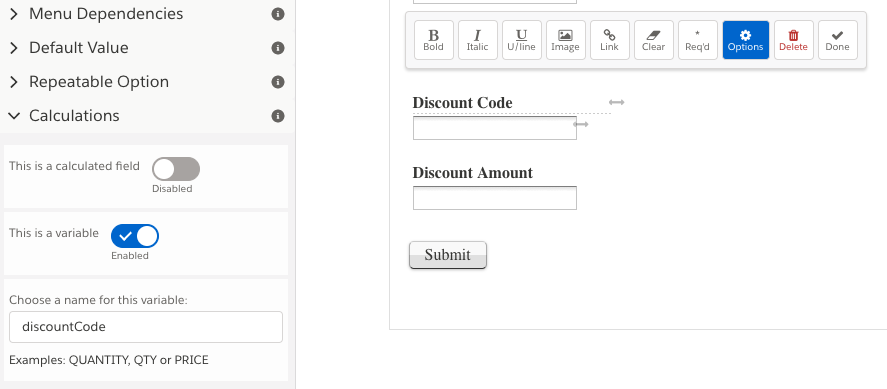
2. Add in the Discount Code Field
- Next, add a text field where your respondents will enter their discount code.
- Like before, open the options menu for this field
- Select Calculations and mark This is a variable. For this example, we will define this variable as discountCode.
- Optional: Under the options menu, you may also want to add a validation rule. This way, if a respondent enters an incorrect discount code, an error message will show.
- To do this, open the Validation options
- Choose Custom
- Under Validate with a Regular Expression paste in the following: ^(CODE1|CODE2|CODE3)$/
- If you choose to add in a validation rule, you will need to replace "CODE1", "CODE2", and "CODE3" with your actual discount codes. You should not use any spaces or special characters for these codes. These codes are also case-sensitive.
- You can also define a custom error message here if you would like to.

3. Add in the Discount Amount Field
- Now we need a text field that will hold the total amount of the discount. Add in a text field, label it "discount amount", and mark this field as a variable like before. For this example, we'll define the variable as discountAmount.
- In the end, you may want to mark this as a hidden field, but it's best to keep it visible for testing purposes.
- Next, mark that This is a calculated field.
- Enter the calculation as: calculateDiscount(discountCode)
- Please note, that if you used a different variable name above for the discount code field, you will need to replace "discountCode" with that variable name in this calculation.

4. Add in a Post-Discount Total Field
- Add another text field that will represent your post-discount total or grand total. This will be the field your respondents will see, and it will have your discount applied if they enter the correct discount code.
- Next, mark that This is a calculated field. Please note that the calculation will vary depending on if you are using a percentage-based or dollar-based discount scenario. Based on your choice, please paste in the appropriate calculation:
- Percentage-based discount calculation: prediscountTotal-(prediscountTotal*discountAmount)
- Dollar-based discount calculation: prediscountTotal-discountAmount
5. Add in the Custom JavaScript with Discount Amounts
- Finally, you will need to add the JavaScript code sample below to the Custom Code section of your form (under the Properties menu).
- Please note that lines that contain // at the beginning are comments. These are there to offer guidance, but do not impact the calculation.
<script>
  function calculateDiscount(discountCode) {
      if(discountCode == 'CODE1') {
         return 10;}

    // Add as many of the else if statements below as you need.
    // This is how you can apply multiple discount codes.
    // Please do not change the formatting.

    // If you do not need to apply multiple discount codes
    // simply delete the statements you do not need.

           else if(discountCode == 'CODE2') {
          return 100;}

           else if(discountCode == 'CODE3') {
          return 125;}

       // Always end this with a 0 so that a $0 discount
       // will be applied if they put the wrong code
       else {return 0;}
       }
</script>- The values of "10", "100" and "125" will need to be replaced with your discount amounts.
- If you are using dollar amounts, please replace those amounts. It is important to not use a dollar sign.
- If you are using percent amounts, please replace those amounts in decimal form (e.g., 0.1 for 10%).