Introduction
The Conditional Step allows you to conditionally route your workflow to one or more paths based on one or more rules. You can even customize the conditional logic for these rules!
To add this step to your workflow, click the "Add Step" button on your Map and then select Add a Conditional from the dropdown menu. This will auto-populate two Path Cards in the Properties panel. Path Cards contain the configuration of each path.

You can edit or delete a Conditional Step at any time by selecting it on the Map and opening the Properties panel.
Conditional Steps consist of five main parts:
- Conditional - The main body of the step. This is where you can add, edit, and remove paths, along with configuring the conditional logic applied to them.
- Paths - These are the branches stemming from the conditional. The respondent will only follow one of the paths as they progress through the workflow. Paths can be added or removed, but you will begin with two paths after a Conditional Step by default.
- No Conditions Met Path - This is the path that a respondent will follow if none of the other conditions/rules have been met. This path is auto-populated and cannot be deleted without deleting the entire step.
- Rules - Rules are what determine which path a workflow will take. The respondent will be sent down the first path that equates to "true". Rules appear in rows within the Path Card and are each identified by a letter icon. You can add multiple rules to any path.
- Set Condition - This section allows you to select the conditional logic that will be applied to a set of rules. You will only see this option when you add more than one set of rules to a singular path.

Properties Panel Configuration
Adding this step will automatically open the Properties panel so that you can configure the step. The Properties panel for this step contains the following tabs: Paths and Description.
You can delete any step by opening the Properties panel for the step and clicking the red "Delete Step" button at the bottom.

Paths Tab
The Paths Tab contains a list of Path Cards, each of which contains the configuration for one path. You begin with two Path Cards by default and you can add more by clicking the "Add Path" button.
You must configure the first default Path Card completely by defining rules and setting conditions in order for the path to be valid. You must also configure any additional path that you add. The final Path Card will be the “No Conditions Met” path. This path is pre-configured with conditions/rules and does not require any additional configuration. You can update the title of this path by clicking Configure on the Path Card.
Your respondents will be routed down the first path to equate as "true", according to the order of the Path Cards (as they are displayed left to right on the Map). This means that if a respondent meets the conditions for two or more paths, they'll go down whichever path they meet the conditions of first.
On each Path Card, you'll see the path's Status Icon, Path Name, and buttons to delete or configure the path.
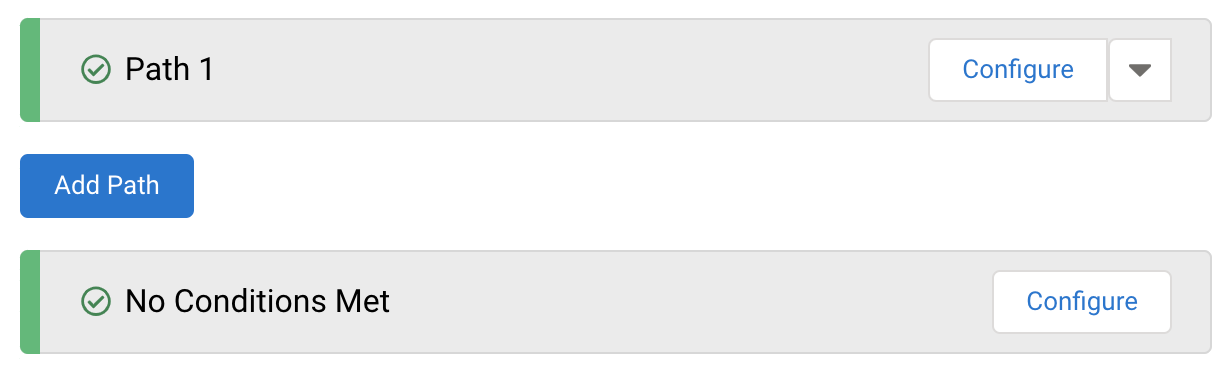
Clicking "Configure" will expand the Path Card so that you can set the Path Name and Rules for the path. Once the card has been opened, you can click Close to collapse the card.

- Path Name - You can change the name of the path and customize it to your needs if you choose.
- Rule Status - The status will be "Invalid" by default until all of the required rule fields have been configured. Once everything has been configured, the status will update to "Valid" and the color will change from yellow to green.
- Define Rules - Each row (rule) in this section is uniquely identified by a letter icon.
- To set a new rule, you'll first select a source which can be either a Form Field or a Formula.
- Form Field - A dropdown with a list of all form fields from all forms above the current step in the workflow.
- Formula - A text field where you can type in a formula. You also have the ability to build a formula using the Formula Editor, by clicking on the blue “f.” If you are not yet familiar with the Formula Editor, learn more about using it to create formulas here.
- After you have selected your source field, you'll need to choose an operator and a value.
- An operator determines how the source field will be compared to the value.
- The value is a number or text that you will compare to the source field. Think of this entire section as one large formula with the following format:
If [source field/formula]+[operator]+[value]="true", then go down this path. Otherwise,
move to the next Path Card.
- So one example of this would be:
If [the Zip Code field in form one] [equals] [90210] then continue down this path.
- To set a new rule, you'll first select a source which can be either a Form Field or a Formula.
- The Formula Editor in the Workflow Builder has some additional aliases when compared to the form-specific Editor. Namely, you can now select fields and aliases from all previous forms when building your formulas.
- Selecting these previous forms' fields and aliases in the Formula Editor will create a "super-alias" - these work across multiple forms and steps.
- Super-aliases have the following format: %%[workflow step #]![field alias]%%
- Additional Notes for Rules
- If you choose a Form Field as your source and a Text Field as your source field, you can use the Formula Editor or enter text in the Value box to determine the functionality of the rule.
- If you choose a Multiple-Choice Field as your source field, you'll be given a list of options from the source field to use for the value.
- The “Contains” operator will only work with Multi-Select Fields.
- If you select the "Between" operator, you will be able to set two values and create a range. The two values you enter in the fields will be included in this range. So if you choose the values "1" and "9" then any number from 1-9 will be valid.

- Set Condition - If you create more than one rule on a Path Card, you will have the ability to set the condition.
- Conditions allow you to add even more detail to your rules by determining when to continue down a path. You can choose to continue down a path when all of the rules are satisfied (Rule A and Rule B), when any of the rules are satisfied (Rule A or Rule B), or you can set custom logic (such as [Rule A and Rule B]or Rule C).
- If you choose custom logic and reference a rule, you will not be able to delete that rule without first removing it from the custom logic. Deleting a rule can also change the letter icons associated with the remaining rules. The default conditions will update automatically to adjust for this.
- In addition, you will see an error message if you do any of the following:
- If you reference a rule that doesn't exist in your custom conditional logic
- If your custom conditional logic formatting is incorrect
- If an existing rule is not referenced in the custom conditional logic
- Custom conditional logic should use the following format:
([rule letter] [operator] [rule letter])
- Here are some examples:
(A AND B)
(A OR B)
(A AND B) OR (C AND D)
- Conditions allow you to add even more detail to your rules by determining when to continue down a path. You can choose to continue down a path when all of the rules are satisfied (Rule A and Rule B), when any of the rules are satisfied (Rule A or Rule B), or you can set custom logic (such as [Rule A and Rule B]or Rule C).
Description Tab
The Description Tab handles the details of the step, including the Step Name and Step Description.

- Step Name - This field allows you to give the step a custom name, which can help you differentiate between your steps. It has a default value of "Conditional" until manually changed.
- Step Description - You can use this field to add a description to your step.