Introduction
The FormAssembly Workflow solution is a visual, no-code process-building interface that allows our users to combine forms, emails, integrations, and more into sequential data collection roadmaps. Workflow is a powerful tool that can help you meet your data collection needs in the following ways:
- Enable better decision-making through automated conditional routing.
- Enhance teamwork through email notifications, connector executions, and involving multiple respondents in a workflow.
- Simplify and automate business processes that require data to be collected from multiple different parties, in multiple different forms.
- Save time and money by reducing the number of cross-departmental responsibilities & tasks.
Thanks to Workflow, you can get processes rolling quickly without the need for extensive setup.
- Workflow is currently only available on Team plans and above.
- Passing data between forms is limited by the maximum size allowed for URLs and shouldn't be used for large text fields (over 2000 characters, all fields combined).
- You must use the Workflow URL to access a workflow. The IDs associated with the individual forms within the workflow are only associated with the forms, not the entire workflow.
The Workflow List Page
The Workflow List page is where all of your workflows live.
This page can be accessed by navigating to your Forms List and clicking "Workflow List" in the left-side menu.

The Workflow List has two different views: Card View and Table View. Switch between these two views with the toggle button on the right of the screen.
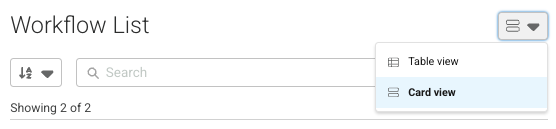
Workflow List - Card View

Use the Card View to see the name, ID, status (active or archived), and last modified date of each workflow in your account. To quickly see how respondents are interacting with your workflows, you can view workflow response counters for each workflow listed. You can also edit, clone, archive/unarchive, and delete your workflows here from the action dropdown.
If you have Legacy Workflows, they will appear in a separate tab. Learn more about Legacy Workflows here.
Active vs. Archived Workflows
A workflow can be set to an Active or an Archived status.
An active workflow can be published, whereas an archived workflow cannot be published, and all publishing options are unavailable to an archived workflow. Changing the status of a workflow is immediate and is reflected across all system interfaces.
To Archive a Workflow
- Locate the workflow to be archived
- Select the action dropdown associated with the workflow
- Select Archive
- Confirm that you want to archive and unpublish the workflow in the Archive Workflow modal
To Activate an Archived Workflow
- Locate the workflow to be activated
- Select the action dropdown associated with the workflow
- Select Unarchive
Workflow List - Table View

The Table View reveals critical workflow health information, allowing you to monitor throughput and operational health of workflow responses for workflows you own or collaborate on.
Use the search bar to filter the table by Workflow ID or Workflow name. Each column is sortable (ascending or descending order) by clicking the column title.
The NAME (workflow name) column is a hyperlink that routes to the workflow builder canvas.
The ellipses action menu hosts the same actions as offered on the List view: View, Clone, Responses, and Delete.
The table offers the following columns:
- STATUS - Displays whether the workflow is active (green check icon) or archived (gray archive icon)
- ID - The workflow ID
- NAME - The workflow name
- COMPLETED - The number of workflow responses that have resulted in a fully “complete” workflow response record
- IN PROGRESS - The number of workflow responses that have resulted in the completion of a form step but not a fully “completed” workflow response record (i.e., the final step of the workflow is not yet complete)
- TOTAL - COMPLETED + IN PROGRESS; the number of workflow responses where a form step was completed, regardless of the overall completion of the workflow
- COMPLETION RATE - COMPLETED / TOTAL; the percentage of workflows that have resulted in the completion of a form step that resulted in a fully “completed” workflow response record
- AVG DURATION - The time difference between the start of workflow step 1 and the end of the final workflow step for fully completed workflow response records
- LAST COMPLETED - The timestamp of the last completed workflow response
- LAST MODIFIED - The timestamp of the last edit date of the workflow
The Workflow Builder
To create a new workflow, you can click the "New Workflow" button in the Workflows menu:

From here, you can choose to create a new Blank Workflow or create a new copy of an existing workflow From a Clone.

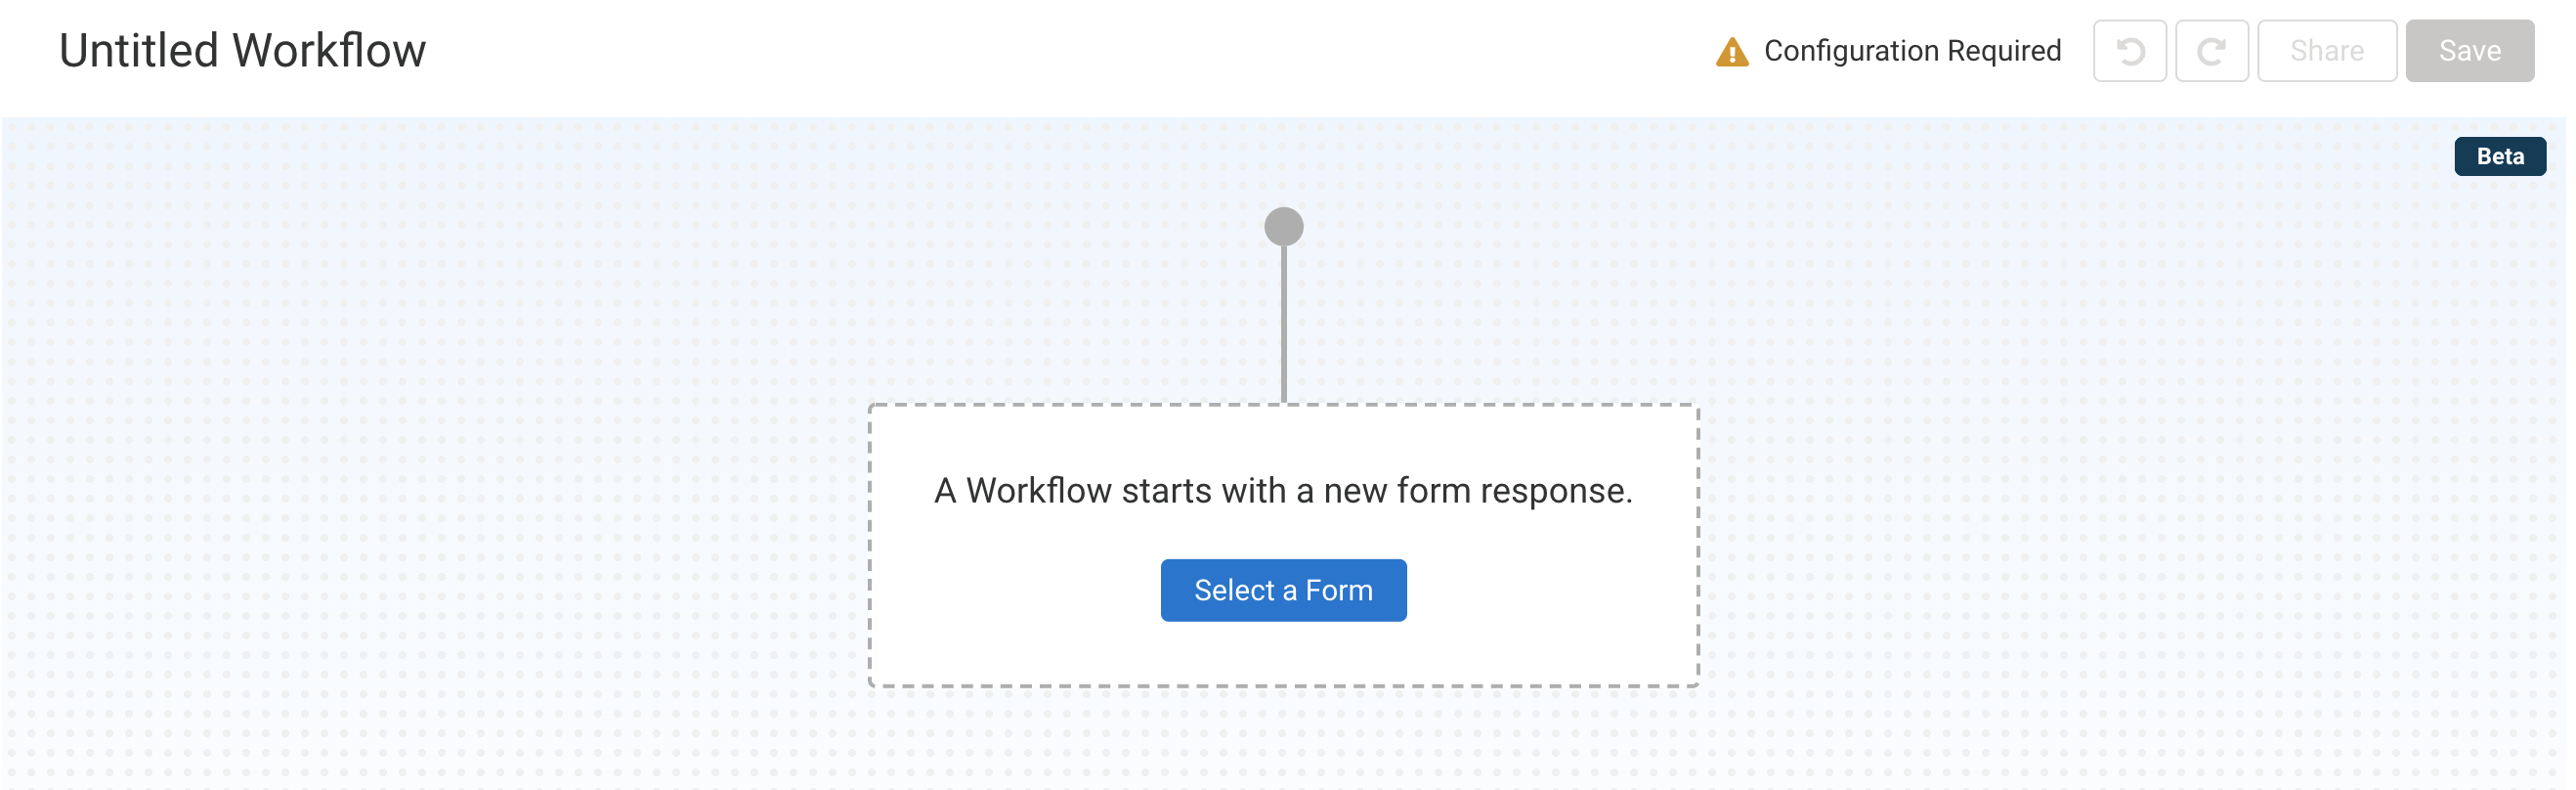
Choosing "Blank Workflow" will open a blank Workflow Builder. The Workflow Builder contains a number of tools that you can use to build out your workflows. Within the empty map, you will see a blue button that says “Select a Form” which you can click to start building your workflow.
Workflow Builder Anatomy

Side Navigation
From the Side Navigation, you can enter the Workflow Builder, view your workflow, clone your workflow, or open your Workflow Responses.
Toolbar
The Toolbar contains the following tools:
- Workflow Title - The default title is "Untitled Workflow". You can change the title by clicking on the title and updating the text.
- Configuration Status Indicator - This indicator has two states, showing whether Steps in the workflow have been fully configured or not. Steps awaiting configuration are denoted with a yellow accent bar and an exclamation triangle icon. The two states are:
- All Steps Configured
- A green checkmark accompanied by the text “All Steps Configured” means that there are no further configurations needed at this time, and your workflow should function as expected. You will also see a green accent bar on the left side of all Steps.

- A green checkmark accompanied by the text “All Steps Configured” means that there are no further configurations needed at this time, and your workflow should function as expected. You will also see a green accent bar on the left side of all Steps.
- Configuration Required
- A yellow triangle with an exclamation point, accompanied by the test “Configuration Required” means that there are components of the workflow that need to be configured. You will also see a yellow accent bar on the left side of the Step that requires configuration.

- A yellow triangle with an exclamation point, accompanied by the test “Configuration Required” means that there are components of the workflow that need to be configured. You will also see a yellow accent bar on the left side of the Step that requires configuration.
- All Steps Configured
- Undo and Redo - Once changes have been made to the workflow's configuration, the Undo button is enabled. You can use this to undo previous actions. The Redo button will be disabled until an undo event occurs, and can be used to reverse the undo event.
- Configure - The Configure (cog) button opens the Workflow Properties panel. In this panel, you can:
- Add and define URL Parameters
- Publish your workflow
- Configure Error Notifications
- Manage Collaboration settings
- View Revision History and revert to a previous version of your workflow
- Share - The Share button is disabled until Steps have been added to the workflow, and the workflow has been saved. Once it is enabled, you can click the Share button to open a pop-up where you can copy the Workflow URL. You will need this URL to test or share your workflows. The Form IDs cannot be used.
- Note: The URL from the Share button does not include URL Parameters. If using URL Parameters, use the Publish tab in Workflow Properties to copy the Workflow URL.
- Save - The Save button is disabled until a change is first made to the workflow. Once it has been enabled, you can use this button to save your building progress.


Map
The Map is the area of the Workflow Builder where workflows are built. It is made up primarily of Steps and Paths. These create the flow diagram that illustrates the timing and order in which the Steps of the workflow will run. You can zoom in and out of the Map and drag to move around as needed.
You will add your first Step using the “Select a Form” button. All other Steps in the workflow will be added using the “Add Step” button. You can also hover over the space between Steps in your workflow, and the “+” icon will appear. You can read more about Workflow Steps below.

Properties Panel
The Properties Panel is where all step configuration is completed. This panel slides out from the right side of the screen, next to the Map. Open the Properties Panel by either adding a new step or clicking the configure (cog) icon on a specific step. Close this panel by clicking the "X" in the top-right corner.
The Properties Panel comes with a number of tabs that you can use to configure your Steps. This is also where you can delete steps in your workflow. Click on the step you wish to delete, then click on the red "Delete" button at the bottom of the Properties Panel. Every step, with the exception of the first step, can be deleted.
You can view the documentation for each step to learn more about the available Properties tabs.

Workflow Step Types
As you build your workflow, you'll want to add steps. Steps contain the action or activity that your respondent will experience at this point in their journey. Below is a list of available steps:
- Start Workflow/Select a Form - The first form in a workflow is considered the Start Workflow Step. You will start your workflow by adding a form. You cannot delete this step. However, if you added a form here by mistake, then you can click the Undo button to take you back to a blank map.
- Form - A Form Step represents a form view and response collection activity from a respondent. You can learn more here.
- Conditional - Allows for automated decision-making to take place in a workflow. You can learn more here.
- Email - An Email Step represents an activity in a workflow in which an email is sent to one or more recipients. You can learn more here.
- Go to Step - Direct the workflow to a previous or future step, or even to a step on another path. You can learn more here.
- Connector - Add a FormAssembly Connector to the workflow. You can learn more here.
- Page Redirect - Redirect respondents to a Thank You page or an external page using a URL. You can learn more here.
Revision History
Every time a workflow is saved after a change is made, a revision is recorded. If a change breaks a workflow or produces an undesired result, a workflow can be rolled back to any prior version without losing any of the revision history in between.
To view Revision History, open Workflow Properties and select the Revisions tab.
Here, you will see a list of workflow revisions with the most recent revision at the top.
Each entry in the revision history table shows:
- Revision number
- Date and time the revision was created
- A "Current" badge identifying the actively loaded revision
- The name of the workflow when the revision was created
To restore a revision:
- Locate the revision you want to revert to
- Click on the ellipses (three dots)
- Select “Revert to this revision”
- Click Revert on the confirmation modal
- Note: If you are reverting to a workflow revision that has incomplete configuration requirements, you will see a note indicating that the revision is not publishable. You can still revert to this revision; however, doing so will not change the workflow version the respondent sees until the workflow is saved in a publishable state. Until then, the respondent will see the last saved, configured version of the workflow.
Reverting creates a brand-new revision containing the restored state. Reverting does not delete or overwrite any existing revisions, so the full history is always preserved as an ever-expanding audit log.
- Revisions are only created after a change has been made and saved. Clicking the save button after no changes were made does not create a new revision.
- Revision History will list only the most recent 100 versions. Versions beyond the last 100 saved changes are no longer accessible.
- Revisions cannot be manually deleted.
Publishing Options

Share the Workflow URL
Use the Workflow URL to share/access the workflow. Individual URLs for your forms will still only bring your respondent to that specific form. The Workflow URL is needed to launch your workflow. This allows you to have one form in multiple workflows without any of them conflicting.
Custom URL
It is possible to set a custom URL for your workflow. This custom URL masks the standard URL's workflow ID without replacing it. Because the URL is being masked and not replaced, both URLs are available to your respondents.
 | 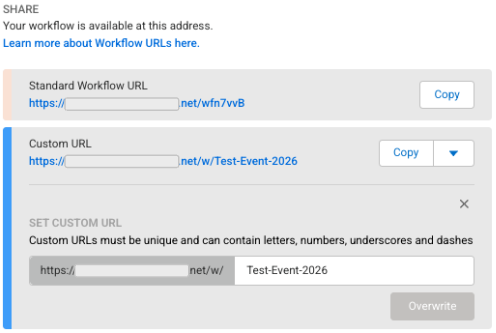 |
Configure a Custom URL
- Click Configure
- Enter a custom slug
- Custom URLs must be unique to your organization and can contain letters, numbers, underscores, and dashes. Spaces are not allowed.
- If the URL has been used on this instance previously or if the format is invalid, an error will appear.
- Otherwise, you will see a success message.
- Custom URLs must be unique to your organization and can contain letters, numbers, underscores, and dashes. Spaces are not allowed.
- Click Save once a valid URL has been entered.
This will apply the slug, and your new URL will be live and ready for use. The custom URL simply offers an additional point of access to the workflow for your respondents. It will not replace the original URL.
Overwrite a Custom URL
- Click the dropdown beside Copy and select Configure
- Enter a new slug
- Click Overwrite once a valid URL has been entered
Additional Notes:
- URLs must have a minimum of one character and a maximum of 255 characters.
- You can delete the custom URL. However, deleting it will break any existing links.
- Custom URLs persist on deleted workflows.
- If a custom URL is associated with an archived workflow, it is removed and becomes available for reuse by another active workflow.
Embed the Workflow
Copy the JavaScript code and embed the snippet on an external website to publish the first form of your workflow. This snippet is to be placed within an existing page. It does not contain the code needed to create a web page.
- Click the Copy button to copy the code and then paste it into the code of your website.
- The JavaScript code references a "data-qp-target-id". To customize where you want your form to appear on your website, you must add a target to your page. If you do not add a target, the form will display at the bottom of your webpage by default.
- In the example below, we chose to define the target ID as "fa-workflow".
<script src="https://preview.formassembly.com/publish/wf/abcdefg" data-qp-target-id="fa-workflow" defer></script>- To place the target on the webpage, we add the following code snippet to the desired location.
<div id="fa-workflow"></div>
- Your workflow will be rendered within the embedded element on your webpage, and your respondents will remain on this webpage to complete all workflow steps.
- Behavior Exceptions:
- Payment connectors - Workflow-native payment connectors (Stripe or PayPal) will route users to the payment provider’s checkout page, then to a FormAssembly-hosted page to complete remaining workflow steps. Users will not return to the embedded page after payment.
- Save and Resume - When using Save and Resume, the resume link will direct users to a FormAssembly-hosted page rather than returning them to the embedded page.
- Behavior Exceptions:
- If using URL parameters, both field-targeting and secure/unsecure workflow parameters can be set on your page’s URL.
- If using prefill, prefill connectors can prefill the first form in the workflow.
URL Parameters
The URL Parameters section is where you can define values for any URL Parameters configured in your workflow. This section is only visible if URL Parameters have been added to your workflow in the Workflow Properties panel.
When a value is added to a URL Parameter, the Workflow URL and JavaScript, provided in the Share and Embed sections of the page, will update. Copy and paste the updated Workflow URL and/or JavaScript code to publish the workflow using the entered value.


If using Secure URL Parameters, this section will include the Secure URL Parameter Settings section, where you may set an expiration date and time for the Secret Key generated for your Secure URL Parameter. Values entered for Secure URL Parameters are signed using the Secret Key.
For more information about using URL Parameters, please reference this document.
Access the Form Builder from Workflow
Once a form is selected in the Configure tab of a Form Step, the Form Step on the map will show an Edit button. Clicking this button will open the form in the Form Builder in a new browser tab, where you can make changes.

To reflect changes made (and saved) in the form, refresh your Workflow Builder's browser tab.