About
With FormAssembly's FreshBooks Classic integration, you can turn your web form into a powerful business tool. A sales form, a work order form, or any other form can be set up to generate invoices and receive payments through FreshBooks Classic.
For instance, a professional electrician can build a work order form using FormAssembly and set it up so that invoices are created through his FreshBooks account.
Upon finishing his work on-site, our electrician would get the sign-off from the customer, complete the form, and submit it. FormAssembly collects the data, FreshBooks invoices the customer, and our electrician can go home and have a cup of tea...
Sensitive Data Notice
Credit Card Numbers and CVV Codes must be marked as Sensitive Data. Please click here to read more about these fields.
Requirements
To use the FreshBooks Connector, you must have an account with FreshBooks Classic.
Required Fields
As you build your web form with FormAssembly, make sure that you collect the following information:
- Client name
- Organization
- Email address
- Mailing address (if you intend to send invoices by mail)
Typically, your form should also list billable items and allow quantities to be defined. We also recommend reading more about how you can use reCAPTCHA to prevent spam submissions on your payment form.
Configuration Steps
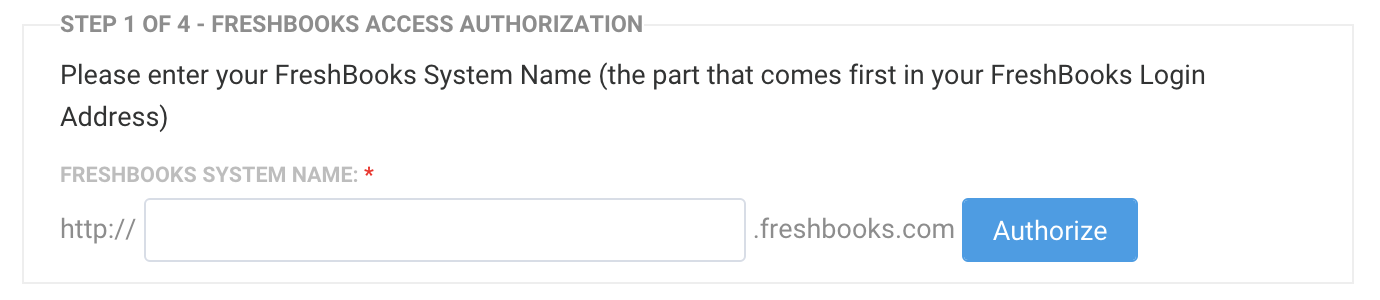
1. FreshBooks Authorization
FormAssembly needs to know your FreshBooks Classic System Name.
After filling in the System Name and clicking the Authorize button, you'll be redirected to FreshBooks and sign in from there.
When successful, you'll return to the connector configuration page and see that the connector has been authorized.
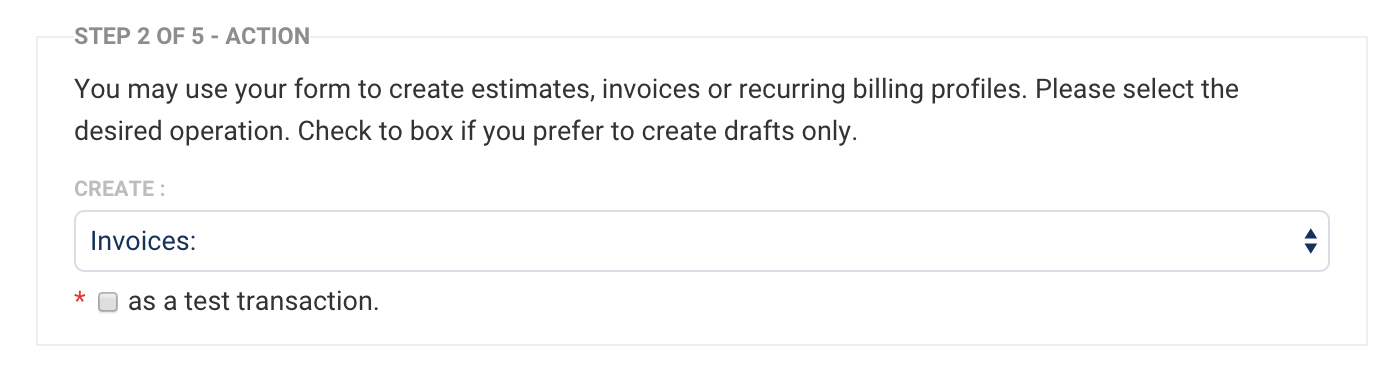
2. Specify the Action to be Performed
Choose which action you'd like FreshBooks to perform. You may want to create an Invoice, an Estimate, or Recurring Billing, which sends invoices on a predetermined schedule.
If you prefer, you may create invoices as "draft" by checking the corresponding box. This ensures that your client will not be billed immediately.
If you choose to set up a recurring billing profile, you will need to specify the billing frequency and how long it should go on. You'll be able to further manage your client profiles in FreshBooks.
You can read more here about how you could use a single form to create multiple actions based on a respondent's choice within a form.
3. Field Mapping
The field mapping describes which fields in your form collect the information needed by FreshBooks to create your invoices or estimates.
FreshBooks requires the information listed in the Client Information, Client Address and Items for Sale sections.
In most cases, all fields will be "defined in the form," in which case a drop-down menu appears and lets you select the corresponding field in your web form.
If some information is needed but not collected in the form, you can choose to provide a predetermined value in the mapping settings, by choosing the "defined here" option in the drop-down menu and entering the value in the text input.
Optionally, if an item is not required, it can be omitted by choosing "not used..."
Once you're done, don't forget to click Apply to save your settings. You're now ready to test your form.

Troubleshooting
Event Log
The FreshBooks connector keeps a log each time it is executed and records error messages when they occur. You can review the log by clicking the Log button next to the connector page.
Successful log messages are in green. Error messages are red. You can review the response in error by clicking the view response link. If you are able to resolve the issue, you can resend the data to FreshBooks with the Resend link to ensure that the invoice is created.
Remarks
Client Quota | This connector creates new "client" accounts when no existing client is found for a given email address. Since FreshBooks pricing model imposes quotas on the number of clients you can manage, be sure to keep an eye on your form submissions. If you reach your client quota, FormAssembly will not be able to create the corresponding invoices. |
|---|---|
Duplicate Clients | Note that since the connector uses the email address to identify clients, it is possible to end up with duplicate clients in FreshBooks if a different email address is entered in the form. |