Please use the following link for FormAssembly Workflow information on Teams plans and above: Workflow Setup
Overview
Forms can be combined to define a workflow.
The workflow determines the order each form must be filled out and allows data to be passed between forms. While data can be passed between forms, it is important to note that files and attachments cannot be passed.
Forms are processed separately, and the processing options defined for each form are applied (e.g., preview, email notifications, connectors), with the exception of the Acknowledgment options (i.e., Thank You message and redirection), which are overwritten by the workflow engine.
One of the benefits of using a workflow is that all information is submitted and run through your respective connectors after each form. This way, if a user fails to complete the entire workflow, some of their information is still submitted. On the other hand, if you're working within a single form that is broken into multiple pages, information is not submitted until the completion of the last page.
- Workflow logic is not yet available. You can only define a predefined, sequential list of forms.
- Passing data between forms is limited by the maximum size allowed for URLs and shouldn't be used for large text fields (over 2000 characters, all fields combined).
- You are not currently able to use a redirect link at the end of a workflow.
Configuration
To create a new workflow, on your Forms page, select New Workflow on the left sidebar.
The workflow configuration screen contains the following settings:
Name | The name of the workflow (not displayed to the respondents) |
|---|---|
Thank You Page | The address of a page where you want the respondent to be redirected once the last form of the workflow has been completed. If this option is not set, the Thank You message in the Notification settings of the last form of the workflow will be used instead. |
Steps | A Workflow Component, or step, is a single form with its optional parameters. |
Parameters | (Optional) This setting is automatically appended to a form's query string and must be formatted accordingly. You may used it to pass data between forms (see below). |
Pass Data Between Forms
In the workflow configuration screen, the parameters option can be used to pass data between forms. A parameter is a field name/value pair, with the following format:
FIELD_NAME=FIELD_VALUE
You can find your field names on the form's alias page.
For example, if you had a field called "price" with an alias of tfa_1 and you wanted to automatically fill it with a value of "$10.00," your parameter would look like this:

You can also reference data submitted in the previous form by replacing FIELD_VALUE with the corresponding field name, surrounded by a double percent sign (%%).
FIELD_NAME=%%FIELD_NAME_PREVIOUS_FORM%%
For example, if you had a field on your second form with an alias of tfa_1 that you wanted to fill with a value from a field on your first form that had an alias of tfa_7, your parameter would look like this:

To separate different field name/value pairs, use the ampersand (&) character.
FIELD_NAME=FIELD_VALUE&OTHER_FIELD_NAME=%%OTHER_FIELD_NAME_PREVIOUS_FORM%%
For example, if you wanted to define a field value and prefill a field with a previous field's value, your parameter would look like this:

Again, you can refer to the form's aliases page to identify field names.
Public Workflow Link
Click Edit on the workflow for the FormAssembly hosted workflow link to send to prospective respondents. You can also publish your workflow, see below for more.

Embedding a Workflow
Using an iFrame
To publish your workflow within an iFrame, use the standard FormAssembly iFrame code and replace the URL in the iframe src="http://tfaforms.com/YOUR_FORM_ID" below with your Workflow Start URL:
<iframe src="http://tfaforms.com/YOUR_FORM_ID" height="800" width="600"
frameborder="0" ></iframe>
<script src="//tfaforms.com/js/iframe_resize_helper.js"></script>
Your Workflow Start URL can be found on the Workflow tab:

Using WordPress
To embed a workflow within WordPress, begin by making sure that you have installed the most recent version of our WordPress plugin.
Next, use the following shortcode to publish your workflow:
[formassembly workflowid=1234]

Using a Server-Side Method
To use a server-side script to publish your workflow you should begin by placing the code that you are using for your server-side script into the page you're making.
Next, you'll want to replace the reset link that is referencing your form.
Replace: https://app.formassembly.com/rest/forms/view/123456
With workflow details: https://app.formassembly.com/rest/workflows/start/98765
Then you should be ready to test! Just make sure that your workflow ID and URL are correct as outlined above.
Passing Prefill Parameters to a Workflow
If you would like to pass an unsecure query parameter to the first form in a workflow, then there is one step you'll need to complete in addition to building your prefilling link.
For this example, let's say you're using the parameter "AID" for an account ID. On the configuration page of the first form in your workflow, you'll need to add AID=%%AID%% for the first step. For example:
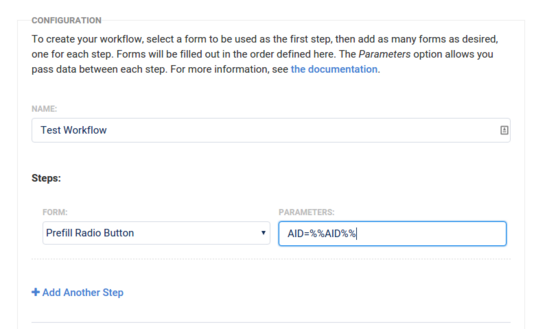
Once you've added that into the configuration and applied the changes, you'll be good to start testing your prefilling link!