Welcome to the Form Builder!
If you're reading this documentation, you're likely a new FormAssembly user or a longtime user who wants to build more efficiently-designed forms. The Form Builder has a multitude of features and options which makes planning your forms all the more important. Careful planning and understanding of our best practices will allow you to quickly design and deploy your forms while avoiding common building missteps.
BUILD Your Forms
While you can always use one of our templates and customize them as needed, there are many instances where you might want to build your form from scratch. Our best practices can be outlined by thinking "BUILD":
Begin with a plan.
Understand your respondents.
Incremental building.
Life cycle testing.
Divide when necessary.
Begin with a plan.
It's always best to start your form-building process by answering a few vital questions about what you'd like to accomplish with this form.
- Who is going to fill out the form?
- What information is the respondent going to provide?
- Why is collecting this information important?
- Where do you plan to publish the form?
- Will this form require prefilling?
- How would you like to store this information?
Use the answers to these questions to plan which fields will be necessary in order to build your form. You can also use them to determine which connectors will need to be used. While choosing your connectors, keep in mind if any additional fields will be required by the connector. Having a clear idea of what you want in your form and how you would like it to work will help prevent issues during the building process. Measure twice, cut once!
Once you've laid out your plan, take a moment to consider your skill level with each of the necessary features. If you're unsure if a needed feature exists, you can look through our help documentation or reach out to our Support team. It can be a great idea to have the necessary help documents at the ready as well before building. Make sure all of your tools are prepared before starting your form-building process.
Understand your respondents.
FormAssembly is an amazing product with very few limits. Do you want to build a 20-page form with dozens of conditional rules? You can do that! However, this may not be what's best for your respondents.
Who is filling out your form? Maybe they're students, coworkers, customers, or businesses. Consider what sort of device they'll be filling out your form with and remember that not all of them will have as powerful a device as you. While your computer may be able to handle loading the 20-page form with dozens of conditional rules and a few calculations thrown in, theirs might not be able to. Consider if they're the type of respondents who may have JavaScript turned off or may be using old browsers. You may need to use Google reCAPTCHA to enforce JavaScript in the browsers of your respondents.
If you think your respondents may need an easier-to-load form, you can use the last section of this acronym, Divide When Necessary, to make sure your form is available to all.
Incremental building.
Depending on the length and style of your form, we have two best methods for form building: Systematic Form Building and Minimum Viable Form ("MVF").
Systematic Form Building is when you work through your form field by field and section by section. If you prefer this style of building, it's important to stop and test as you go. Some good times to test your form are:
- After completing each page of the form.
- After creating one new form calculation.
- After setting up a conditional rules trigger.
- If you've added more than 15 fields to your form.
- After adding a step in your connector.
These are simply some examples of when it's a good idea to stop and test. You can stop as often as you'd like. The more testing you do, the better! Also, we recommend always waiting to make fields required until all testing is complete. It'll save you a lot of time! When testing, save your form and open it in your browser using the View button. Go through the form the way a respondent would. Try every conditional rule you just set up, test the calculation you created in every way you can think of, and run through your connector steps each time you add more.
The goal with this style of testing is to test incrementally and often so that if something goes wrong then you know where it went wrong. That way you know where to look in our help documentation or what to ask our Support team for assistance with.
A Minimum Viable Form (“MVF”) is the simplest possible iteration of a form that you can use for testing before you add any additional fields. An MVF:
- Provides the foundation for meeting the requirements of your use case.
- Has a minimum set of fields (less than 10).
- Defines and activates all required connectors (Salesforce, payment gateways).
- Does not have any field defined as "Required”.
Before you add additional text, images, fields, and sections, you should run your MVF through the next section (Life cycle testing).
Life cycle testing.
After you've finished with your Systematic Form Building or once your MVF has been created, it's important to walk your form through every step of the life cycle. In particular, we recommend that you do this twice if you would like to publish your form on your website. This is because you'll want to test your form once while it's hosted by FormAssembly and then again once publishing code comes into play. That way if an issue arises you will know if the issue is in the form, or with the publishing method.
- Save your form and open it with the View button to test it in your browser.
- Fill out the form multiple times with different data and attachments.
- Verify that each of your connectors function as expected.
- Check your responses regularly to make sure you can see all of the necessary information.
- If you're using Notifications, test with multiple email addresses if possible to ensure delivery and format are correct.
- If possible, go through this process with more than one browser.
- Publish the form and run through this process again.
- If you are working with an MVF, make sure to follow this process one more time after completing your form building.
If you encounter any issues, you can check out our resource center for help or you can contact our Support team for further assistance. Because you were testing during the process, you'll be able to let our Support team know when and where the issue occurred which can help speed up the support process!
Divide when necessary.
This may be the most important best practice that we can provide to you. During your testing, you may notice some slowdowns if your form is full of conditionals, custom code, or calculations. This can happen if you have a large number of fields and pages as well, though it's much less common than you'd see if you're implementing a number of additional features.
When we talked about understanding your respondents, we mentioned that they may be using older devices than you. They may also have a poor internet connection or an out-of-date browser. So if you see any slowdown during testing then it is best to imagine that a respondent may see it in a much more pronounced way. Don't worry, though! You can use a few best practices to make sure that your form is accessible to all.
Additional Best Practices
We also have a couple of suggestions from members of our team to help you build your forms efficiently!
Think in Sections
Based on your organization’s needs, it’s very likely that multiple forms may need similar sections of content. For example:
- Collecting Contact information
- Creating new Account details
- Gathering Membership data
FormAssembly allows you to create a library of Predefined Content that you can then drag and drop into new forms. This can greatly accelerate your form-designing process.
Share your Knowledge
Especially when collaborating on forms with others, it's a good idea to keep notes as you build your forms. This will also be helpful if you bring new members to your team. Our help documentation is a fantastic tool, but at times you may need to have accompanying notes on your specific forms' use cases. With this, you can help reduce their learning curve when using FormAssembly. Our team also recommends using the Version Description feature on the Revisions page for your form. If you make a major revision to your form, you can add your notes on the Revisions page so that your colleagues can see how the form progressed and can even roll back to the correct revision if necessary.
Salesforce Success
These are some pointers to make your work in the Salesforce connectors easier:
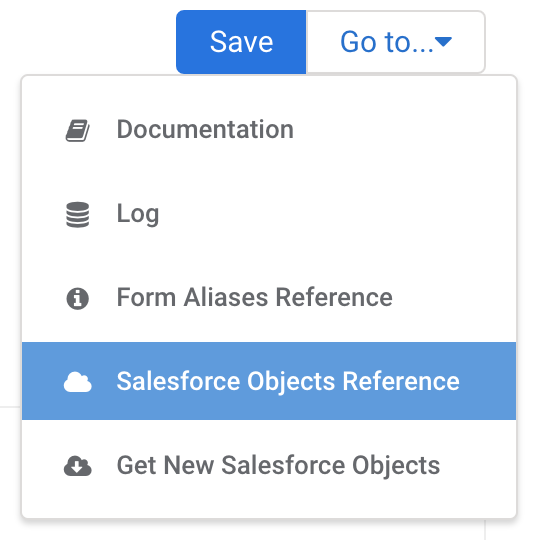
- Check your Salesforce Objects Reference in the connector by using the "Go to..." menu in the upper-right corner of your connector's configuration page. This tells you which fields are required for each object as well as what information each Salesforce field requires of the respondent.
- If possible, do not work against your Salesforce org's production instance during form development. You can use a Salesforce development instance or a Sandbox instead and then adjust the connector settings after testing to connect to the Production instance (make sure to test again!).
- If you do not see a custom object or field in your Salesforce connector then you can click "Get New Salesforce Objects" under the "Go to..." menu to refresh the schema.
- Creating a separate Salesforce user specifically for FormAssembly is a great way to avoid issues arising with user permissions.

Save Often
While our Form Builder does come with a fantastic autosave feature, it's always best practice to save after making major changes to your form. It's also important to save often in our connectors and while working with notification emails as these do not have an autosave feature available at this time. There's nothing worse than losing all of your hard work due to issues with electricity or wifi.