
Overview
A well-designed form is a lot like a conversation. You're asking your users for information and you want them to submit their responses. However, designing a user-friendly form can be a tricky business. Knowing what makes users apprehensive, annoyed, or frustrated will give you the opportunity to make your forms more friendly and help to avoid frustration before it happens. Whether you're building a donation form, a registration form, or even a simple contact form, we want to help you create the best possible design.
Why Are Forms Abandoned?
As with any conversation, a first impression is important. When respondents see your form for the first time you want them to have a positive reaction and not get scared away by an overwhelming or disorganized form. If they don't have a favorable first impression, your users might close the form before they even begin to fill it out.
On top of that, your form should be clear and understandable, and there should be no question as to what you are asking for and why you are asking for it. These simple criteria are some of the most basic reasons forms get abandoned.
Basic Features of User-Friendly Forms
To begin, let's look at some quick and simple ways you can get your form off to a good, user-friendly start.
- The Title: The first thing anyone will see on your form is the title. It should be clear, specific, and let the user know exactly where they are.
- Field Labeling: In general, field labels should be placed above or below your fields, and not to the left or the right. This will make it much easier for your users to determine exactly what they are responding to when they're filling in your fields.

- Spacing: Make sure to give your respondents plenty of space, both vertical and horizontal. Adding space between items will make the form much less overwhelming.
- Styling: You can use our Theme Editor to give your form a simple style. You should also make sure that the form shares a similar style with your website, email campaign, or wherever the user came from before opening the form. This will make the user feel more confident and comfortable when giving information.
- Sections: Breaking your form up into sections will help the users better understand the variety of questions you're asking them.

- Question Phrasing: If a form is meant to be like a conversation, the way you phrase your questions can have a big impact. For example, instead of "Date Available," why not ask, "What day can you begin work?"
- Pages: Like sections, pages can help split up your form and make it less intimidating. Pages can also help users see the complete progression of the form, and give them a better idea of how long it will take to complete.
- Mobile-Friendly Layout: If your form is likely to be viewed on mobile devices as well as computers, you should consider left-aligning the fields, which will make your form much easier to fill out on a smaller screen.
Advanced Features: Part 1
Now that we've covered the basics, it's time to dig a little deeper and explore the more advanced features that will allow you to build more user-friendly forms. In this section, we will discuss the benefits of using conditional questions, repeated fields, and prefilling.
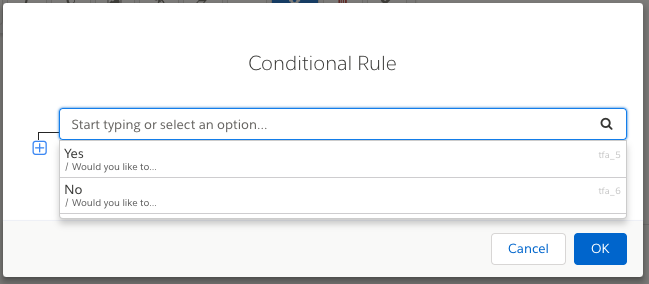
Using Conditional Questions
Within your form, you might have questions that are only relevant to certain users. By using conditional logic, you can hide these fields and only have them appear when they are needed. This helps you keep your form simple, so users won't be bogged down with irrelevant information.
Repeated Fields
You also have the option of setting up repeatable fields or sections. For example, if you're creating an RSVP form with the option to bring a guest, some users may want to enter the information for only one guest, whereas others might want to bring several guests. By using repeatable sections, you can eliminate extra fields and simplify your form. You can also customize the link to add a repeatable section and make it more friendly and specific to your form. Plus, you can limit the number of repeats by setting a maximum number.

Prefilling
Another great tool to help make long forms feel shorter is prefilling. There are several options for prefilling and if you'd like to learn more, we have an extensive collection of tutorials and examples within our Knowledge Base.
- Prefilling Through the URL: If you are sending out a form link to your users, you can actually set up that link to prefill some of the information in your form. This way, when the user opens the form, part of the work will already be done for them.
- Prefilling Through a Connector: If you have an Enterprise account with FormAssembly, you can set up our Salesforce and LDAP prefill connectors. These will allow you to pull information from Salesforce or your LDAP directory and prefill that data directly into your form.
- Prefilling With a Redirect URL: You can utilize two forms with a connecting Redirect URL to prefill information from one form to the next. You can even use this method to gather information in one form, and then send it to a Salesforce Prefill Connector on the second form which displays Salesforce data!
Advanced Features: Part 2
Now that you're familiar with some of our advanced features, let's move on and discuss how you can make forms more user-friendly by carefully selecting your questions, choosing required fields wisely, and using color choices that support the goals of your form.
Question Selection
For the most part, the questions you decide to ask will determine if your users complete or abandon your form. If you ask questions that are too personal, or if you're asking for sensitive data, this might cause respondents to have second thoughts about finishing your form. One way around this is to make those fields optional, so the user can skip them if they don't feel comfortable.
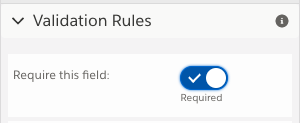
Required Fields
When you're writing questions and deciding what to make required, ask yourself: "Is no response better than a made-up response?" If users are not comfortable providing the information in a required field, they might invent an answer, or worse yet, abandon your form.
Also, if you're using a CRM that requires certain fields, but you don't want to require them on your form, you can use post-processing formulas to ensure that your CRM does not error out. (For example @IF this field is left blank, then fill it with a N/A.)
Color Choices
You should always be careful when adding color choices or background images to a form. Too much color can distract the users from the form or make it difficult to read. You don't want respondents to leave simply because your form had a distracting background image.

When choosing colors, simpler is better. Pick 2 or 3 colors that are not harsh to look at and that compliment each other well.
Advanced Features: Part 3
Next, let's explore some additional advanced features that will help make the layout and design of your form even more user-friendly. In this section, we will discuss the best-practice methods for displaying labels, hints, and multiple-choice fields.
Labels
When creating labels for your fields, make sure you are being clear and concise. You want your users to understand exactly what you mean, but you also don't want to add extra or needless information. For example, if you wanted to know a user's birthday, you may not want to have the label say "DOB" as some people might not understand the abbreviation. Alternatively, you don't need to use complicated wording, such as "Please tell us the day you were born on, including the year." Instead, you can ask a simple question like "When were you born?" and include a helpful hint, if necessary.

Hints
You can use hints to help ensure that your users input information in the correct format, or offer additional information they need to easily and successfully complete the form fields. For instance, there are many different ways to format a date. If you need a particular format, use a hint underneath the field to show them exactly how you would like their response formatted.

Multiple Choice Fields
Choosing the right multiple-choice field is incredibly important in the design of your form. Imagine using radio buttons for a country selection question with over 180 options, or a dropdown menu with only two choices. Selecting the right type of multiple-choice question will increase the user-friendliness of your form. Below, you'll find some good tips to follow.
- Use radio buttons and menus for questions where you only want the respondent to select one item.
- Use checkboxes and lists for questions where you want the respondent to be able to select multiple items.
- For fields that only have a few possible responses, use radio buttons or checkboxes.
- For fields with many possible responses, use menus or lists.
- If you're using a list, users can make multiple selections by holding the CTRL key, so you might want to include that tip in a hint.
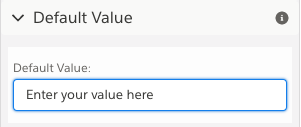
Default Values
Use default values on fields where you think most people will choose one answer over the others. For instance, if most of your respondents are going to be from the same country, you can save them the effort of selecting the country from a long drop-down menu.
You can do this in the field's options menu within the Form Builder.
Speaking of drop-down fields, who says the choices must be organized alphabetically? If most of the people responding are from the US or Canada, put those options at the top. If respondents are going to be from Sweden and Norway, put those countries at the top. This will save your users the time it takes to click and find the right choice.
Quick Picks
When deciding how to list your field choices, try to keep it as simple as possible and don't use any extra or special characters.
For example, with drop-downs for states, it's great to be able to use your keyboard to choose an answer. When form builders decide to place characters in front of the choices, it's not possible to do so. Therefore, it's best to think twice before adding any extra characters that users might not expect.
Key Points
- Order your questions thoughtfully.
- Use conditionals to show only the questions that are relevant.
- Don't limit how respondents can answer.
- Choose your questions carefully. By asking for too much, you might get nothing.
- Be simple and clear about what information you need.
- Anticipate questions and confusion. Be proactive!
- Test, test, and test again!