Overview
The PayPal Connector allows you to easily collect one-time payments with your web form. We recommend using our reCAPTCHA feature in conjunction with the PayPal connector in order to better prevent spam submissions.
Our PayPal connector relies on the "PayPal Payments Standard" solution from PayPal.
In order to set up a basic PayPal connector, you must provide the system with your PayPal account information, define how form responses translate into PayPal purchases and provide messages to keep your users informed about the process. We'll show you how to complete these steps below.
Sensitive Data Notice
Credit Card Numbers and CVV Codes must be marked as Sensitive Data. Please click here to read more about these fields.
Note that there are no definite restrictions on what the form may contain or what you may sell with it, but this service is better suited for simple situations, where:
- You have a limited number of types of items to sell.
- Items have a fixed price and a fixed or variable quantity.
- Shipping & handling fees and taxes are applied to the total price.
Here are a few examples:
- Selling intangible goods such as music (MP3s), software, ebooks, etc.
- Charging a membership or an admission fee.
- Charging a flat fee for consulting services.
- Accepting donations.
- Selling physical goods, to the extent that inventory is not an issue.
- The PayPal Connector does not recognize repeating fields. Each field must be manually created in the form.
- Additionally, the PayPal Connector cannot be used to process recurring payments.
- You can only use a single PayPal connector in your Connector Timeline. Using more than one PayPal connector will cause errors.
Purchasing Process
Using the PayPal Connector creates a slightly different submission process compared to other forms. The submission process for a form with PayPal is as follows:
- The respondent fills out the form.
- The respondent is instructed that the payment will be finalized on the PayPal website.
- The respondent chooses the method of payment: PayPal or Credit Card
- The respondent reviews the content of the shopping cart and finalizes the transaction.
- The respondent is redirected to a page of your choosing.
Connector Setup
PayPal Account Information
First, add the PayPal Connector to the Form Submitted section of your Connector Timeline.
Inside the PayPal Connector, click Enable to enable the PayPal connector, then fill out the information in Step 1 of 4 - PayPal Account Information using your PayPal account information.
(Note that if you don't know which kind of PayPal account you have, you most likely have a personal account.)
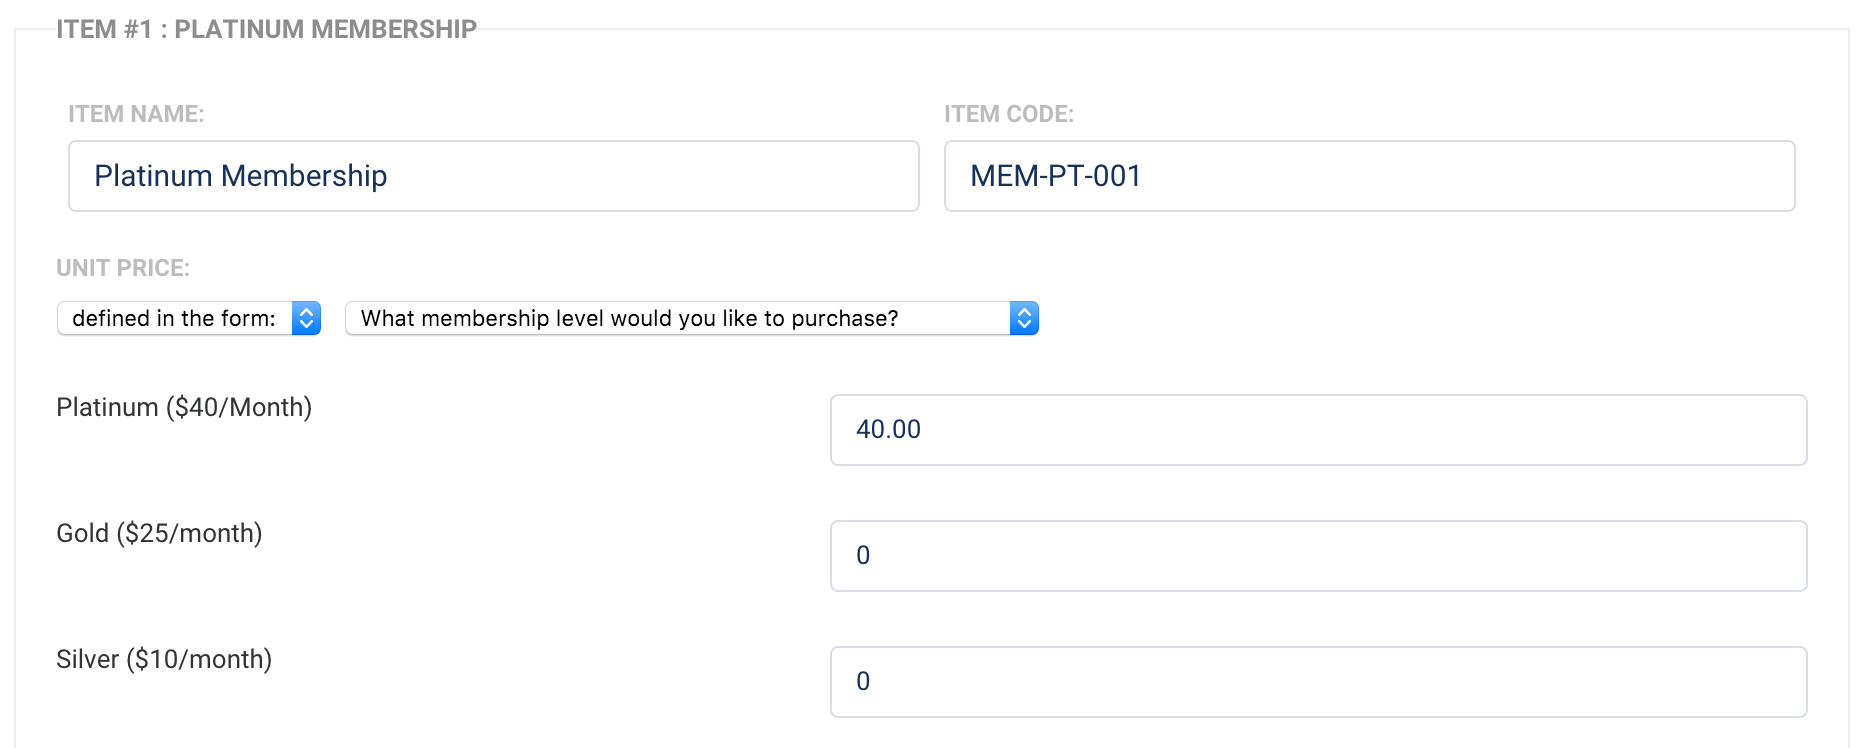
Item(s) for Sale
In Step 2 of 4 - Item(s) for Sale, click add your first item for sale. Then, map the fields accordingly:
- Item Name - The name of the item you're selling.
- Product Code - A unique reference number you can optionally provide for your own records.
- Unit Price - You can define the price of this item in the form or within the connector.
- Quantity Ordered - You can define how many of each item will be sold in the form or within the connector.
Configure Shipping Addresses and Order Encryption (Optional)
Shipping Address
In most cases when shipping is required, you should allow PayPal to collect the shipping information from your users using the option I need PayPal to collect it for me, as the PayPal system has very stringent checks on the validity of shipping addresses.
However, if you would prefer to collect the shipping information on your form, you can do so using the option My form is designed to collect it. Exporting the shipping address works like the item quantity setting. For each address field, select in the drop-down list the corresponding question in your web form.
Optional Settings
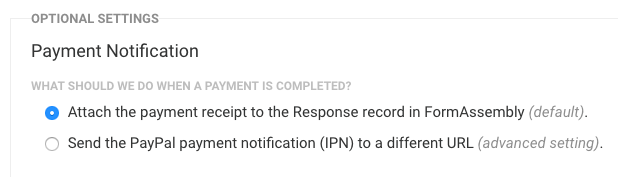
Under Payment Notification, we have a setting for "What should we do when the payment is completed". The default is "Attach the payment receipt to the Response record in FormAssembly". This allows the PayPal response information to be shown in the Responses within FormAssembly.
If you manually reprocess individual responses later, after the PayPal data is received (which can be minutes to days, depending upon the payment type), you can send the data to Salesforce.
To use this setting, you do have to enable IPN within your PayPal account. Go to My Account → Profile → Instant Payment Notification Preferences.
Click Edit Settings and check Receive IPN messages (Enabled). The notification URL is required, but the value doesn't matter here, so any URL will do (e.g., http://www.google.com).
If you would prefer to send the PayPal payment notification to a different URL, you would need to follow the PayPal instructions found here: https://developer.paypal.com/docs/classic/products/instant-payment-notification/
Order Encryption
By default, the data transmitted to PayPal is not encrypted. This could allow a malicious customer to modify an item's price or description before paying for it. This should not be a problem as long as you are checking every order before delivering the goods.
If you have a PayPal Premier or Business account, we can use a secure certificate to encrypt the data. This prevents the risk mentioned above and opens the possibility of automating the delivery process since no manual review of the order is necessary.
To create your secure certificate, follow the instructions in Step 4 of your connector.
Mapping Multiple Choice Fields as Separate Items
You can map the Unit Price field to a multiple-choice field in order to allow the respondent to purchase a different item based on their selection.
You'll be creating a separate Item for each choice.
In the Unit Price row, select Defined in the form: and select the field containing the various products.
A table will appear, containing the field options on the left, and empty boxes to set the prices on the right.
Next to the choice that you want to trigger this item, set the Unit Price.
Enter a '0' next to all of the other options. This will ensure that they will not be recognized as a purchase in this item, and you will be able to set them up as separate items with their own specific name and item code.