Introduction
The Form Step allows you to collect a form response. With this step, you can collect data at various stages in your workflow to be used later in other steps. Before configuring this step, your forms should already be built and saved using the Form Builder.
To add a Form Step to your workflow, click Add Step or the '+' icon and select Form from the dropdown.

Properties Panel Configuration
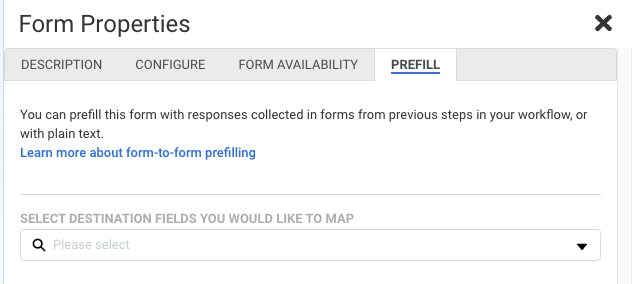
Adding any new step (including collecting a form response) will automatically open the Properties Panel where you can configure the step. The Properties Panel for a Form Step contains the following tabs: Description, Configure, Form Availability, and Prefill. You will not see a Prefill option on the first form in your workflow.
You can also delete any step within the Properties Panel by clicking the red "Delete Step" button at the bottom. This is not possible on the first form in a workflow. If you need to change the first form in your workflow, you can do that from the Configure tab in the Properties Panel.
Description Tab
The Description tab handles the details of a step, such as the Step Type, Step Name, and Step Description.
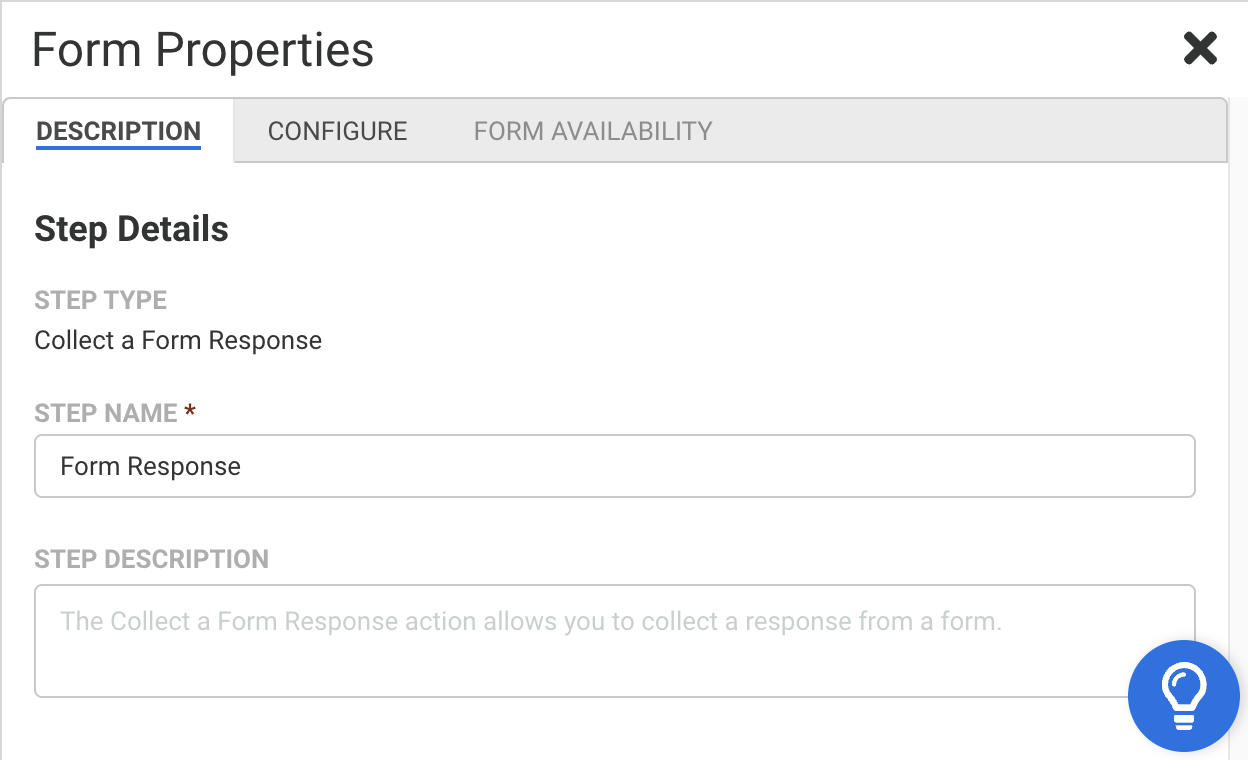
Step Type
This indicates the task that this step will complete.
Step Name
This field allows you to give the step a custom name, without affecting the form details. It has a default value of "Form Response" until manually changed, or until a form is selected. Once you have selected a form, the name of the form will appear in this field automatically (unless you have manually set a new name).
Step Description
You can use this field to add a description to your step in addition to the custom Step Name. You can use both of these fields to denote what the goal of this step is, which can be very helpful when using the same form in multiple steps or workflows.
Configure Tab
The Configure tab allows you to select the form collecting responses during this step. A list of available forms to select from will appear in the Form dropdown menu. Once a form has been selected, an Additional Options section will appear and the Form Availability tab will populate to the right of the Configure tab.
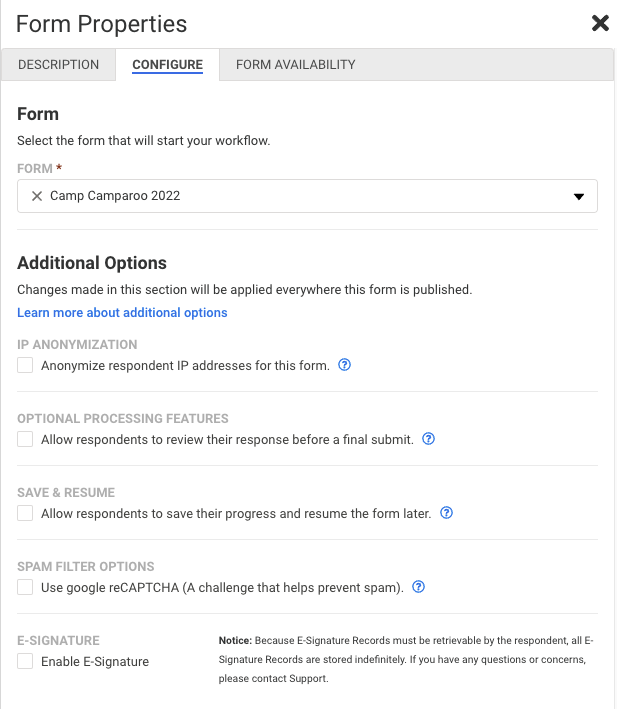
Additional Options
Processing settings in the Additional Options section include:
- IP Anonymization
- Review Before Submit
- Save & Resume
- Spam Filter Options
- E-Signature
You can access further documentation on the functionality of each of these settings by clicking the blue question mark icon next to the description text in the Configure tab.
Access the Form Builder from Workflow
Once a form is selected in the Configure tab, the Form Step will have an Edit button available. Clicking this button will open the form in the Form Builder in a new browser tab, where you can make changes.

To reflect changes made (and saved) in the form, refresh your Workflow's browser tab.
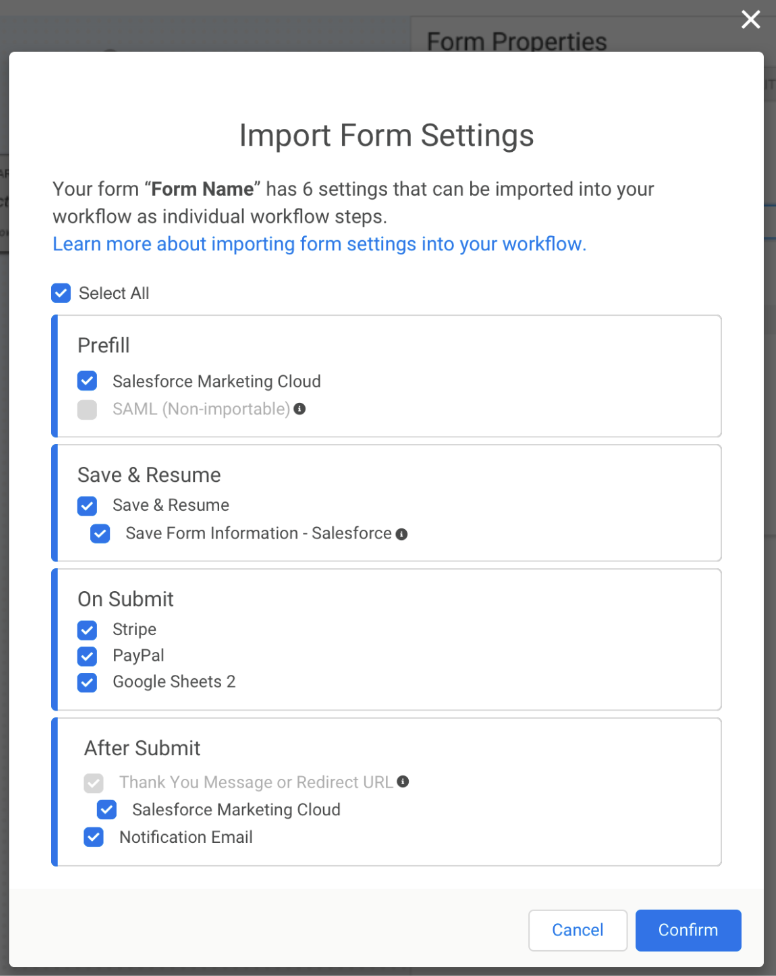
Import Form Settings to Workflow
Save time and effort by not having to rebuild settings when using a form in a workflow. When selecting a form, for the first time, you may choose to import existing Form Connectors and Processing Settings previously configured on the form into your workflow.
When selecting a form, a modal will pop up to offer the user basic import options.
Form Availability Tab
In this tab, you can view and set the Form Availability Settings for both the form and the workflow. You can restrict submissions by date, as well as the number of responses. It is very important to note that changing these Availability Settings will affect the form at the form level and across all workflows that include the form.
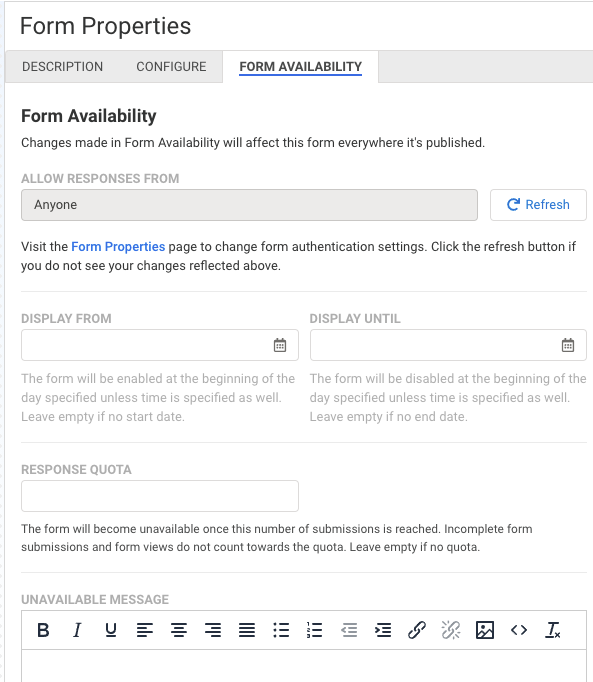
Allow Responses From
This is a read-only field that displays the Authentication Settings for your form. You can click on the Form Properties link under this field to open the necessary Form Page and edit these settings. This setting will affect the form everywhere it is published, including all workflows it is associated with. Additionally, you can use the Refresh Button to sync these settings.
Display From/Until
With these fields, you can set a specific date and time range during which the form will be available. You can leave these fields blank to avoid restricting the form to a date and time range. If no time is added to the fields but a date is, then the time will default to 12:00 AM on the specified date. If the form is accessed outside of these dates, the respondent will see a default "Form Unavailable" message which can also be customized within this tab. This setting will affect the form everywhere it is published, including all workflows that include the form.
Response Quota
This field allows you to limit the number of responses that a form can collect. Once the response quota is met, respondents will see a default "Form Unavailable" message which can also be customized within this tab. This setting will affect the form everywhere it is published, including all workflows that include the form.
Unavailable Message
Finally, you can use this field to customize the message that respondents will see when the form is no longer available. This includes restrictions by date, quota, or if the form has been archived. This setting will affect the form everywhere it is published, including all workflows that include the form.
Prefill Tab
The Prefill tab allows you to prefill Form Fields with values from previous Form Responses, formulas, and text. You can prefill hidden fields, multiple-choice fields, and more!
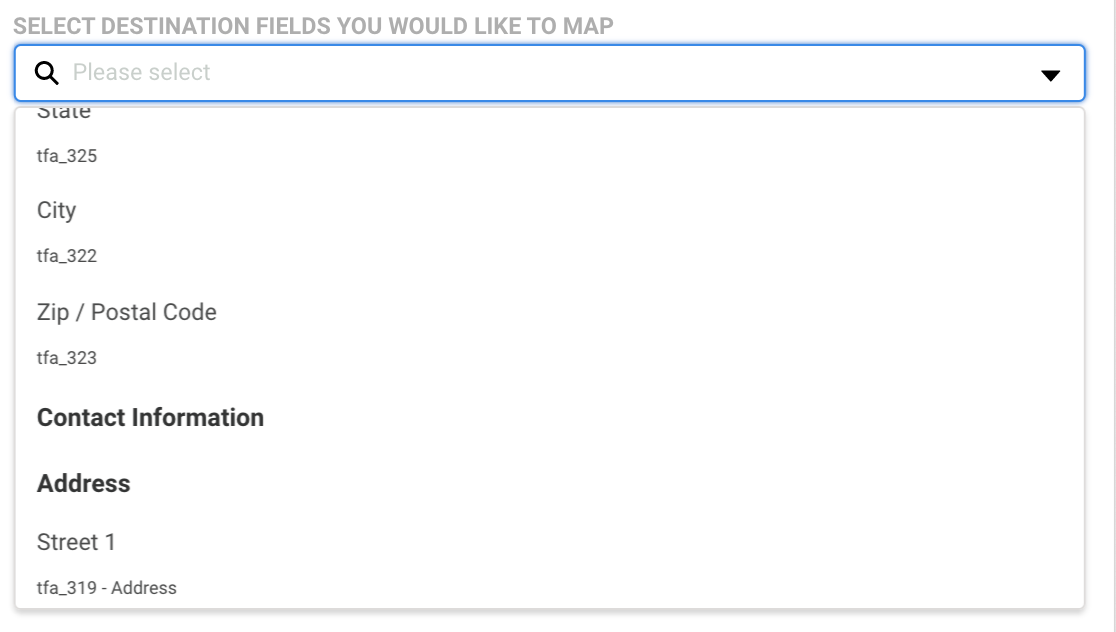
First, select your destination fields. This dropdown menu displays a list of all fields within the destination form (the form you're currently configuring). Any fields outside of a section will be displayed first on the list, followed by non-selectable subheaders that denote form sections. Each of the listed options displays primary text and secondary text.
- Primary text: [field name]
- Secondary text: [field alias] - [section title]
You can also use the type-ahead input to narrow down the list of options by either field name or alias.
Once you have selected a destination field, the dropdown menu will close and the selected field will populate as a new field mapping row. (If you add multiple destination fields, the field mapping rows will appear in the order listed in the dropdown menu, regardless of the order in which they were added.) This means that if you add a destination field and you don’t see it appear in your prefill list, you may need to scroll up or down the prefill tab to locate and configure it.
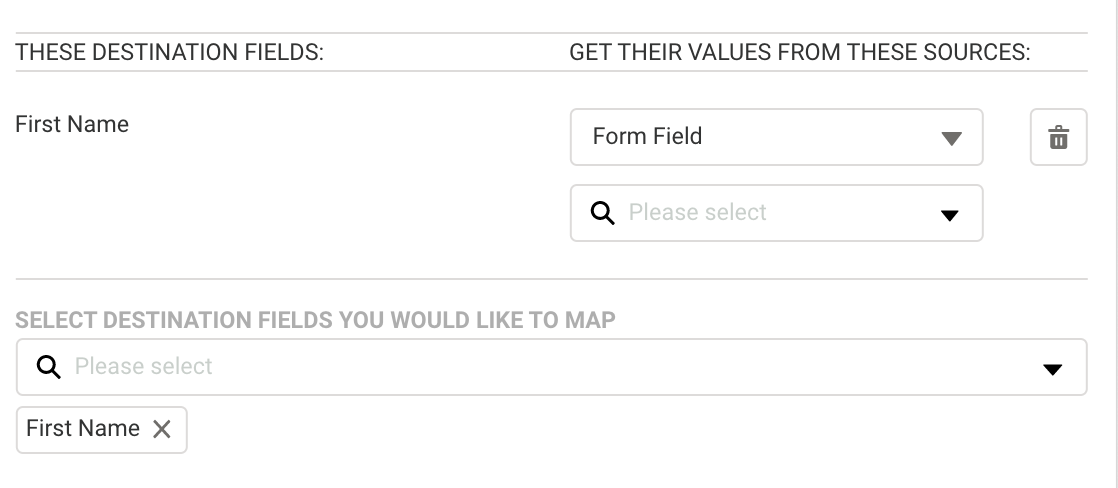
Each row in the field mapping table will consist of two columns. The left column displays the destination field names, while the right column allows you to define the source type and selection.
- Form Field - A dropdown with a list of all form fields from all forms above the current form in the workflow.
- Formula - A text field where you can type in a formula. You also have the ability to build a formula using the formula editor by clicking on the blue “f". Please note that you will only see the Formula option if you are prefilling a text field. This is currently not an option for multiple-choice fields.
Form Field
Selecting Form Field for your source type will cause a type-ahead dropdown field to appear. This dropdown provides a list of all available fields you can source prefill information from. You can only prefill from forms that precede the form you are prefilling in the workflow. This means that you cannot prefill information from a later step. You can select any of these fields to pass the value from the source field into the destination field on the current form.
- Form fields marked as Protected Health Information (PHI) cannot be prefilled with the Prefill tab.
- Validation is not in place to ensure the expected input of the destination field matches the expected input of the selected source field. We strongly recommend testing your prefill setup before going live with your workflow.
Formula
The Formula Editor in the Prefill Tab has some additional aliases when compared to the Form-specific Editor. Namely, you can now select fields and aliases from all previous forms when building your formulas. Selecting these previous forms' fields and aliases in the Formula Editor will create a "super-alias", an alias that works across multiple forms and steps. Super-aliases have the following format:
%%[workflow step #]![field alias]%%
If you are not yet familiar with the Formula Editor, then you can learn more about using the Formula Editor to create formulas here first.
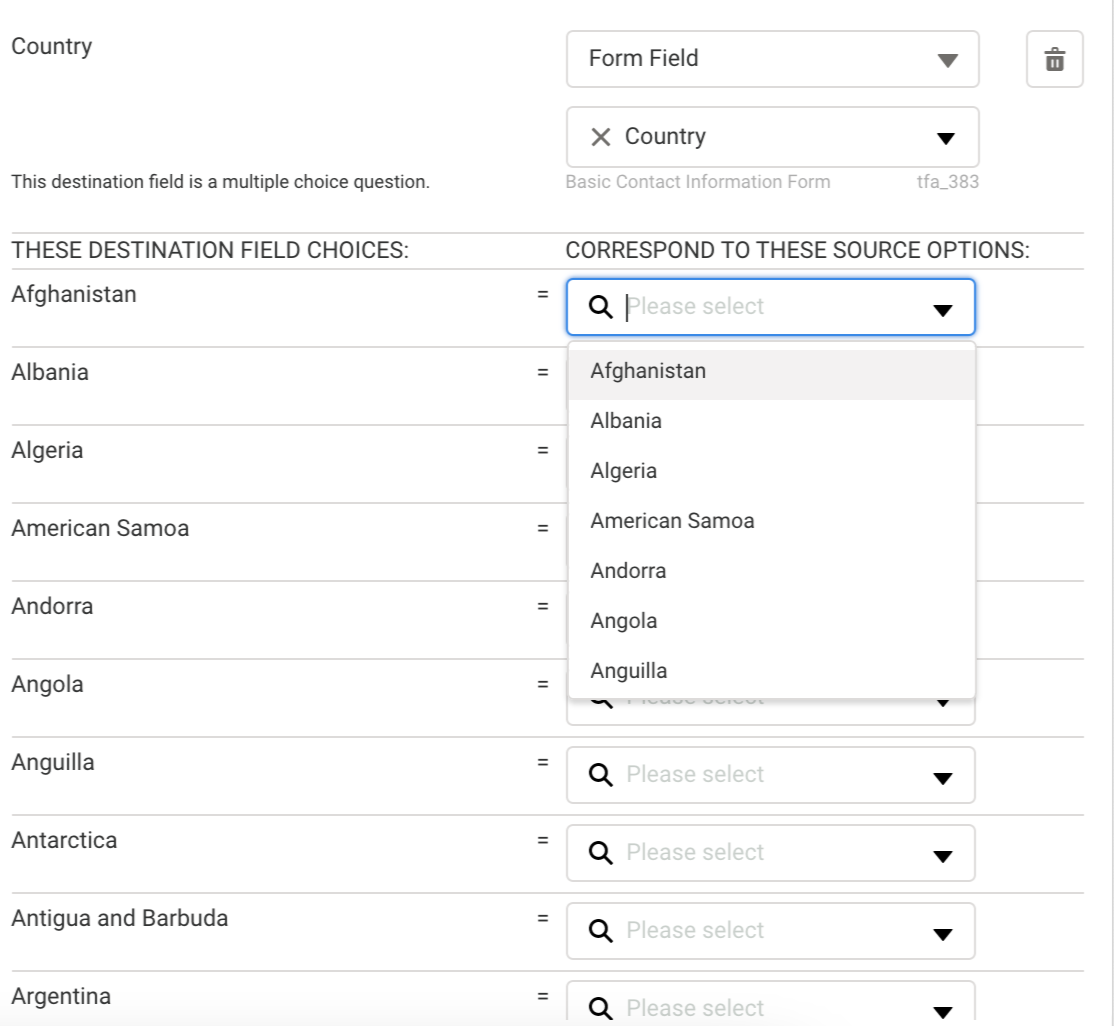
Multiple-choice Destination Field
When prefilling multiple-choice destination fields, it is not possible to use a formula. Instead, you will select a previous form field to prefill with. A choice mapping table will appear after you have selected the source field. You can then set which choices in the destination field you'd like to be prefilled based on the value from the source field:
Repeatable Field Prefilling
When mapping to a repeatable destination field, or a destination field within a repeatable section, you will be presented with a repeatable content section in the field mapping table. Any repeatable field or section is represented in the dropdowns with an "R" in front of it. When mapping repeatable fields there are four possible outcomes:
| Destination | Source | Mapping Result |
| Non-repeatable | Non-repeatable | 1:1 |
| Repeatable | Non-repeatable | 1:1 |
| Non-repeatable | Repeatable | Merge repeated source responses into a single destination field |
| Repeatable | Repeatable | The destination field is repeated as many times as the repeated source field repeats |
As mentioned previously, mapping to a repeatable destination field will open a repeatable content section in the field mapping table. This section contains the Source Repeated Content field, along with the usual source type/selection fields.
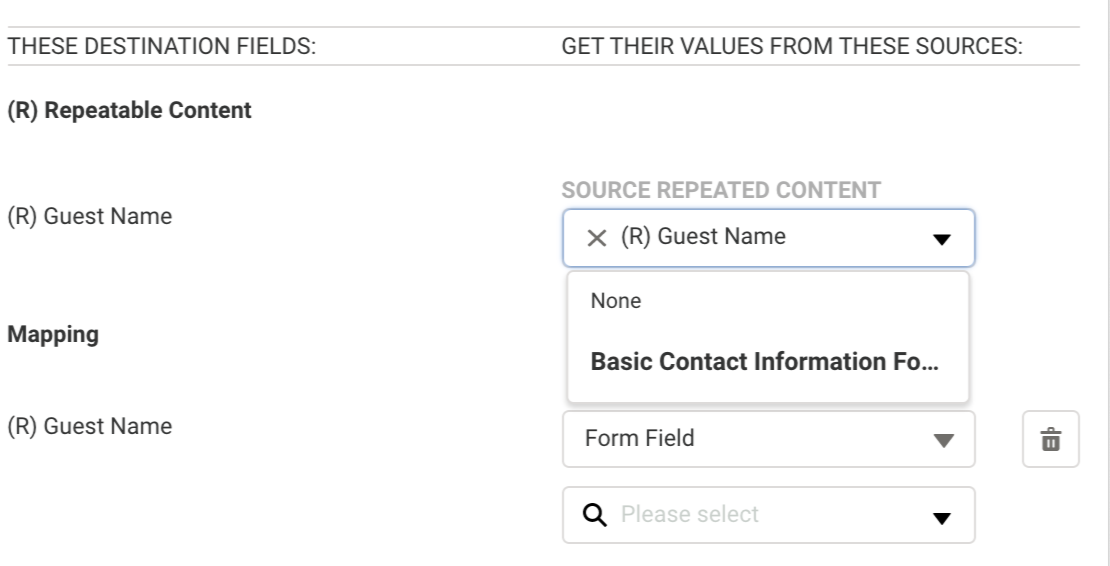
The Source Repeated Content dropdown menu determines the number of times that the repeatable destination field is prefilled. If the Source Repeated Content field is set to "None" when the source field is also repeatable, then all of the repeated fields will be merged into one and prefilled into the destination field.
The source field (the field selected if you choose the source type "Form Field") or the formula will still determine the value prefilled into the destination field. The Source Repeated Content field will just determine how many times the destination field is repeated right as the form opens.
For example, if you set the Source Repeated Content to pull from your previous form's repeatable "How many guests are you bringing?" section, and mapped it to your second form's repeatable "Do you have any food allergies?" field, followed by a formula mapping which filled this field with the default value of "I do not have any food allergies" then your outcome could be something like this:
Respondent A fills in the first form and notes that they'll be bringing five guests. They repeat the "How many guests are you bringing?" section five times. When they move to the second form in the Workflow, they'll see five "Do you have any food allergies?" fields, each of which has some default text stating "I do not have any food allergies".