My Responses
You can use the My Responses page to easily view, sort, and download the response data that has been submitted to your form.
Across the top of the My Responses page, you will also see basic analytics for your form including the number of responses, average completion time, and the completion rate.

You can use the dropdown menu next to the form title to quickly view responses from your other forms as well.

Download Response Data
At the top right of the My Responses page, you have the option to download your response data in a few different formats.

If you select "Attachments" you will only download the attachments that users have uploaded through the file upload fields.
- When downloading responses or attachments from the response report, you will need to use a filter to limit what is being downloaded. If a filter is not used, the download will include all responses and attachments.
- PDF downloads are only available to Essentials plans and higher.
- When downloading the PDF of responses from the response report, you will need to select the responses from the response list that you would like to download. If no responses are selected then the downloaded PDF will be empty.
Edit Table Columns
When viewing your response report you can choose to view all response fields or select only specific fields to view. To begin, click the "Edit Table Columns" button on the left-hand side of the page:

From there, you'll be able to select which fields (columns) you would like to view and reorder the fields by using the 3 bars on the right (drag and drop to where you want them displayed in the response report). The settings you select here will also be applied to any reports that you download.

Selection Options
Above your response data, you can use the checkbox dropdown menu to select specific responses:

From this menu, you have the option of selecting your read, unread, starred, unstarred, complete, incomplete, or invalid responses. Once those responses have been selected you can then choose to print, delete, or mark them all as read by using the Select Action dropdown.

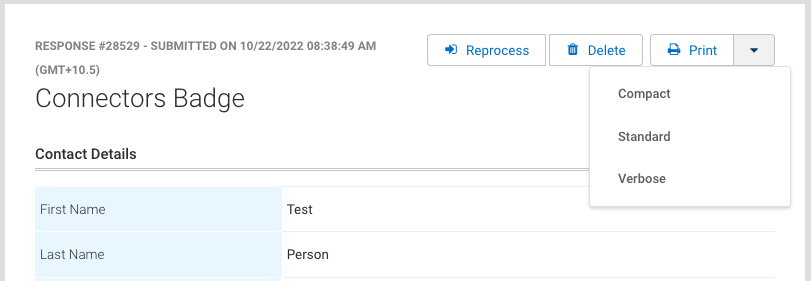
If you choose to print your selected responses, you'll be taken to a new tab where you will have multiple print options to select from. Each of these selections offers a different layout.

Verbose | This view will include all images, paragraph text, and formatting as seen in the form. |
|---|---|
Standard | The Default view will exclude any additional text and only show the form fields. |
Compact | The Compact view will exclude any additional text and only show the form fields. Form labels and values will be inline to reduce the length of the response. |
Viewing Response Data
While viewing your response data, there are a few additional features to keep in mind.
- If you hold your mouse cursor over your columns, you can easily adjust the display width of any of your report columns:

- To the left of every response you can see if a response has been completed, select a response for printing or deletion, or star a response to mark it as important or needing attention.
- The green check mark indicates a completed response.

- The yellow clock icon indicates an incomplete response and applies to saved responses or responses being reviewed by the respondent.

- When you click on an incomplete response, it'll say if the response has been saved or is being reviewed (review before final submit is enabled).


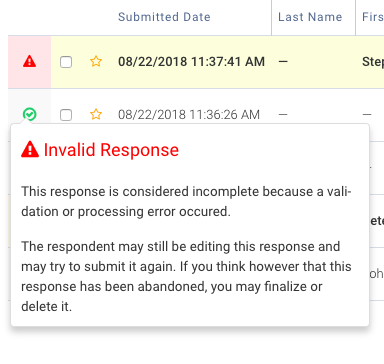
- The red icon indicates an invalid response. This applies to responses with validation or processing errors (including connector errors)

Response Options
You can click on any specific response to view additional data and options. Once you've clicked on a response, on the left panel, you'll have the ability to view (selected by default), print, edit, and reopen the response.

Print Response
The print-friendly option displays a clear view of the response without the left menu.
You will also have the option of selecting the different viewing options mentioned above (Standard, Verbose, or Compact).
Edit Response
This option will take you to the form which will be filled in with the current response data. You may alter the data and resubmit. Doing so will update the data in the response. See below if you need to reprocess the edited response through the enabled connectors and resend email notifications.
Reopen Response
Reopening a Response allows you, as the form owner, to send a new password to a respondent who has not completed a response, even if the Save & Resume option is not enabled for a particular form.

This can be useful when the form has changed and you would like previous respondents to update their responses, too.
The "Reopen a Response" feature appears in completed and incomplete responses.
For this to be effective, you must either collect the respondent's email address on the form or have another way of acquiring it. You can modify the text of this message to suit your individual needs, but take care not to change the password.
Reprocess a Response
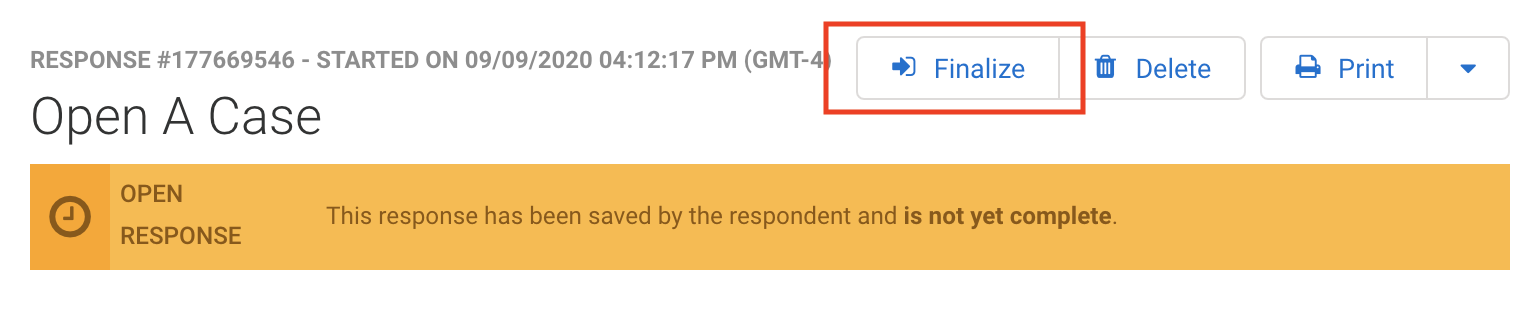
At the top of each response, you'll have the option to Reprocess a form submission. This can be helpful if you have made any edits to a response, or if the response was submitted while a connector was disabled. If a connector error occurred which resulted in an invalid form submission, you will see a Finalize button. You will also see a Finalize button for incomplete responses that have been saved.
Only one of the two buttons will appear in the response. Clicking either one will initiate a reprocess.
Reprocessing a response will resend the email notification and the form will be reprocessed through any connectors that are enabled. Auto-response emails will not be resent.

Reindex Responses
If you encounter issues with the search not finding results for your query and some expected results are not showing, you will need to reindex the responses for the Search feature of the filter options to work.
- For Basic plans, please use this link template to reindex your form's responses: https://app.formassembly.com/elasticsearch/index_form_responses/FORM_ID
- For Essentials plans and higher, please use this link template to reindex your form's responses: https://INSTANCE_NAME/elasticsearch/index_form_responses/FORM_ID
Please make sure to replace INSTANCE_NAME with the URL of your FormAssembly instance, and replace FORM_ID with the ID of the form you would like to index the responses for.
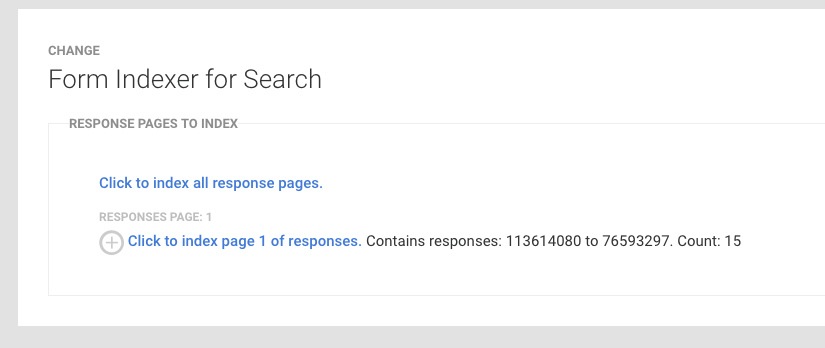
If you have a significant amount of responses you can select Click to index all response pages. to index all at once. Otherwise, you can click the circle+plus icon to do each batch manually.
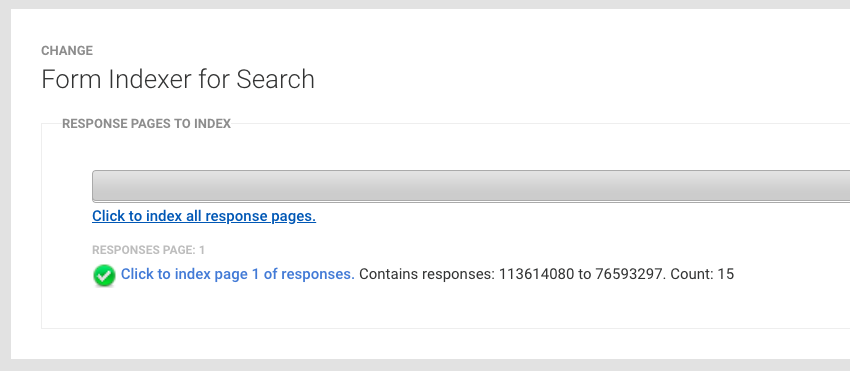
The grey progress bar indicates the progression of the batch job and the green check shows successful indexing.
If you are an Essentials user, you will need to make sure the "Allow user to (re)index form responses for search manually" permission is checked under User Roles in the Admin Dashboard for any user wishing to use this feature.
Form Notes
Below each form's response data, you also have the option to add notes to your form. These notes will be saved on this page for future viewing.

Response Metadata
Below the form notes, you will see the response metadata, which are additional details of the response.
Submitted on: | The date and time of the response submission. |
|---|---|
From: | The IP address of the respondent. |
Referrer: | The URL or address where the form was completed. |
Completion time: | The total time the respondent has opened the form. Additional details on how the completion time is calculated are available here. |
Form revision: | Each time you save your form, that version is recorded. The version number is available here for each submission. |
Response ID: | The unique number assigned to each response. |
Log Entries
Finally, at the bottom of each response, you will see the Log Entries. In the log, you will find detailed data for any connector or e-signature processing that occurred when the form was submitted. For more information on the log, please visit the specific page for any connectors you are working with.
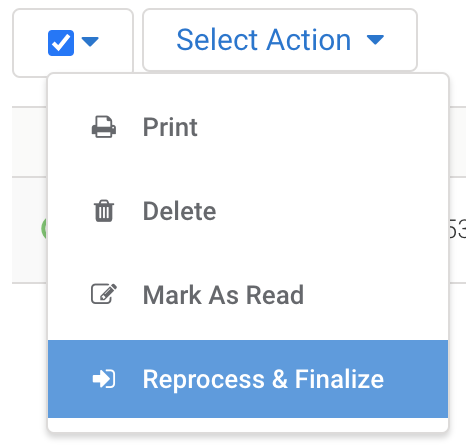
Reprocessing Responses in Bulk
It is now possible to reprocess responses in bulk if you are on an Essentials plan or above. To reprocess a number of responses, you can follow the steps below.
- Navigate to the Responses page of the form in need of reprocessing.
- Select all responses which need to be reprocessed.
- Hover over the "Select Action" dropdown menu.
- Select the option, "Reprocess & Finalize"
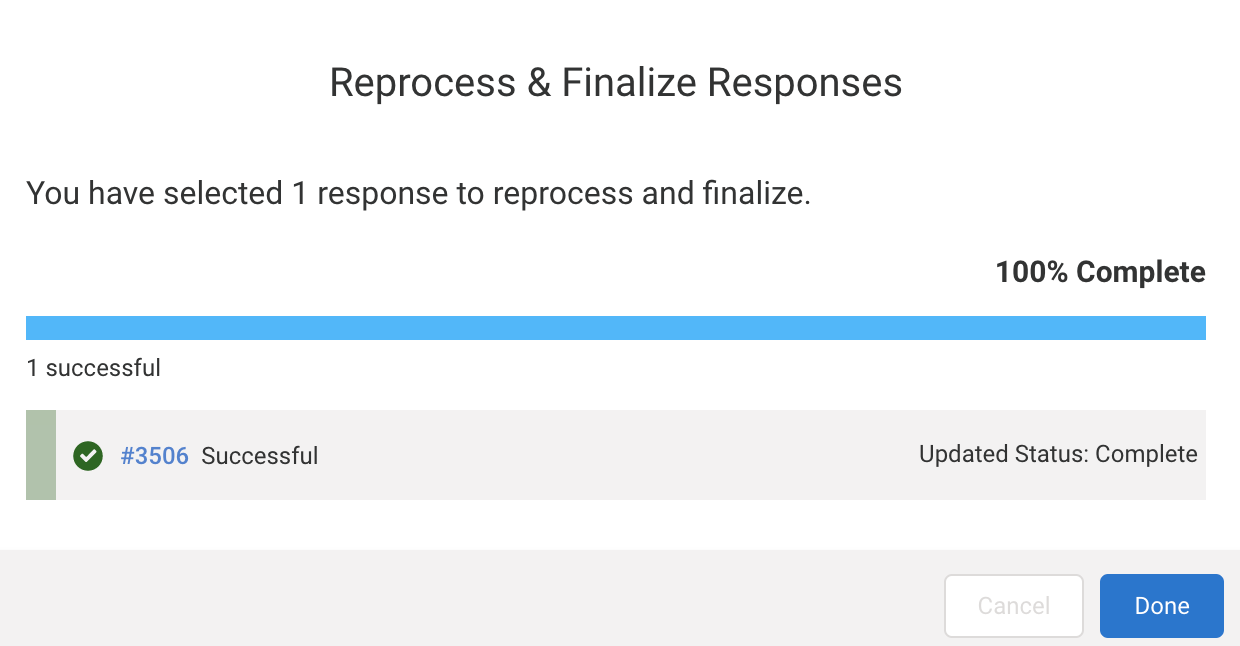
- A "Reprocess and Finalize Responses" pop-up will appear. Click "Confirm".
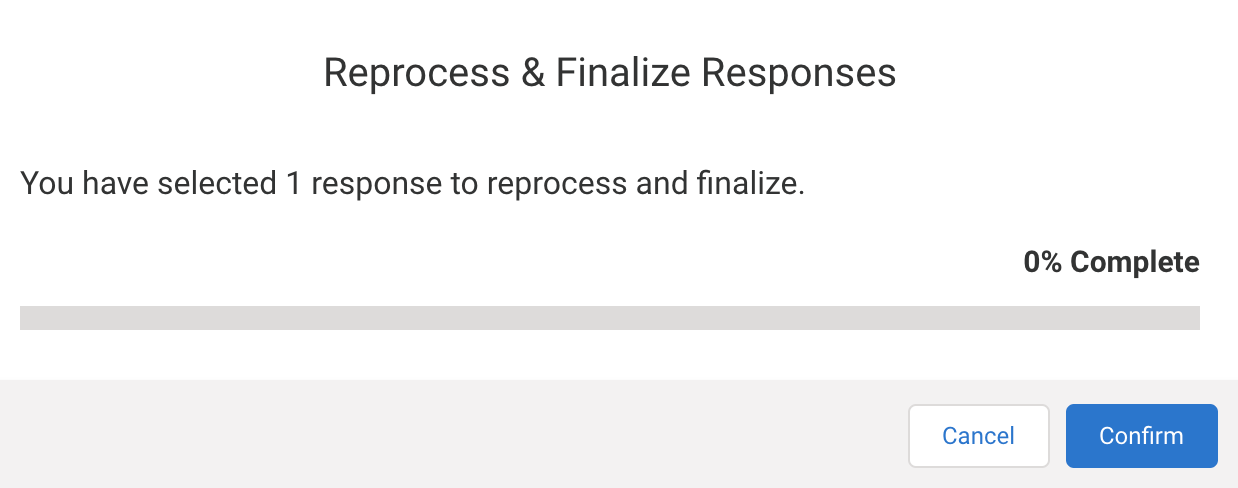
- Once the loading bar reaches 100%, you can click "Done".


Errors With nbsp In Aggregate View
If you are seeing " " in your aggregate view, there are a few steps to take in order to resolve this issue.
This issue is caused by spaces (or no-break spaces) that are present in the questions or field labels in your form.
Your first step should be to enter the Form Builder, highlight the text where you are seeing the issues in the aggregate view, and click the clear formatting button. Then save your form.
You may also need to submit a test response once you have made this change, in order for the aggregate view to switch over to using the new field labels.