Overview
When publishing or sending out your forms, you may wish to have some information automatically populate into the fields in your form. This is called “Prefilling.” You can accomplish this by using a "prefilled link" or "prefilling through the URL". Here are some examples of what prefilling through the URL can achieve:
- Prefilling a hidden field with a value indicating where the link to reach the form was clicked
- Prefilling a menu option for all the recipients of a particular email campaign
- Prefilling your email address into a "contact me" field in the form
These are just a few examples of what you can do with a prefilled link. Before you begin, you will need to consider the size and content of the link. The more fields you choose to prefill, the longer the link gets, and longer links can easily break. So keep in mind: The shorter the link, the better.
It's also easiest to prefill fields which don't have spaces. Spaces can also cause links to break. In most cases, however, it's possible to work around these concerns.
Prepare to Build Your Link
To build your prefill link, you'll need:
The form's address (URL):
- Go to the Publish page and copy the public address under "Your form is publicly available at this address."
- You can also click the "View" button instead and copy the URL of the live form.
The aliases of the fields you want to fill:
- In the Notifications page for your form, scroll to the bottom and click the link labeled "Show the list of available aliases for this form".
- You can also open the Outline in your Form Builder and view the aliases to the right of each field.
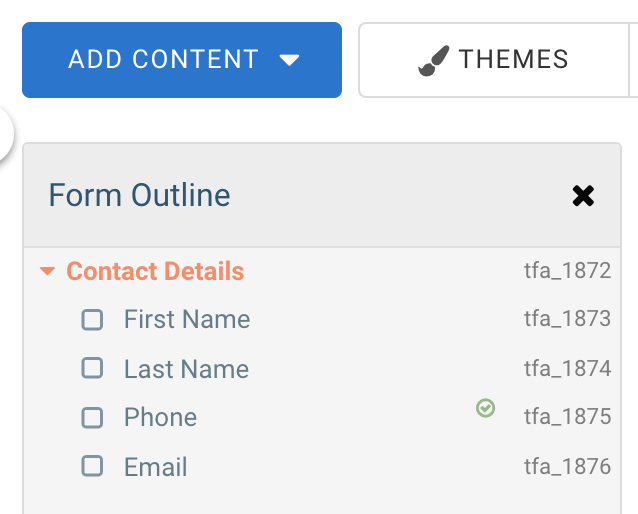
Here are the prefill parameters for the form we'll be looking at:

Build Your Prefill URL
You can use a basic text editor to build your link, like Notepad or TextEdit. Here's a form link from the Publish page, where 4905473 is the form ID.
https://app-test.tfaforms.net/4905473
Now, place a question mark after the form ID in your URL. Here's what our example link looks like:
https://app-test.tfaforms.net/4905473?Next, pick one field alias from the list that you want to prefill, and place it after the question mark. Here, we're using the email field "tfa_1876." Add an equals sign after the field alias.
https://app-test.tfaforms.net/4905473?tfa_1876=
After the equals sign, you'll want to enter the data that will prefill the form field.
https://app-test.tfaforms.net/4905473?tfa_1876=name@domain.com
This is the link you will provide to your respondents that allows them to access the prefilled form.
Dynamic Prefilling
You may have noticed that by following these steps, your form will prefill in the exact same way every single time this prefilled link is clicked. You would need to change the prefilled link in order to prefill the form differently. This is useful when you're sending out the same link to a large number of recipients, or embedding each link in a different location, but what if you want to email one link to a number of people and have the link prefill differently for everyone?
This is something that you can do with "merge fields". Many email systems have a "merge field" option which you can place into an email template in order to change the value based on the recipient. A simple example of this would be having the first name in the email change based on who is receiving the email. You can use this same process with your forms!
To do this, you can use the prefilled link from earlier, but with a merge field instead of a value at the end of the link. Here is an example of how it would look in MailChimp:
https://app-test.tfaforms.net/4905473?tfa_1876=*|MERGE0|*
The merge field format will change based on your email system, so please reach out to your email provider if you have any questions about merge fields.
Prefilling Multiple-Choice Fields
List, Radio Button, or Drop-Down Menu
When prefilling a selection list, radio button, or drop-down menu field, the question has an alias, and so does the choice. You can view the choice aliases by clicking on the field in your form builder, selecting "Choices", and then taking the alias from the column on the right.

You'll be placing the alias of the question before the equals sign and the choice alias after the equals sign. In the example below, the alias for this field is tfa_1877. We would like to prefill the field with the "Sales" choice, so the prefilled link would look like this:
https://app-test.tfaforms.net/4905473?tfa_1877=tfa_1878
Or you can use the exact text of the choice.
https://app-test.tfaforms.net/4905473?tfa_1877=Sales
In this example, the question is a menu list, where you can select multiple answers by separating them with a semicolon.
https://app-test.tfaforms.net/4905473?tfa_1877=Sales;Marketing
Checkboxes
Checkboxes work a little differently than other multiple-choice fields. The alias before the equals sign is the choice alias. You can get this choice alias by clicking on the field in your form builder, selecting "Choices", and then taking the alias from the column on the right.

When you're using checkboxes, you can use a "1" (which means "TRUE") to check a box or "0" (which means "FALSE") to uncheck a box.
https://app-test.tfaforms.net/4905473?tfa_1883=1
Or, you can use the exact text to fill the field.
Prefill More than One Field
To prefill more than one field, you can add more field aliases with their value, separated by an ampersand (&).
https://app-test.tfaforms.net/4905473?tfa_1876=name@domain.com&tfa_1873=MyFirstName&tfa_1874=MyLastName
Repeat this as needed, but remember that the shorter the link, the better.