Before Setup
The following steps will walk you through using FormAssembly's Lightning Component to publish a form within your Salesforce Experience Cloud Site (formerly Salesforce Communities).
Before starting these steps, please ensure you have installed FormAssembly for AppExchange. Follow the steps outlined here to install and set up the application.
Things to Note:
- You do not need to use Salesforce Experience Cloud Authentication (available for Team plan customers and up) to use our Lightning component and embed a form on your Experience Cloud Site. This is an option if you would like to restrict your forms to your Experience Cloud Users only, and it is not required.
- If you are a Team plan user and have the Salesforce Add-on, you may use the Salesforce Prefill Connector with Salesforce Experience Cloud Authentication enabled to prefill Experience Cloud User information.
- You do not need to set up Single Sign-On (SSO) between Salesforce and FormAssembly to use the FormAssembly Lightning Component.
- The Lightning Component can be installed in a sandbox by using this link.
- Support for Experience Cloud varies across device types and browsers. Please refer to Salesforce for information about their browser support requirements for communities.
Configuration Steps
1. Go to Setup → Feature Settings → Digital Experiences → All Sites and click Builder for the Experience Cloud Site where you plan to publish your form.
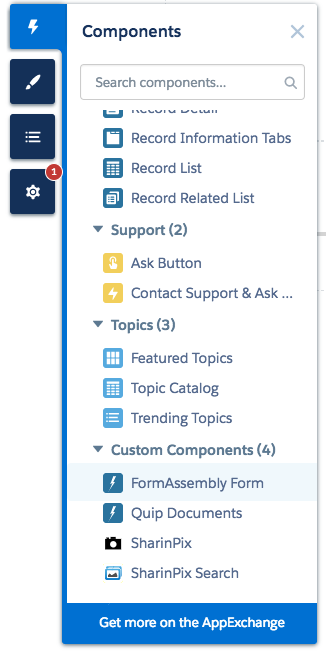
2. Go to the Experience Cloud Builder, find the page where you want to publish the form, and select Components.
3. Next, select FormAssembly Form under Custom Components. If you do not see this option, ensure you have installed FormAssembly from the AppExchange and have updated it to at least version 2.34.
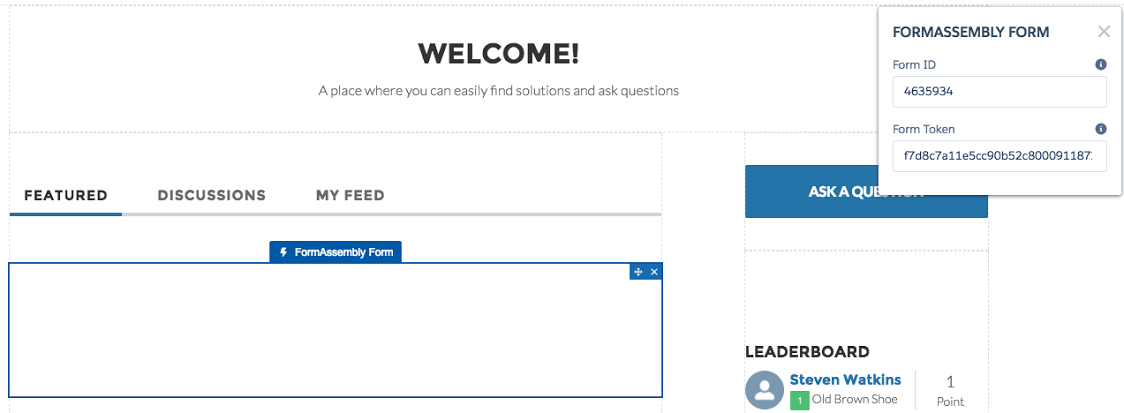
4. Drag the form to the place on your page where you would like it. Then, open a new tab or browser window and log in to your FormAssembly account.
5. Within FormAssembly, find the form you would like to publish and copy the Form ID of the form you would like to publish.
6. Return to the Experience Cloud Builder and paste the Form ID into the Lightning Component dialog box.
- If you are not using the Salesforce Experience Cloud Authentication, you do not need to complete the remaining steps. Add the Form ID (found on the Publishing page in FormAssembly) to the component dialog box to complete the configuration.
- If you are using Salesforce Experience Cloud Authentication, please continue with the subsequent steps.
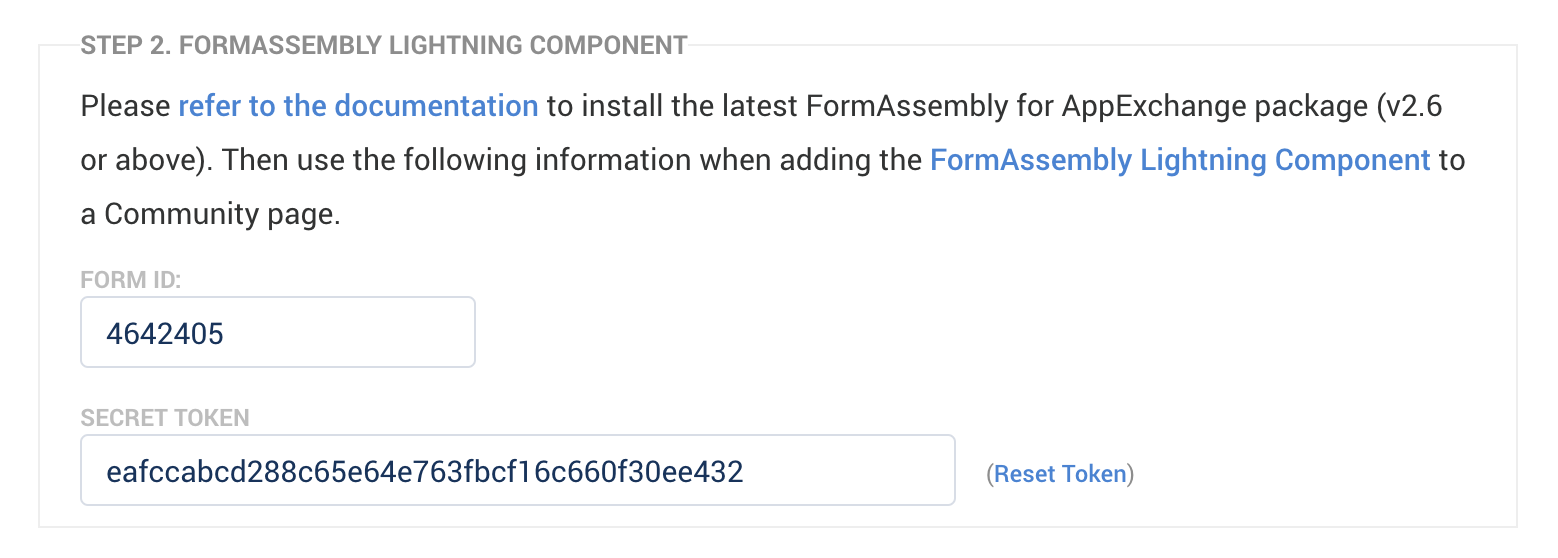
7. Return to your FormAssembly account, find the form you would like to publish, and go to Configure → Processing.
8. Under Allow Responses From select Salesforce Experience Cloud User.

9. Click Configure and enter your Portal Login URL and Salesforce Org ID. Additional information and details on this process can be found on our Salesforce Experience Cloud Authentication page.
10. Scroll down to Step 2. FormAssembly Lightning Component. Copy and paste the values for Form ID and Secret Token to the Lightning Component dialog box on your Experience Cloud Builder.
12. Press Enter on your keyboard to save the configuration, and Publish the changes to your Experience Cloud Site. You should now be able to see the form when logged in to your Experience Cloud Site.
Add FormAssembly Apex Class Permissions for Experience Cloud Users
To ensure the function of forms embedded using the FormAssembly Lightning Component for Salesforce Experience Cloud Sites, you will need to assign specific Apex Classes to Guest and Experience Cloud Users.
You may follow the steps in either of the two options:
Option 1: Using Enhanced Profile Views to Modify User Profiles
- Navigate to Setup → Users → Profiles
- Select your Experience Cloud User Profile
- At the top of the profile select the Enabled Apex Class Access option, this will redirect you to the Enabled Apex Class Access section where you can see the Apex Classes this profile has access to.
- Select Edit
- Select all Available Apex Classes containing the "tfa." prefix namespace and add them to the Enabled Apex Classes
- Note: Apex Classes are case-sensitive and the lowercase "tfa." classes may appear near the bottom of the list.
- Click Save
Option 2: Adding User Permission Set
- Navigate to Setup → Users → Permission Sets
- Create a new permission set to apply to users who need access to FormAssembly forms embedded in Salesforce Experience Cloud Sites.
- Select the newly created permission set.
- Under the Apps section, select Apex Class Access
- Click Edit
- Select all Available Apex Classes containing the "tfa." prefix namespace and add them to the Enabled Apex Classes
- Note: Apex Classes are case-sensitive and the lowercase "tfa." classes may appear near the bottom of the list.
- Click Save
- Click Manage Assignments to apply the permission set to any users that need access.
Troubleshooting
After you publish your form, if you see "Please wait" or "Form will be displayed here" on your live Experience Cloud Site where the form should be, there are a few settings you will need to check to attempt to resolve this error.
Method 1
For FormAssembly App version 2.4 or Lower:
You will need to complete the new package setup process introduced in version 2.15 up to the current version. Documentation on how to install FormAssembly for AppExchange is here.
For FormAssembly App version 2.34 (current version):
1. Go to Salesforce > Setup > Installed Packages > Configure (for FormAssembly) under FormAssembly Setup Information. This will take you to the following screen:
2. To confirm what the instance URL is, scroll down and go to "previous", "edit details", and "previous" to reach the page below:
3. Ensure the instance URL does not include "https://" here.
4. Once you've confirmed the installed package URL is correct, navigate to Setup > Custom Settings > Manage > Edit, and ensure the instance URL matches the installed package URL (and does not include "https://"):
5. Refresh your Experience Cloud Page and your form should now show.
Method 2
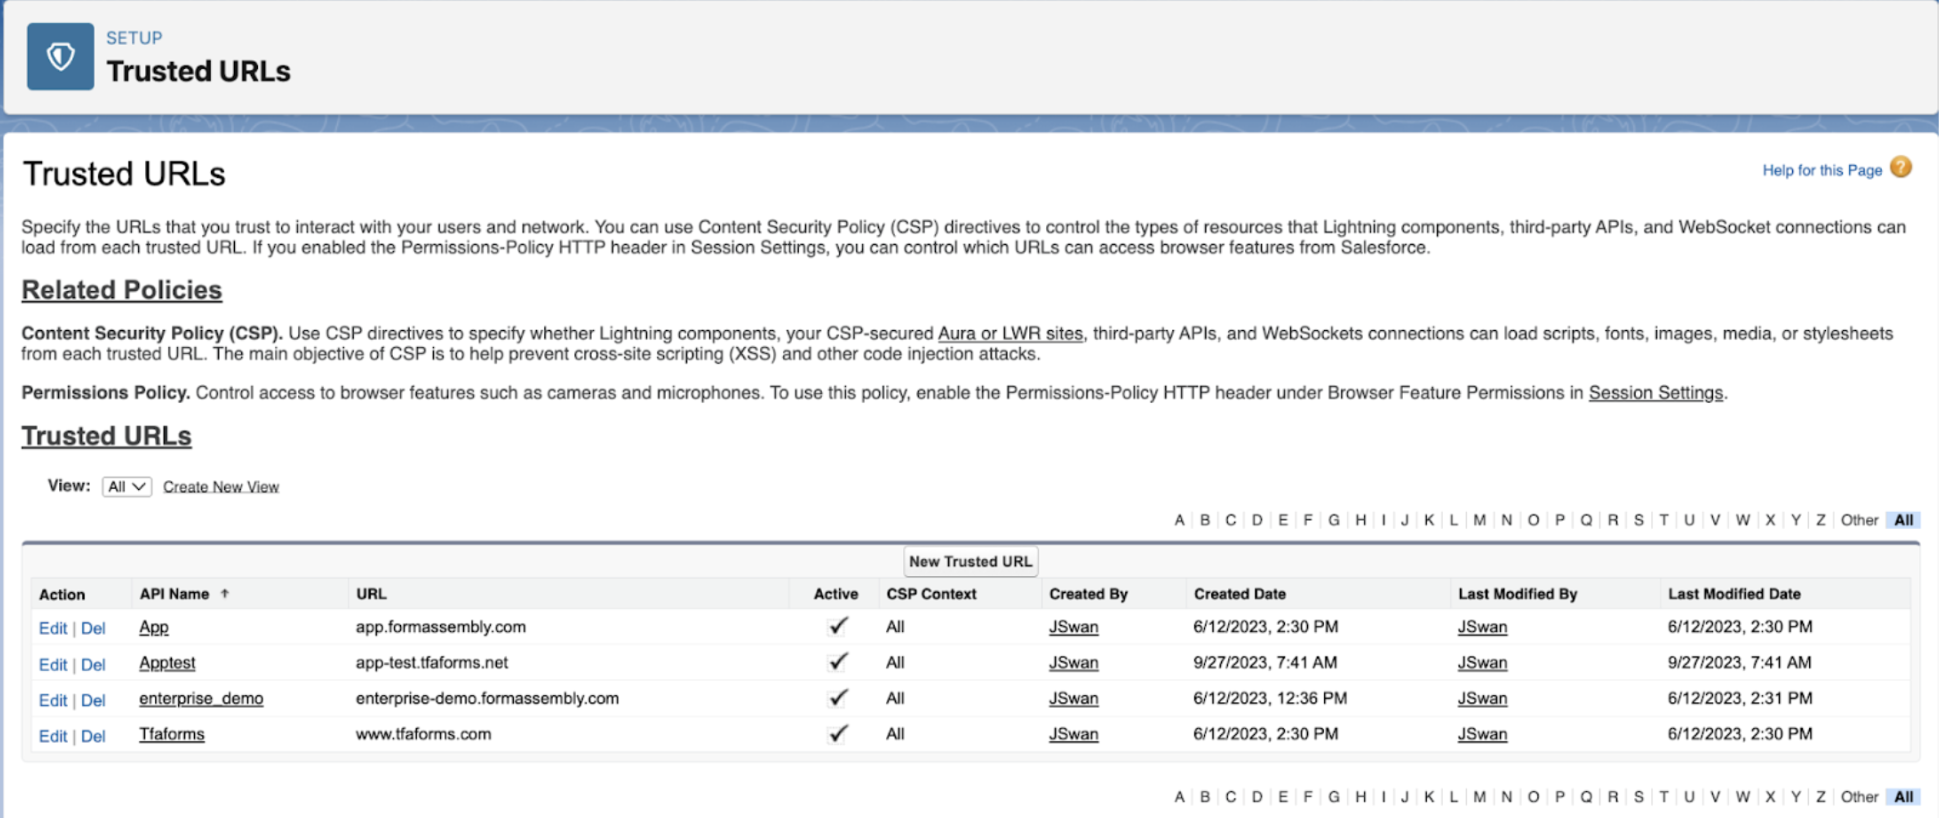
If the Custom Setting does not resolve the error, go to Salesforce > Setup > TRUSTED URLs. If your FormAssembly instance URL is not configured as a trusted site, add it here.
In addition to your FormAssembly instance URL (Enterprise and Compliance Cloud users), we recommend adding the following sites to your list of TRUSTED URLs:
- http://www.tfaforms.com/
- https://www.tfaforms.com/
Method 3
If the form is still not displaying,
- Navigate to Salesforce > Setup > Manage Users > Profiles.
- Find the user profile you are using for your Experience Cloud User and click Edit
- Using CTRL-F (or Command-F for MacOS), search for "API"
- Confirm that the API Enabled setting is checked

Method 4
If you are still unable to see your form on the Experience Cloud Site, please contact our support team.
Prefilling with the Lightning Component
When a form is embedded in an Experience Cloud Site with the FormAssembly Lightning Component, it is possible to use standard prefilling methods to prefill Salesforce data into your form.
- You can prefill through the Experience Cloud Site URL.
- You can prefill your form using the Salesforce Prefill Connector.
- If you have enabled Salesforce Experience Cloud Authentication, then you can prefill using session parameters.
When prefilling using methods 1 and 2, you'll need to add the prefill values to the URL of the Experience Cloud Site.
- For the following URL: https://FAdemo.na50.force.com/prefillingtest/s/
- Method 1: If your form was embedded on your Experience Cloud Site at the URL above and you are prefilling through the URL, you would need to append "?field_alias=XXXXXX" to the end of the URL.
- https://FAdemo.na50.force.com/prefillingtest/s/?field_alias=XXXXXX
- Method 2: If your form was embedded on your Experience Cloud Site at the URL above and you are using the Salesforce Prefill Connector, you will need to append "?queryparameter=XXXXXX" to the end of that URL.
- https://FAdemo.na50.force.com/prefillingtest/s/?queryparameter=XXXXXX
- Method 1: If your form was embedded on your Experience Cloud Site at the URL above and you are prefilling through the URL, you would need to append "?field_alias=XXXXXX" to the end of the URL.
Please refer to the help documentation for your chosen prefilling method before building your link.