Overview
For users of the Essentials plan or above, you can enable E-Signature collection on your Forms to help provide authentication of your respondents and associate respondents to a particular response.
FormAssembly's E-Signature feature is designed to comply with U.S. E-Signature Regulations, including the Uniform Electronic Transactions Act (UETA). It is also compliant with the Australian Electronic Transactions Act.
The E-Signature feature accomplishes two primary functions:
- Provides an audit trail that includes authentication of the respondent, verifying their identity, and ensuring they are who they claim to be.
- Complies with the E-Sign Act that states that electronic signatures, if used according to the law, are legally binding and valid to the same extent as signatures attached to paper documents.
On forms where you have enabled E-Signature collection, your users will be asked to verify their submission with an E-Signature after they submit the form.
To get started with our E-Signature feature, you can follow the steps below.
For information on how to use E-Signatures within a workflow, check out this article here.
Requirement
To use the E-Signature feature, a FormAssembly user must
- be part of an Essentials plan or higher
- have Content Management user permissions enabled for their login
- specifically, the Enable E-Signature permission must be enabled for the user account
Enabling
To enable E-Signature Collection on your form, click on the Processing page and then check the box at the bottom to enable the E-Signature. From there, you'll be able to enable your E-Signature Processing.
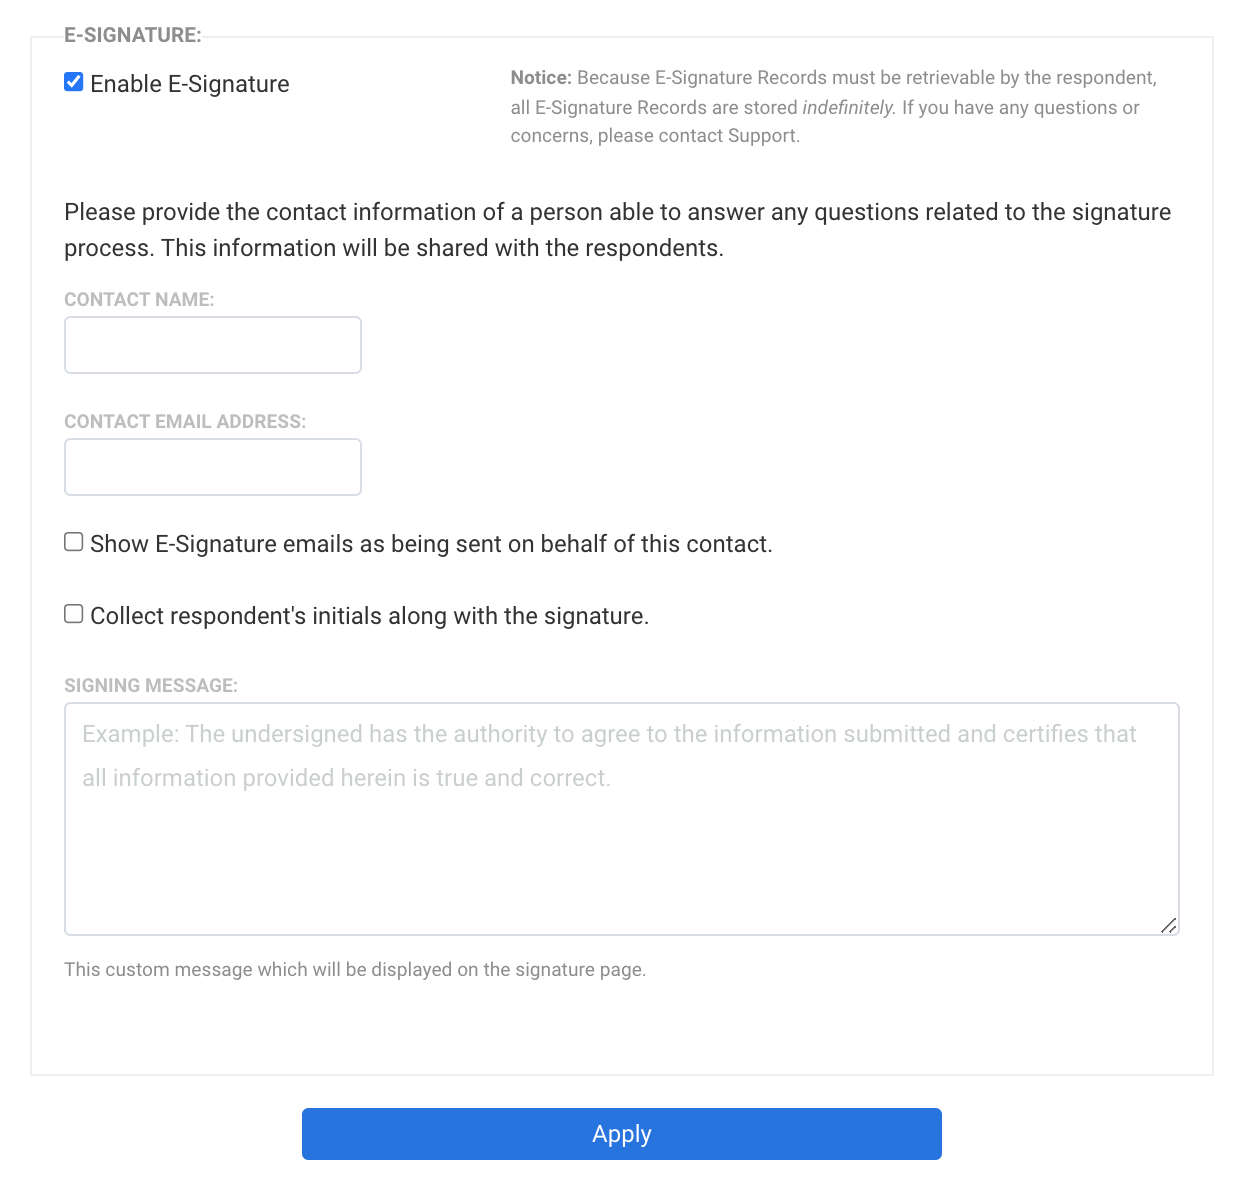
Once you have enabled E-Signature processing, the E-Signature Settings will appear on the processing page.
Settings
Form Contact Information
After E-Signature Collection has been enabled, you will need to configure several settings before you can begin processing, all of which can be done through the E-Signature tab. To begin, you'll need to configure your Form Contact Information so that those completing your form will have a specific person to contact should they have questions about the E-Signature.
You will need to enter a Contact Name and a Contact Email Address where the person responsible for this form can be reached. You will be unable to apply any changes made on this tab until these two fields are filled in. This information will be provided to the form respondent within the verification email.
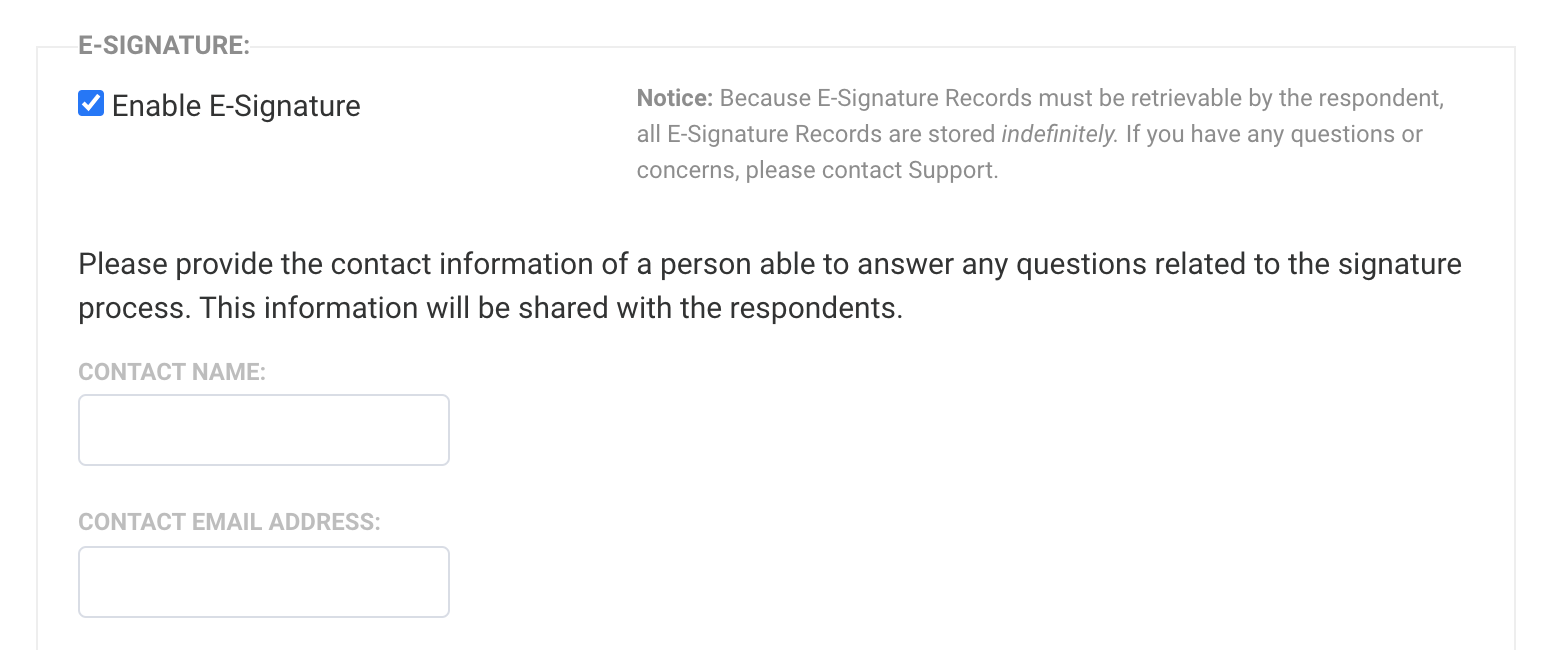
Signature Configuration
In the Signature Configuration section, you have the option to collect signatures with initials and to customize a signing message. The signing message will be displayed above the signature request when the user is completing their E-Signature.

Form Submission Process
On forms where you have enabled E-Signature processing, once the respondent clicks the submit button, they will be taken to the E-Signature request screen. Here, they will be required to electronically sign their name, enter a valid email address, and submit their initials (if you have selected the initials option in the configuration).
The respondent can either use their mouse or finger on a touch-enabled device to sign the form, or they can check the box that says "type your name to sign" to use their keyboard and type their signature. Once they have completed all the required information, they will need to click on Submit Signed Response.
As noted in the E-Signature collection box, the respondent's signature will not be accepted until they have clicked the link in the verification email that is sent immediately after they submit their response.

- The typed name and email address must always be completed, even if the signature line is used. The red notation is not an error, but just a warning that always shows.
- The option to make a correction expires after 48 hours. If expired, the respondent will see a Link Expired page. Please see our article on reopening expired form links for more information.
Email Verification
Once the respondent has signed and submitted their E-Signature, they will receive an email with a verification link to help ensure the authenticity of their signature. They will need to click on the link (or copy and paste the link into their browser's URL) to finish the verification process.
After the respondent has completed this verification, they will receive a final email confirmation, as will the email address listed in the "contact email address" field of the E-Signature setup and anyone else who is designated to receive form notifications. This email will contain a link that allows the respondent and form creator to view a record of the E-Signature.
Additionally, those email addresses that are listed to receive form notifications will also receive the final email confirmation. 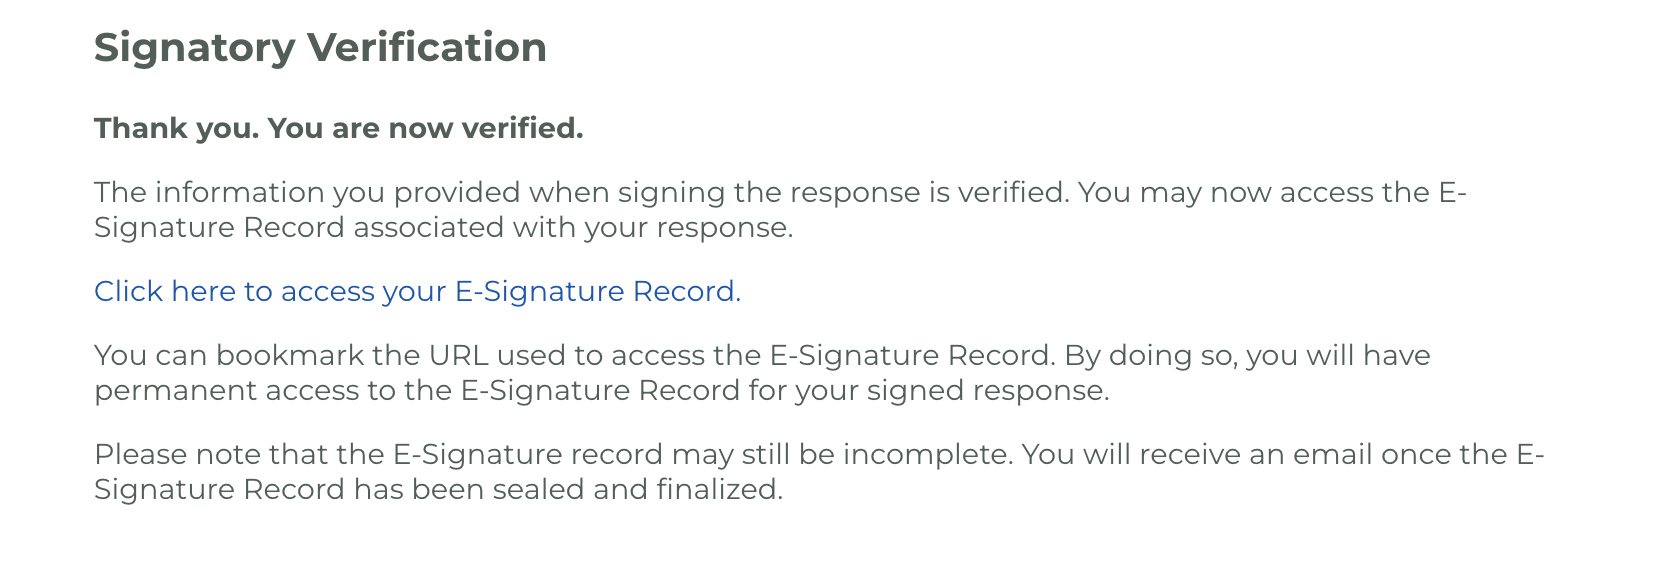
Accessing E-Signature Records
Once your respondent completes the email verification of their E-Signature, you will receive an email that says the Form has been sealed and is ready for viewing. In the email, you will see a link to access the E-Signature record. Another way to access the E-Signature record is to view it from an individual Response.
Sealed Email - Link to E-Signature Record:

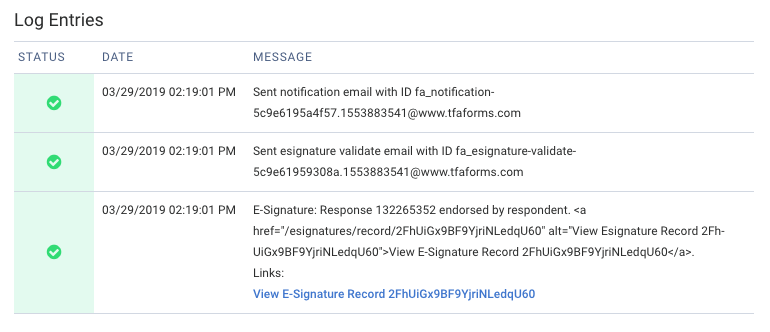
Individual Response
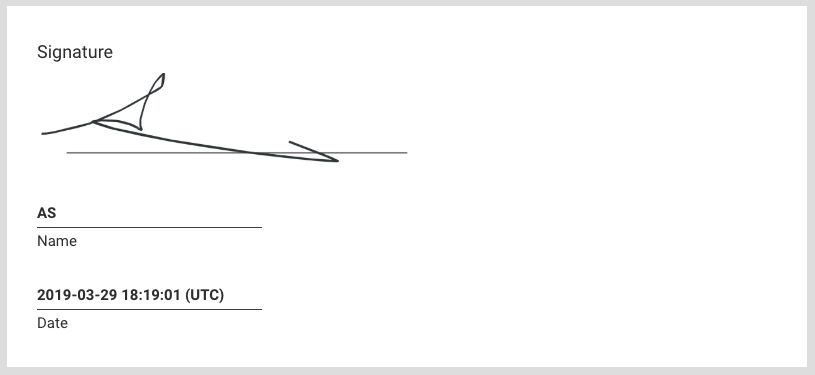
You'll see an image of the E-Signature directly under the response data. You can also see a link to the E-Signature Record in an individual Response if you scroll down to the Log Entries section of the Response.
E-Signature Record
From the record page, you will be able to see a summary of the completed processing, a copy of the Signed Response, and several options as well. For the signatory, this page will look nearly identical. Only the Options tab will not be visible.
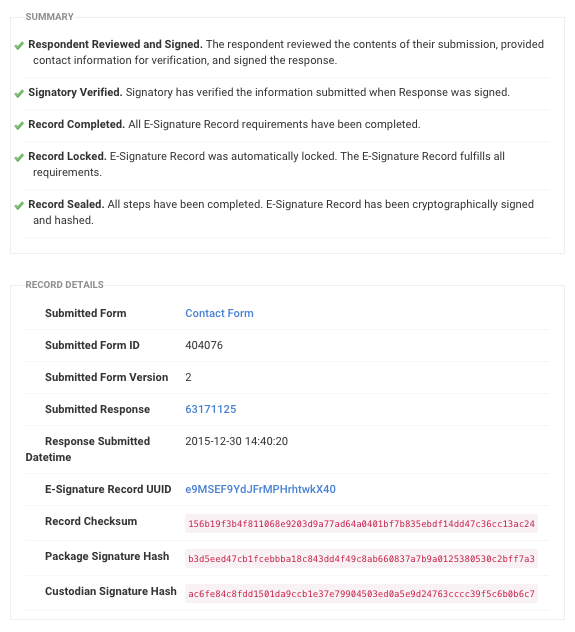
Summary
From the Summary section of the E-Signature Record page, you will be able to see what specific steps of processing have been completed as well as the record details and events that occurred during the processing.
You will also find the UUID (Universally Unique Identifier) which is a unique ID that is assigned to each E-Signature submission. Finally, you can find the record checksum, the package signature hash, and the custodian signature hash on this page as well.
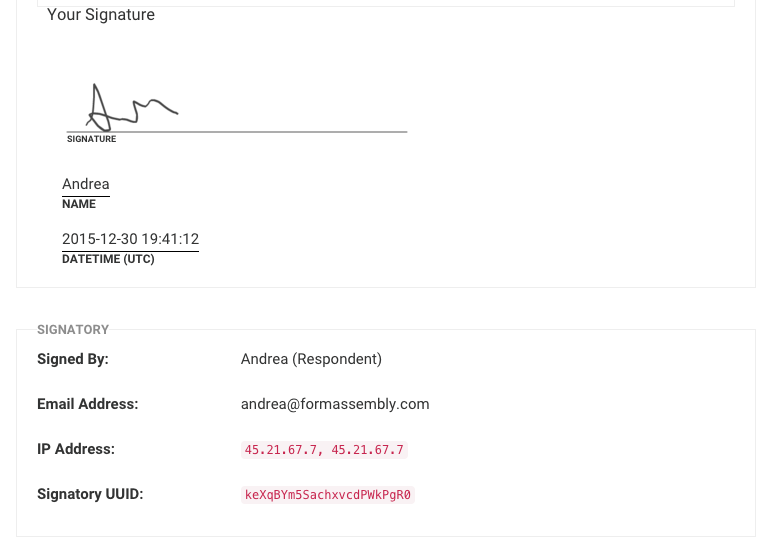
Signed Response
From the Signed Response section of the E-Signature Record page, you will be able to view a copy of the E-Signature, which includes the signatory's IP address and the UUID for the submission. You can also view a Printer-Friendly Version of this response if you wish.
Options
From the Options section, which is only available to the Form Creator and not the signatory, you can choose to resend the record retrieval email to the signatories on record.
You can also choose to send the record to a third party if you would like them to have temporary access to the E-Signature Record for a 24-hour period.

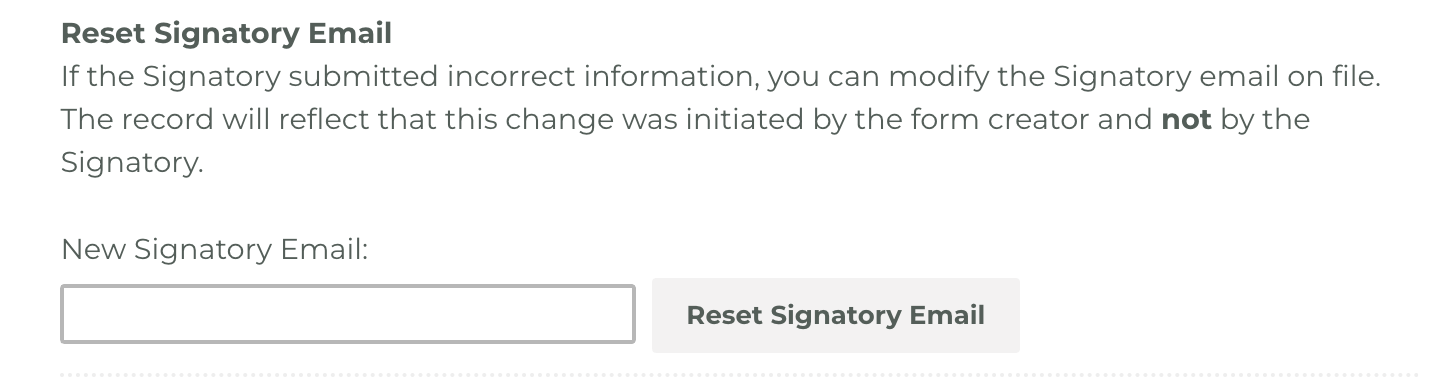
If the signatory entered an incorrect email when signing, you can also choose to reset the signatory email from the options page, provided they have not clicked the verification link. This will resend the verification email to the new address.
E-Signature Field Aliases
You can use E-Signature field aliases to send record links, images, and other E-Signature data through connectors, email notifications, and wherever aliases can be used. This can be particularly useful if you would like to attach or link aspects of the E-Signature record to an object in Salesforce.
The following aliases are available to use and should be wrapped in %% as with other FormAssembly aliases:
E-Signature Field Aliases | Field Alias Value |
|---|---|
| ESIG_ID | The record's UUID |
| ESIG_RECORD_URL | URL for the form creator to access the record |
| ESIG_PRINT_URL | URL for the form creator to access the printable record |
| ESIG_UNPROTECTED_RECORD_URL | URL that contains an access key to view the record |
| ESIG_UNPROTECTED_PRINT_URL | URL that contains an access key to view the printable record |
| ESIG_SIGNATURE_IMG | Base64 representation of the signature image. This will need to be sent to a file or attachment in Salesforce. This alias should be mapped to the "body" field in the connector. |
| ESIG_SIGNATURE_IMG_TYPE | The content type of the image, e.g., image/png |
| ESIG_INITIALS_IMG | Base64 representation of the initials image. This will need to be sent to a file or attachment in Salesforce. This alias should be mapped to the "body" field in the connector. |
| ESIG_INITIALS_IMG_TYPE | The content type of the initials image, e.g., image/png |
| ESIG_INITIALS_TEXT | The text of the initials |
| ESIG_INITIALS_IMG_NAME | A filename for the e-signature initials image, i.e., [RECORD ID]-initials.png |
| ESIG_SIGNATURE_IMG_NAME | A filename for the e-signature signature image, i.e., [RECORD ID]-signature.png |
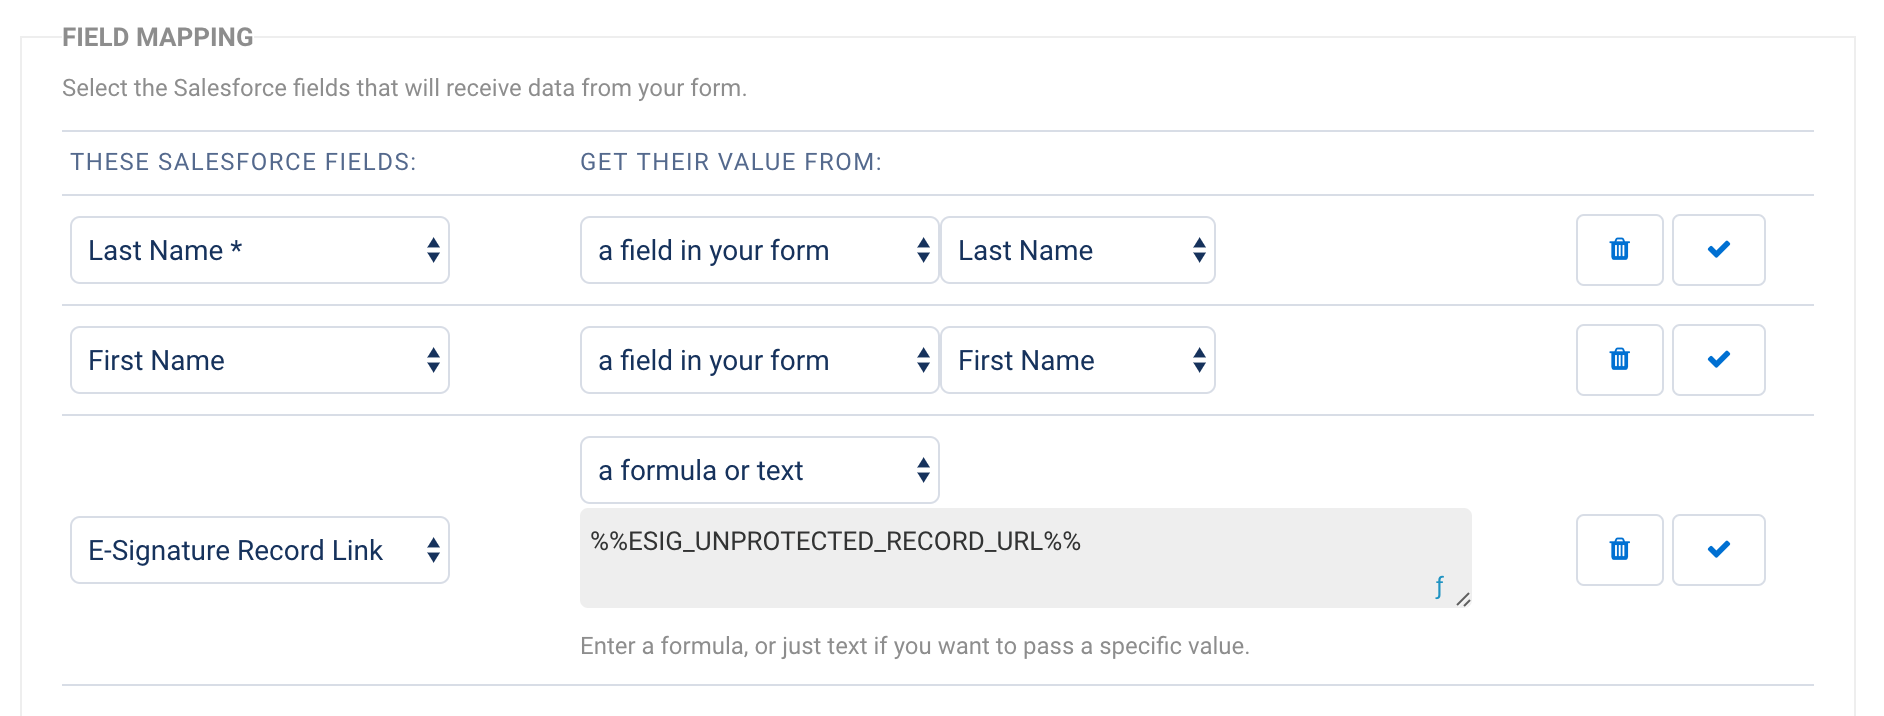
For example, if you wanted to send the unprotected record URL over to Salesforce, you would need to set up your connector as shown in the image below. Make sure to select that the Salesforce field will get its value from "a formula or text" and to wrap the alias in double percent signs (%%).
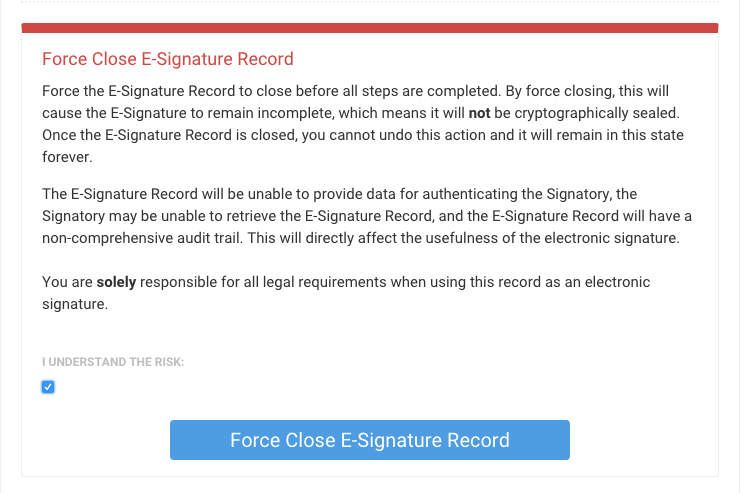
Force Close a Record
If a signatory does not verify their signature through the verification email, you have the option to force close their record from the Summary section.

If you force close a record, that record will be closed, and no future edits or changes can be made. Additionally, since not all verification steps were completed, the record will not be sealed. This is useful for users who only want the signature and are not concerned with an audit or an officially sealed E-Signature Record.
E-Signature Records and Data Purging
If you are using the E-Signature feature in conjunction with FormAssembly's data purging, there are several additional notes to consider.
If you set your purge settings to delete entire response records, the response will be purged, but there will be a separate copy of the signed data that will not be purged.
Your Form Respondent will still have access to the signed data in the initial email they received.
If you have not purged the entire response, you will still have access to the signed data in the response view. If you have purged the entire response, you will need to contact the support team to retrieve that data, as it is stored on our servers for security purposes.