Overview
If Salesforce Experience Cloud Authentication (formerly Salesforce Community Cloud Authentication) is enabled for a form, only authenticated respondents can access the form. When using this authentication combined with the Salesforce Prefill Connector, you can prefill the form with the authenticated respondent's information.
Please note that we no longer support using VisualForce to embed FormAssembly forms within Salesforce Experience Cloud Sites. Instead, please follow the directions below to set up and enable the FormAssembly Lightning Component.
Requirements
You'll need a FormAssembly Team plan or above, and have a Salesforce Customer or Partner Portal set up. Additionally, you will need to install the most recent version of the FormAssembly App for AppExchange (see details below for this process).
Enable Salesforce Experience Cloud Authentication

- Access Processing options for the form you'll be working with.
- In the Allows Responses From dropdown, select Salesforce Experience Cloud Users.
- Click Configure.
Configure Salesforce Experience Cloud Authentication
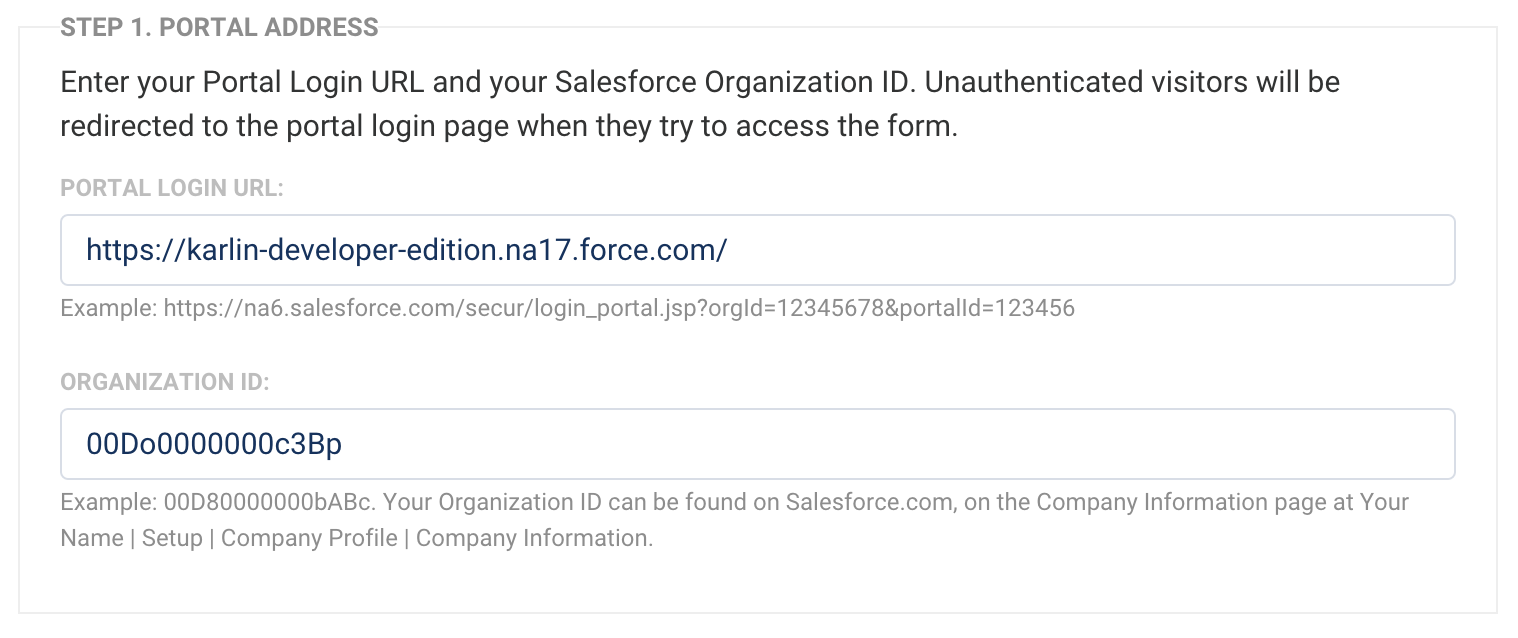
Step 1. Portal Address
To begin configuration, Salesforce Experience Cloud Authentication requires your Salesforce Portal Login URL and Organization ID. By adding your Portal Login URL, all currently unauthenticated users will be redirected to your authentication page to log in.
If you do not know your Portal Login URL, you can access the administration page for your Experience Cloud Site by going to Setup → Feature Settings → Digital Experiences → All Sites. From there, copy the URL displayed next to the Salesforce Experience Cloud Site.
If you do not know your Organization ID, you can access it by going to Setup → Company Settings → Company Information.
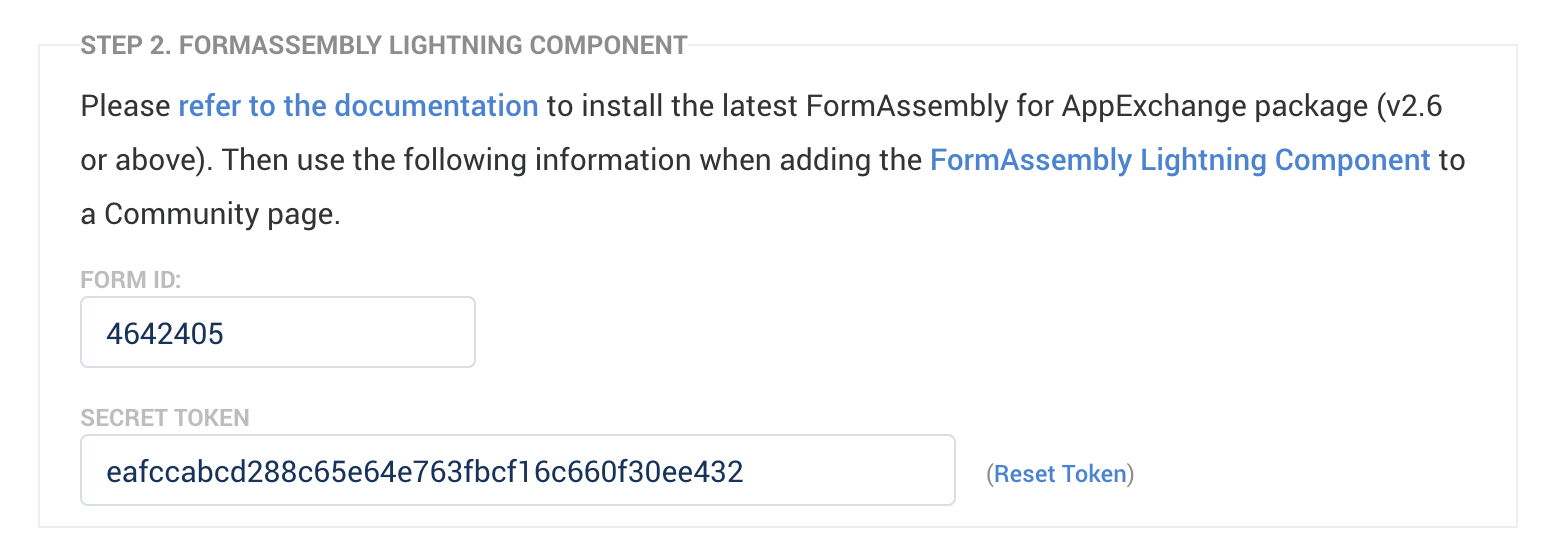
Step 2. FormAssembly Lightning Component
To add your form to your Salesforce Experience Cloud Site, you will need to make sure you have installed the most recent version of FormAssembly for AppExchange so that you can use our Lightning Component.
Once you have installed the most recent version, you can add the Lightning Component to your Experience Cloud Site.
Use the Form ID and Secret Token provided under step 2 to embed the form onto your Experience Cloud Page. More details can be found here.
Please note that your form will only be available from the Experience Cloud Site where your form is embedded. If a respondent attempts to access the form through a FormAssembly link, it will require authentication but will not redirect the respondent back to the form after authentication is completed.
- This form will only work within Salesforce.
- This form will only be accessible to users logged into your Salesforce portal.
- You may reset the form link by clicking Reset Token.
- If you disable and then re-enable the Salesforce Experience Cloud Authentication for this form, your form link will change, and you will need to update your Experience Cloud Site's tabs, links, and buttons accordingly.
Step 3. Options
If Save & Resume is enabled for your form, you can allow it to automatically resume the last saved response once the user has been authenticated. Select the checkbox beside "Automatically resume the last saved response once authenticated", to enable this option.

An authenticated user who saves their response can automatically resume it the next time they log in. A user who saved more than one response before auto-resume is enabled can pick which response to resume.
Click Apply to save your configuration.
Step 4. Prefilling Options
If using the prefilling connector with your Salesforce Experience Cloud Authentication, you can use the %%SF_PORTAL_USER_USERID%% alias to look up a User ID and any information associated with your users. You can find additional details for prefilling within Salesforce Experience Cloud here.
In addition, this help document lists many of the session parameters that are available to you.
Step 5. Ensure API is Enabled on Experience Cloud User Profile
To grant API access to the specific profiles that will be accessing your Experience Cloud Site, do the following:
- Go to Setup → Administration → Users → Profiles
- Click Edit next to the name of the profile you want to give access to
- Select Administrative Permissions
- Select the checkbox for API Enabled
- Click Save Profile

Resolving Common Publishing Issues
After you publish your form, if you see "Please wait" or "Form will be displayed here" on your live Experience Cloud Site where the form should be, there are a few settings you will need to check to attempt to resolve this error. The steps to troubleshoot common issues can be found in this help document.