Overview
With FormAssembly's Chargent Connector, you can easily process one-time credit card payments, set up recurring credit card payments, and integrate every payment with Salesforce. This connector must be set up on a form-by-form basis.
Provided you have Chargent installed through the Salesforce AppExchange, you can follow the steps below to configure the connector and begin processing payments.
We also recommend learning more about how you can use reCAPTCHA to prevent spam submissions to your form, and how connector labels can be useful in keeping your connectors organized.
Getting Started
There are no definite restrictions on what your form may contain or what you may sell with it, but this service is better suited for simple situations, where:
- You have a limited number of types of items to sell.
- Items have a fixed price and a fixed or variable quantity.
- Shipping & handling fees and taxes are applied to the total price.
Here are a few examples:
- Selling intangible goods such as music (MP3s), software, eBooks, etc.
- Charging a membership or an admission fee.
- Charging a flat fee for consulting services.
- Accepting donations.
- Selling physical goods, to the extent that inventory is not an issue.
Requirements
You'll need the following:
- The Payment Connector add-on, for access to the Chargent Connector
- The Salesforce Connector add-on
- Chargent installed on your Salesforce AppExchange
If you are processing recurring charges, you will also need to enable tokenization on your Chargent gateway page within Salesforce.
Required Fields
As you build your form, make sure to collect the following credit card information:
- Credit card number
- Credit card expiration date (month and year in two separate fields)
- Credit card security code
- Card Type (Visa, Mastercard, Amex, and/or Discover)
- Cardholder's full name
- Cardholder's email address
If you are building your form from scratch, check out our predefined content to easily add a payment information section.
Chargent Plans
Previously, Chargent offered three different package types, all of which required a slightly different configuration on the FormAssembly side. If you are using Chargent’s legacy Opportunities or Cases packages, which stopped being distributed in 2017, the end of support for these packages is June 30, 2022.
If you are using a legacy package and wish to switch to the Chargent Orders Package, you will need to reload your Chargent Connector after the migration. Additionally, you may need to make changes to the associated Salesforce Connectors. The Opportunities Package requires the Salesforce Connector to create, lookup, or update an Opportunity record, while the Cases Package requires the same for a Case record. These steps will no longer be required with the Chargent Orders Package, so you may remove them.
Instead, the Chargent Orders Package will create a custom "Chargent Orders" object that will automatically be linked to any records created within the Chargent Connector. If you are using this package, you may continue to the Configuration Steps below.
Salesforce Connector Setup
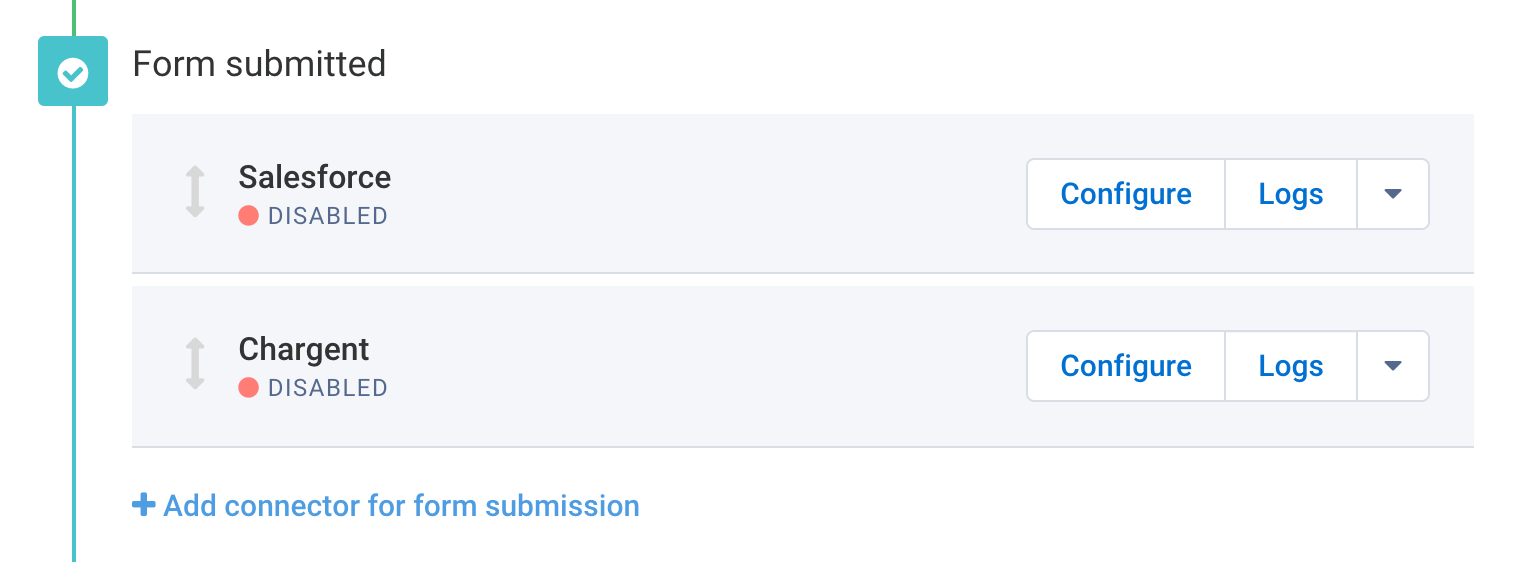
As mentioned above, in addition to the Chargent Connector, you will need to configure a Salesforce Connector. Failure to add a Salesforce Connector will result in an error and the inability to process payments.
To begin, you should select the form you are working with and add the Salesforce Connector to the Form Submitted section of the timeline. The Salesforce Connector will need to be positioned before the Chargent Connector so that it will run prior to the Chargent Connector.

Once you have added the Salesforce Connector to the timeline, you will need to configure it following the typical guidelines.
If you would like to associate the purchase with a particular record, such as an Account or a Contact, you will need to create, update, or look up the record prior to the charge. For more information, you can refer to this help document.
In addition to creating, updating, or looking up a record, you can add any additional steps to the connector that you would like to.
Configuration Steps
- Step 1. Salesforce Authentication
- Step 2. Chargent Configuration
- Step 3. Credit Card Information
- Step 4. Billing Details
- Step 5. Shipping Details
- Step 6. Charge Information
- Step 7. Save the Connector
Once your form has been created, and you know what types of items or services you will be selling, you are ready to begin!
First, select the form you are working with and go to the display options tab. Make sure you have Use SSL Encryption checked, otherwise, you will receive an error when attempting to process payments.
Next, go to the Connectors page, and add the Chargent Connector to the Form Submitted portion of the timeline. Click Configure.
Step 1. Salesforce Authentication
Within your Chargent Connector, you'll begin by selecting Connect to Salesforce. If you are using a sandbox account or a custom domain, you should select the appropriate option instead.

Once you have selected Connect to Salesforce you will be automatically redirected to the Salesforce authentication page.
After entering your Salesforce credentials, you will be asked to Allow Access to FormAssembly. Click on Allow and you will be automatically redirected back to FormAssembly.
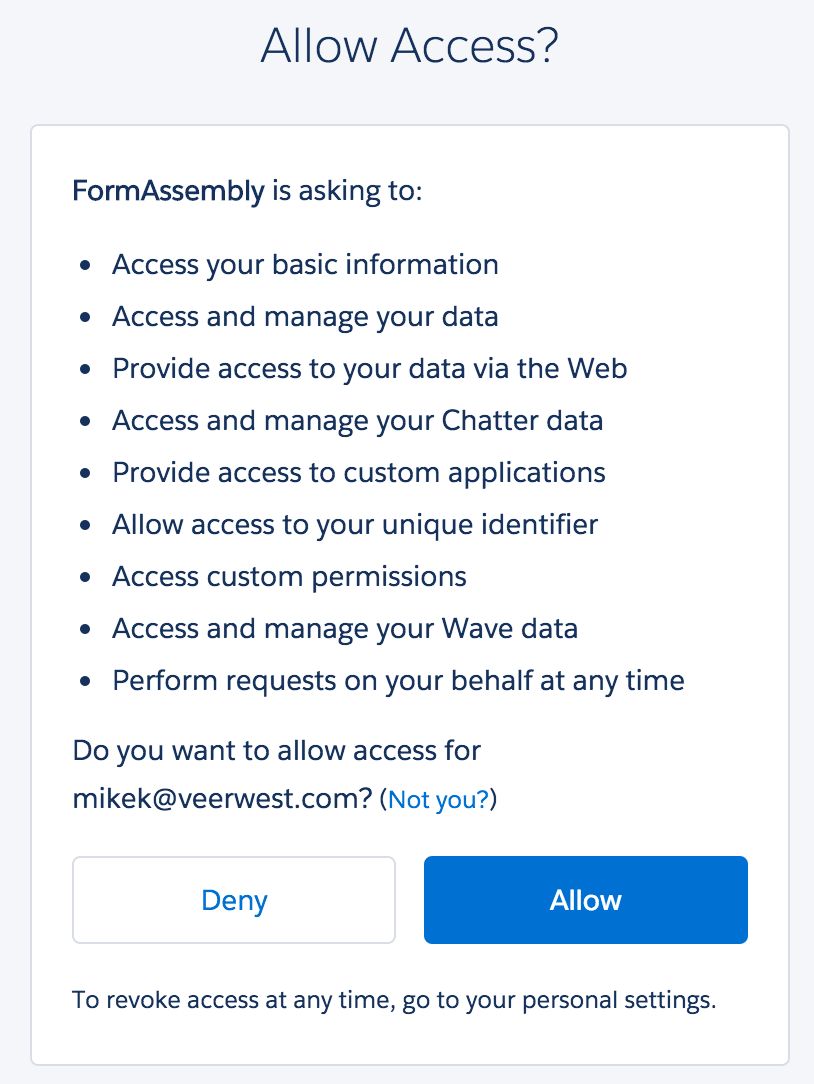
Once you have returned to the connector setup, you will see that your Salesforce Access has been configured to the credentials you entered. You may change this access at any time by clicking the Change Access button.

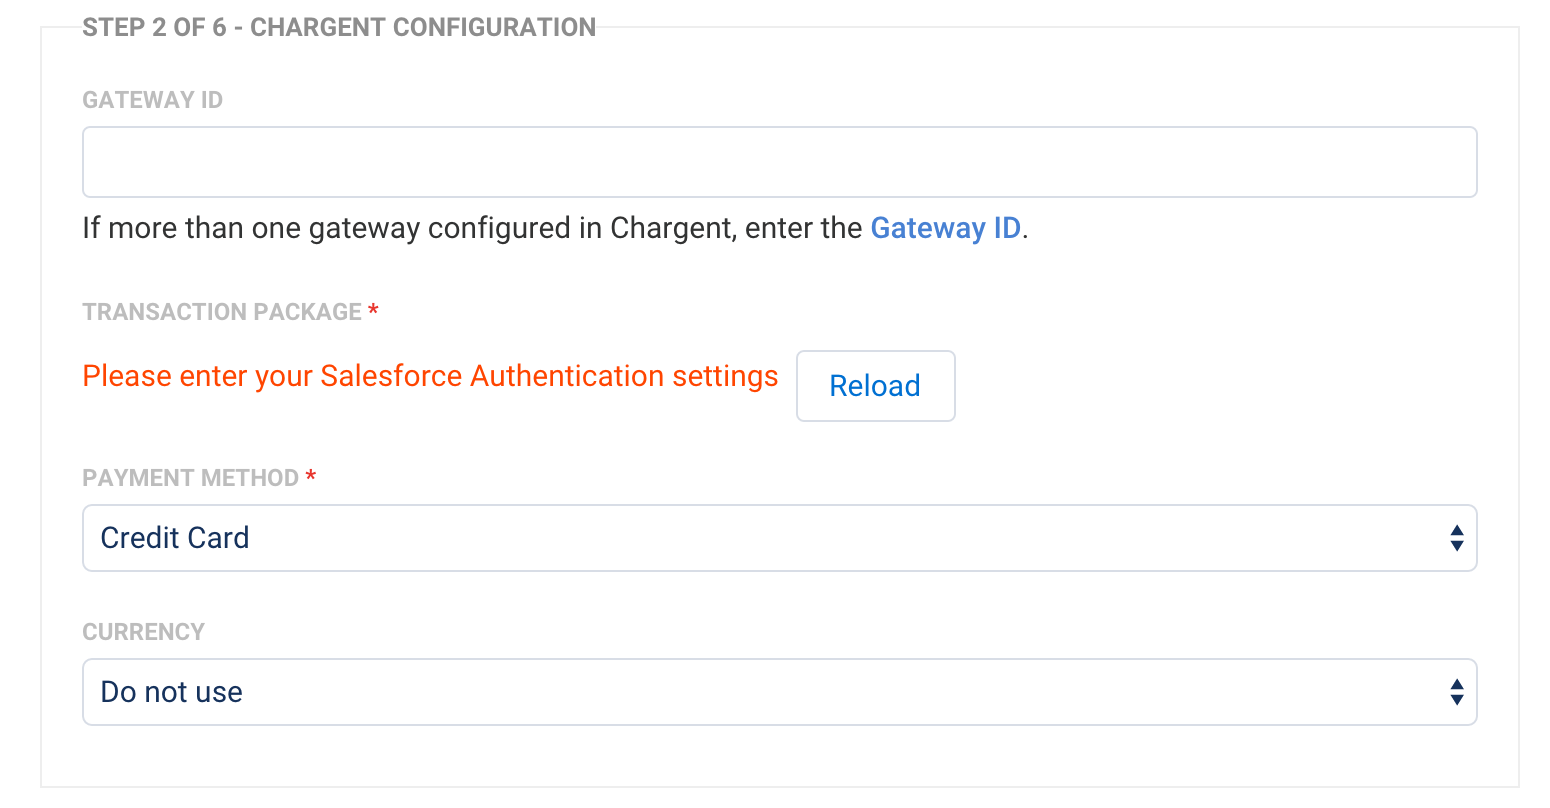
Step 2. Chargent Configuration
Once you've entered your Salesforce credentials, you'll be ready to start on your Chargent Configuration. If you have more than one gateway configured in Chargent, you will need to enter the Gateway ID. This is located in Salesforce in your Chargent configuration. Go to Gateways and find the ID for the specific gateway you are setting up.
Your Transaction Package will show which of the three Chargent packages you have purchased, provided you entered your Salesforce credentials correctly in Step 1.
For Payment Method, you will need to select if you are accepting payments with Credit Card or with Check/eCheck.
Finally, for Currency, you will need to select if the value will be defined in the form or in the connector.
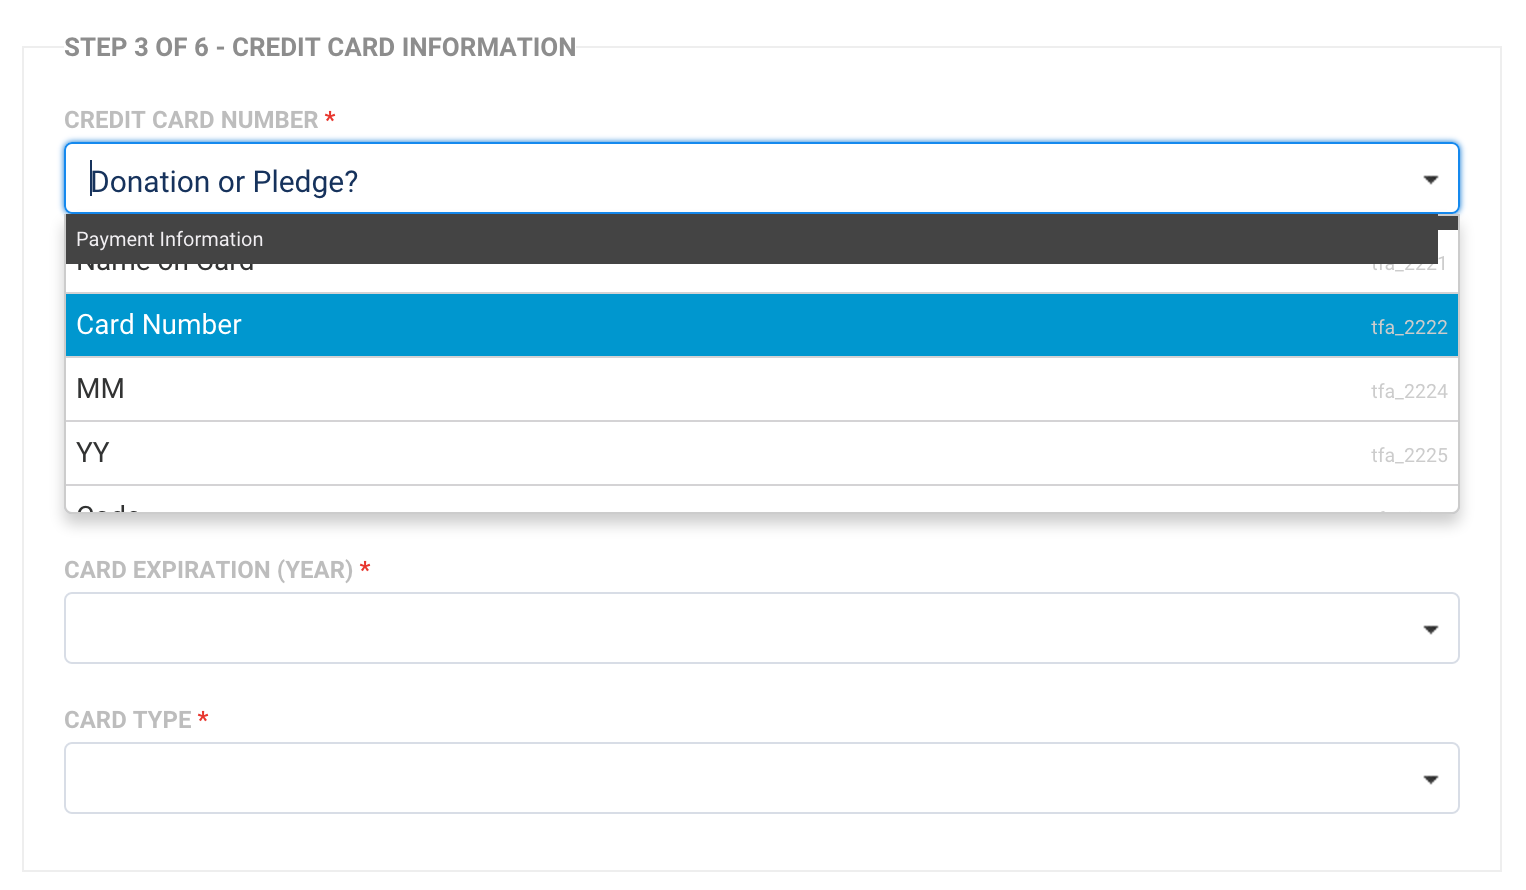
Step 3. Credit Card Information
Once you've entered your credentials, you'll begin your field mapping, so that the connector will know which fields in the form to pull information from. To do this, for each dropdown menu within Credit Card Information, select the field in your form that matches the label of the information to be pulled.
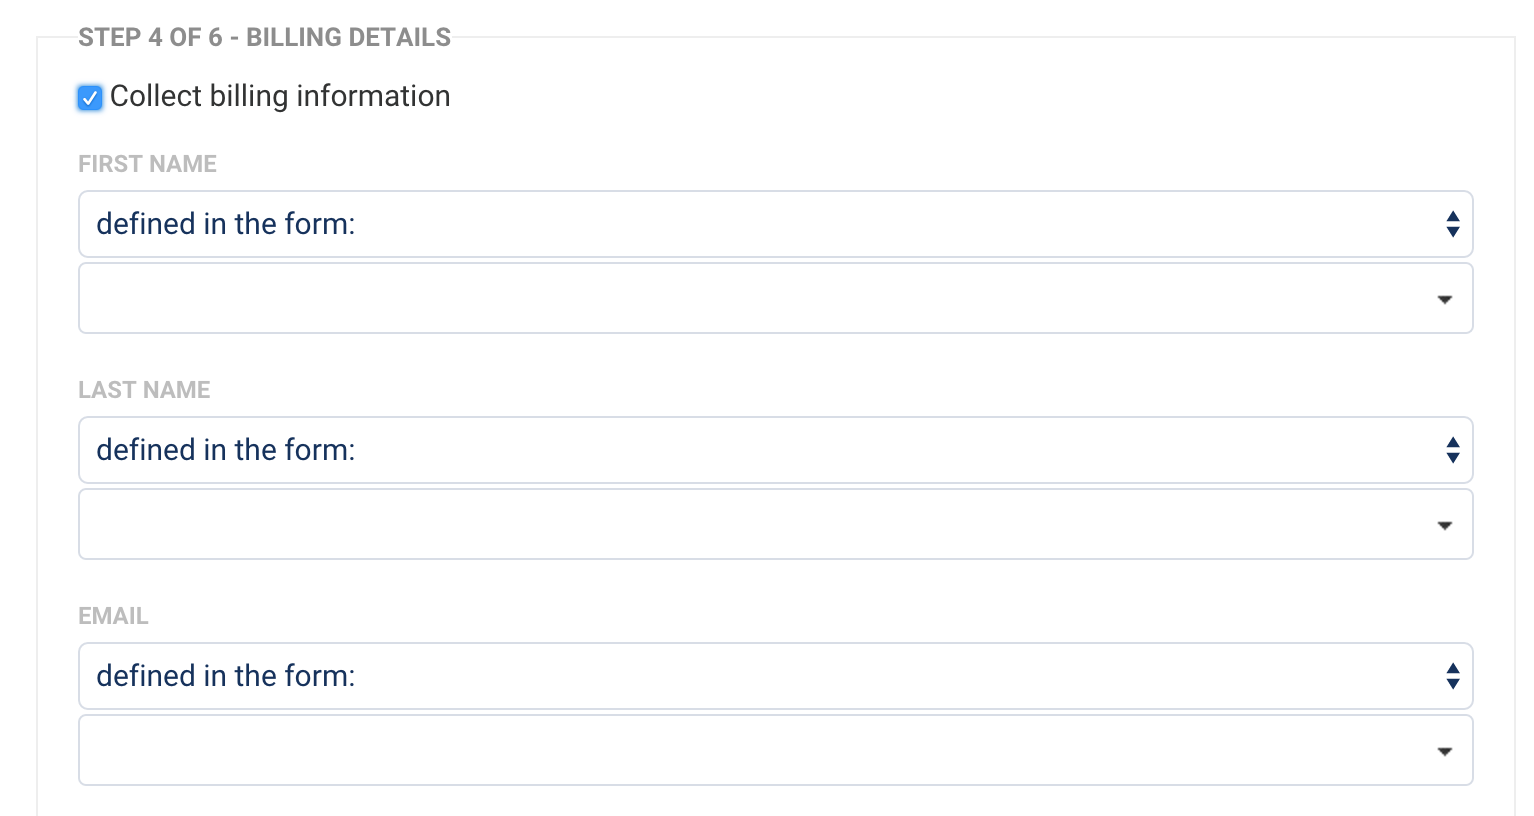
Step 4. Customer Billing Address
Once you have mapped the credit card information, you may do the same for the customer's billing information, although this information is optional and not required. Make selections in the dropdown menus for each field and select where you will define your values. In general, these values will be fields defined in the form, and if you choose to map this information, you will need to select which form field corresponds with which value.
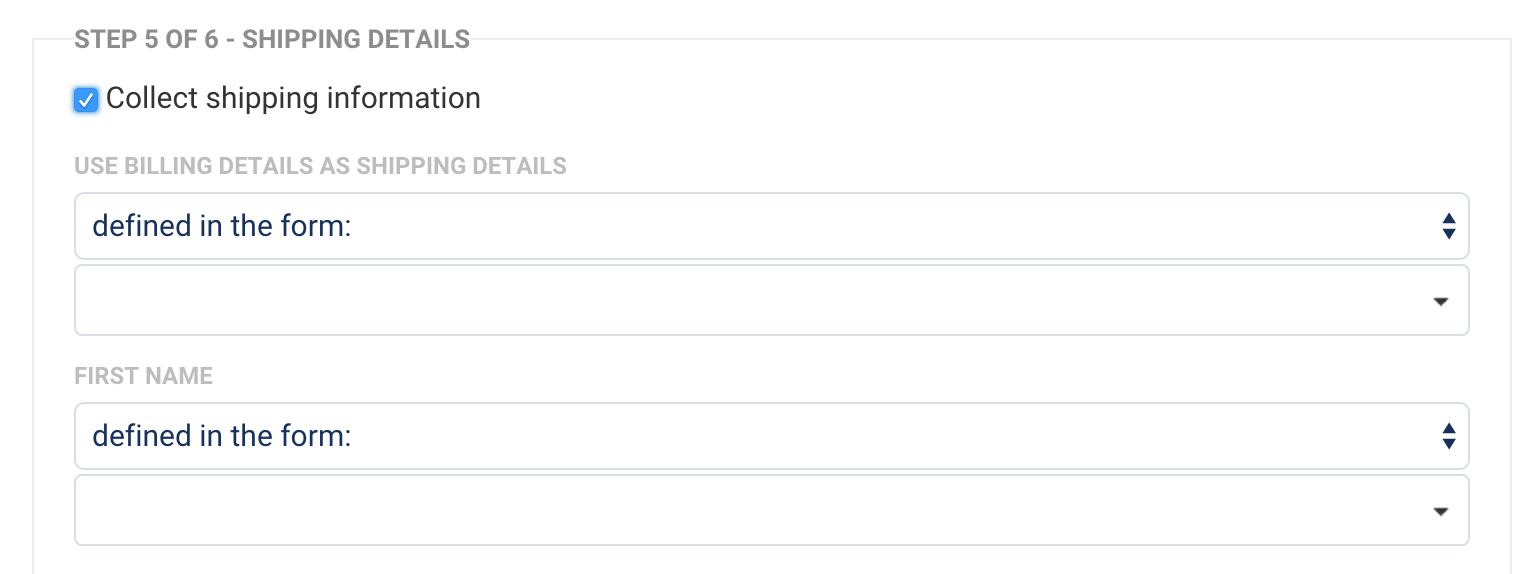
Step 5. Shipping Information
If you choose to collect shipping information, you'll need to define your recipient's name either in the connector or in the form. Additionally, you can choose to use the billing information entered in the Billing Details section above or map separate shipping information fields.
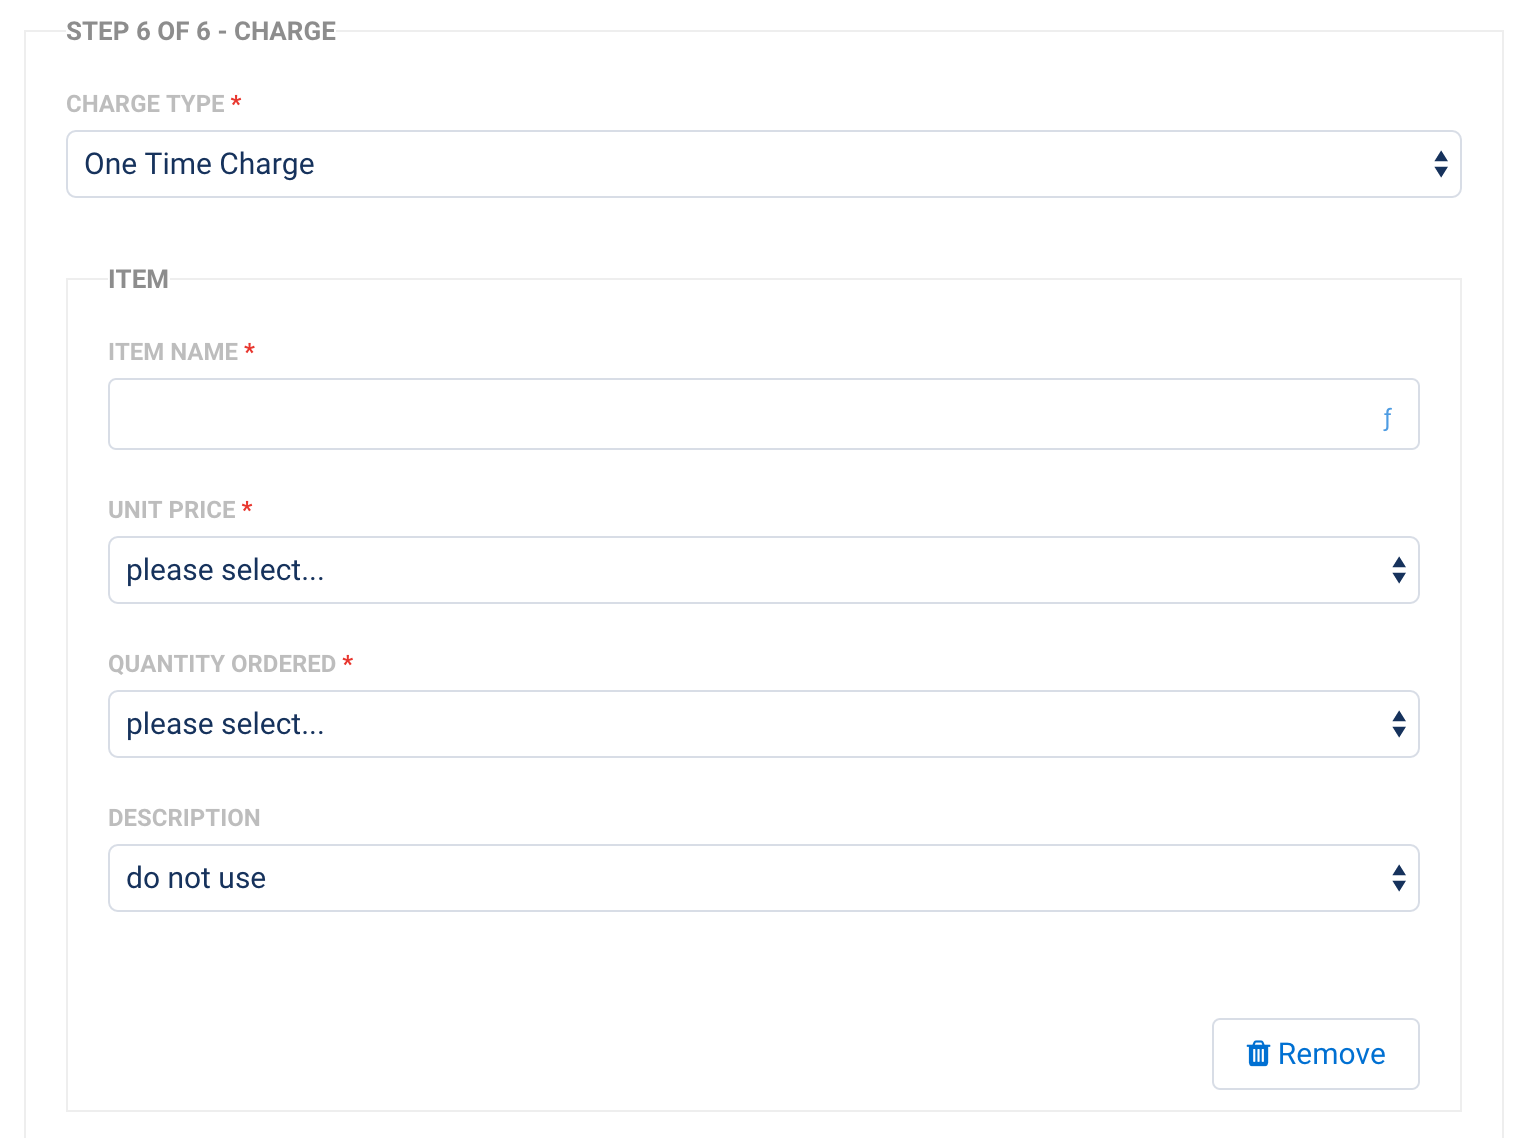
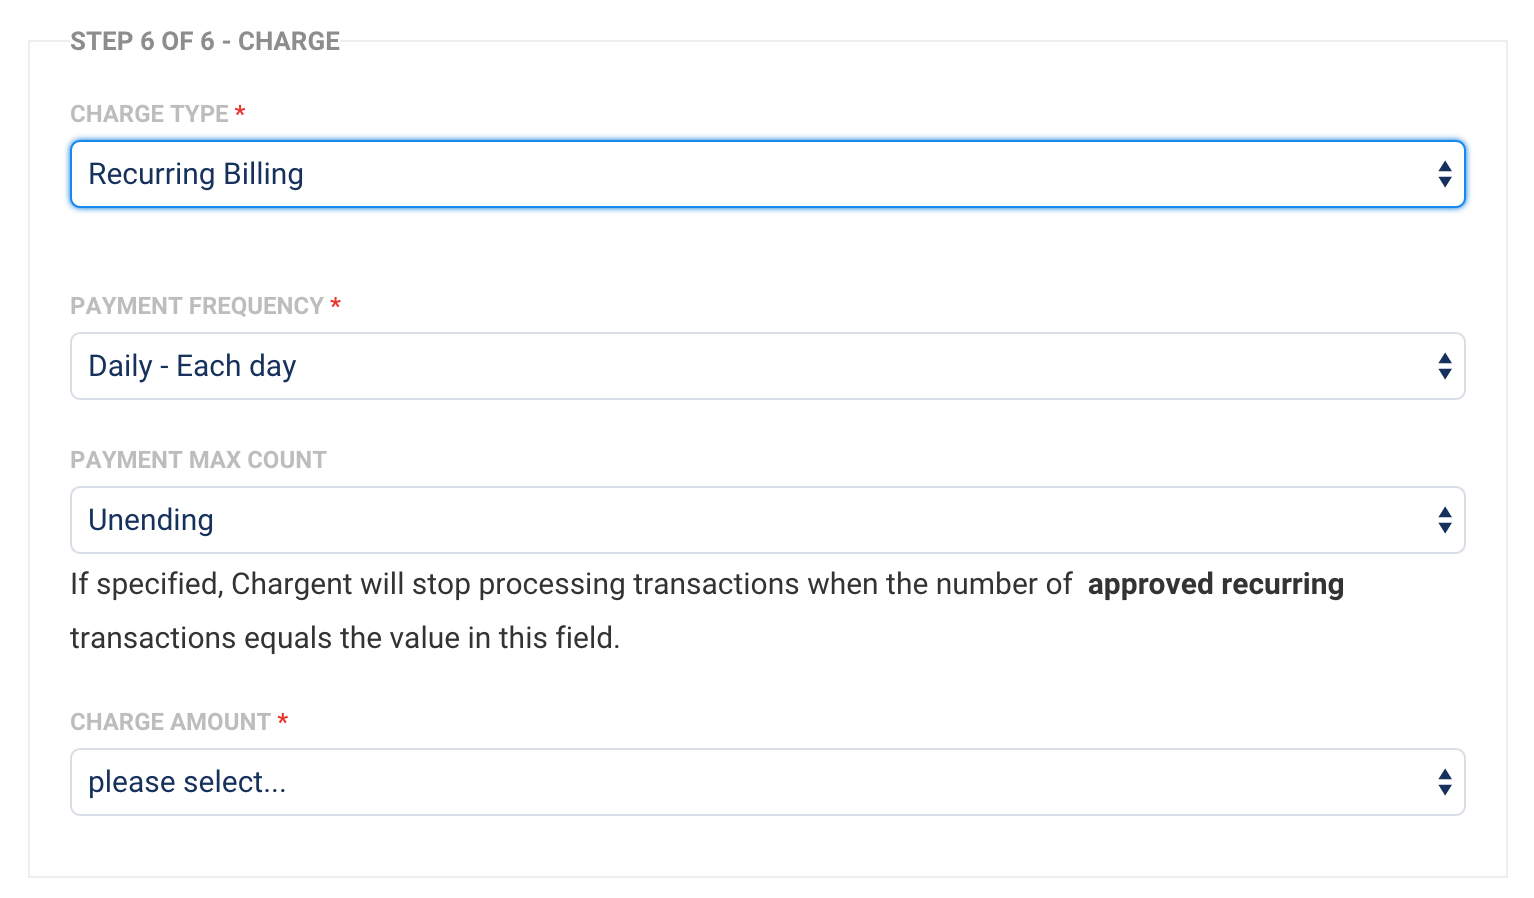
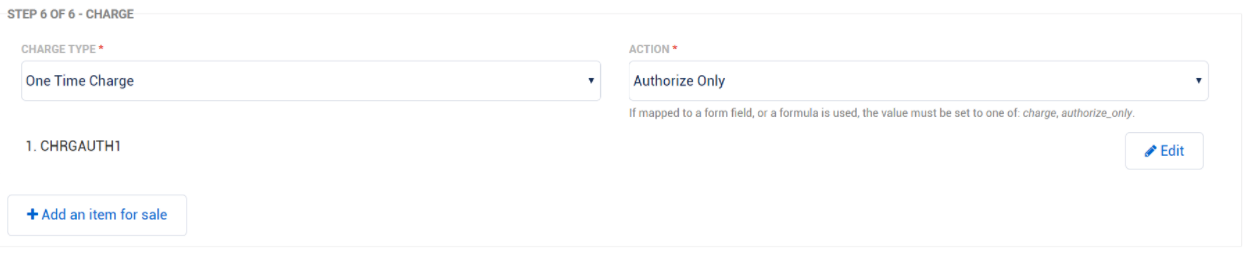
Step 6. Charge Information
Here, you will need to choose if you will be accepting a one-time charge or recurring billing.
One Time Charge
If you select One Time Charge, you will need to configure the item name, unit price, description, and quantity ordered. All of these can be either configured in the form or within the connector.
You can also use the formula editor to define values in the connector.
Using repeated fields and sections within your form will work as expected for single, one-time purchases. Users can add additional repeated fields or sections in your form to multiply the number of one-time items they are purchasing. You can read about using repeated fields here.
Recurring Billing
For Recurring Billing, you will need to configure the payment frequency and charge amount. You can also choose to set up the payment max count if you would like your recurring payment to have an end date.
Additionally, in order to process recurring charges, you will need to enable tokenization on your Chargent gateway page within Salesforce.
Step 7. Save the Connector
When you save your connector, you may see a message that some fields in your form were changed. This is due to the automatic validation feature, which will add validation to any field that did not have one.
Processing Single and Recurring Payments with a Form
It is possible to process both single and recurring payments within a form. In order to enable this setup, you will have to add two separate Chargent Connectors to your connector timeline. This way, you can configure one of the connectors to run for single payments, and the other connector to run for recurring payments. You can read more about this setup here.
For recurring charges, the Chargent connector will only send transaction information to Salesforce and Chargent upon form submission. Therefore, any additional transaction records that are created will be a result of the default Chargent behavior within Salesforce.
Chargent Connector Logs
The Chargent Connector Logs will save information that may be useful depending on your use case and for troubleshooting purposes. Within the logs you can find:
- which opportunity/case object the connector detected to attach a new charge object to
- the ID of the new charge object that the connector created
- the ID of a successful transaction (if any)
- whether billing and/or shipping address has been collected from the form
Using Chargent to Authorize Credit Cards
It is also possible to use the Chargent Connector to authorize credit cards, rather than billing or charging a credit card. This can be useful if you would like to make sure a card is authorized to be charged prior to actually charging the credit card.
Authorizing a card through Chargent is only available for one-time purchases, and cannot be used for ACH/eCheck or recurring charges. If you do select to authorize a card for a one-time purchase, it will not be charged.
In order to set the connector to authorize a card, you will need to change the Action under step 6 to Authorize Only.
Once a card has been authorized successfully, you will see the transaction ID for the authorization in your Chargent Connector Log.

Troubleshooting the Chargent Connector
If you are receiving the error "Please choose an Active Gateway record; status code = FIELD_FILTER_VALIDATION_EXCEPTION", make sure your Chargent Gateway is activated.
Once your Chargent Gateway is active, you can try reprocessing the response that caused the error to make sure the error is resolved.
Aliases
Below are the fields that Chargent automatically adds when you add a Chargent Connector to your form. You can use these as field aliases in your connector.

Map the aliases only for those fields that are actually being populated with values upon submission. The easiest way to do this is to count.
Once you have your aliases, you will need to open the Salesforce Connector that is set up after the Chargent Connector in the connector timeline.
In the screenshot above, you'd be able to use the following:
- %%CHARGENT_ORDER_OBJECT_ID_XXX%%
- %%CHARGENT_ORDER_ID_XXX%%
- %%CHARGENT_TRANSACTION_OBJECT_ID_XXX%%