
Overview
As an administrator of your Enterprise or Compliance cloud instance, you can add, deactivate, restore, or edit users.
We’re excited to officially launch a new licensing model and permission packages for all multi-user FormAssembly plans! This document covers the legacy Enterprise and Compliance Cloud plans. Once your instance has been updated, you can refer to our new User Management and Licensing document.
Requirements
For information on upgrading, please contact our Sales Department at sales@formassembly.com.
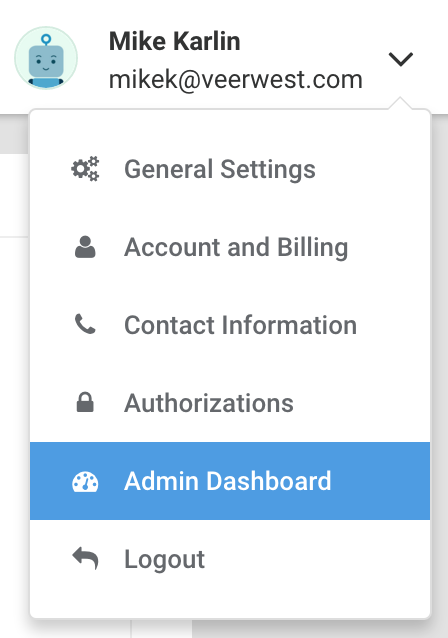
Accessing the Admin Dashboard
To perform the tasks below, you will need access to the admin dashboard. This can be found by going to the dropdown menu next to your name, at the top of the FormAssembly app. From here, you'll be able to select "Admin Dashboard"
Adding a User
- Browse to: Admin Dashboard | Users
- Click Add New User on the left side menu.
- Set the Authentication Type to FormAssembly.
- For On-Site instances, set it to Local Database unless you’re planning to delegate user authentication to an LDAP directory.
- A local database setting indicates that passwords are stored locally and the application authenticates users directly.
- If you would like to use SSO as your Authentication Type, please note that your FormAssembly username should match your SAML or Salesforce username.
- For Role, select from the list of available roles.
- Different roles have different permissions in the application. See Roles & Permissions if you need to create a new role.
Importing from an LDAP Directory (or Windows Active Directory)
- Browse to: Admin | Users
- Click the Import LDAP User button in the top right-hand corner of the page.
- Ensure that the LDAP directory is configured (see FormAssembly On-Site Setup Guide).
- Have the UID (known as "Account Name" in Active Directory) of the user to import.
Deactivating a User
- Browse to: Admin Dashboard | Users
- Select the user you would like to delete, either from the list or through the Search.
- Click the Deactivate link.
- Enter a reason for the deactivation and confirm.
Note:
- Forms that belong to a deactivated user will no longer be available, and the application will no longer accept response submissions for those forms. You must move the forms to another active user before deactivating the owner.
- A deactivated user may no longer log in and access his or her data.
Editing a User
- You may change the username, role, and other options.
- Browse to: Admin Dashboard | Users
- Select the user you would like to edit, either from the list or through the Search.
- Click the Edit link.
- Click Apply when finished.
Restoring a User
- Click the Show deleted users link in the users list.
- Click the Username or the Edit link for the desired user.
- On the User Detail page, click the Restore User link.
Once the account is reactivated, all forms and all previously received responses will become available again.
Changing/Replacing an Account Admin
If you need to change the admin listed on your account, you can edit your existing admin's information to update it. All FormAssembly forms will then be under the new admin's account. Please make sure that your new admin has access to your FormAssembly account before leaving your organization or changing roles.
You will also need to contact our support team so that we can update your account information in our customer database.
You also have the option of replacing your admin account by deleting your current admin account and creating a new one. This can be a more difficult process in terms of moving forms from the old admin account to the new one. We highly recommend contacting our support team to help you move through this process.