Overview
With WebMerge, you can automatically create PDF documents from your responses.
See configuration instructions from WebMerge, or follow the instructions below.
Requirements
You'll need a
- FormAssembly HTTPS Connector
- FormAssembly Essentials plan and higher, or legacy Professional and Premier plans
- WebMerge account
Build Your WebMerge Integration
First, create your form in FormAssembly. Next, you'll want to log in to your WebMerge account and begin creating your document template.
When building your form, please note that repeated fields and sections cannot be sent to WebMerge for the creation of your PDF.
WebMerge Template Creation
In the WebMerge document template, you will need to use WebMerge syntax to create aliases for the specific fields you are planning to send over. These aliases will need to exactly match the values you use in the HTTPS connector.
For example, if you set up your WebMerge template like the example below, using the FormAssembly field aliases for each field you are sending over, then your HTTPS connector mappings would need to reflect that.

You can use any alphanumeric value in your Webmerge template, so long as that value exactly matches what you define in your HTTPS connector. Avoid using spaces and special characters for these values.
Once you complete your document template in WebMerge, you will need to copy the Merge URL that is provided. This value will be pasted into your HTTPS connector.
HTTPS Connector Configuration
To set up your HTTPS connector, open the Connectors page for your form and add the connector to the Form Submitted portion of the timeline.
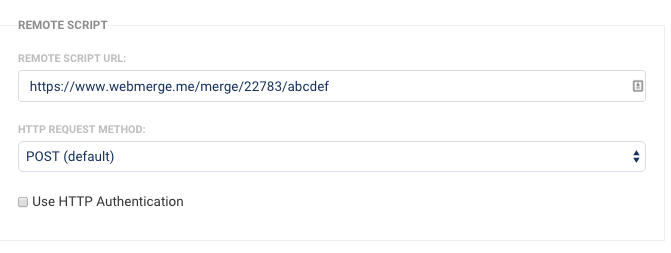
As mentioned above, you will need the Merge URL for your WebMerge document. Paste this URL in the Remote Script field of the HTTP Connector. Leave the HTTP Request Method set to POST.
Finally, add in your field mappings. As mentioned above, these field mappings need to exactly match the aliases you defined in your WebMerge template.

Send a PDF through Connectors & Emails
It's possible to get the PDF created in WebMerge to return to FormAssembly and saved as a file. This will also allow you to send the file through email notifications, to Salesforce, and other services through the connectors.
To get a file returned from WebMerge, you'll need to add ?download=1 to the query string where the data is being sent.
Example Remote Script URL for the HTTPS Connector
https://www.webmerge.me/merge/6242/ekyx4?download=1
This will send the data to WebMerge and send the PDF back to FormAssembly so that it can be stored there or sent to another system through the connectors.
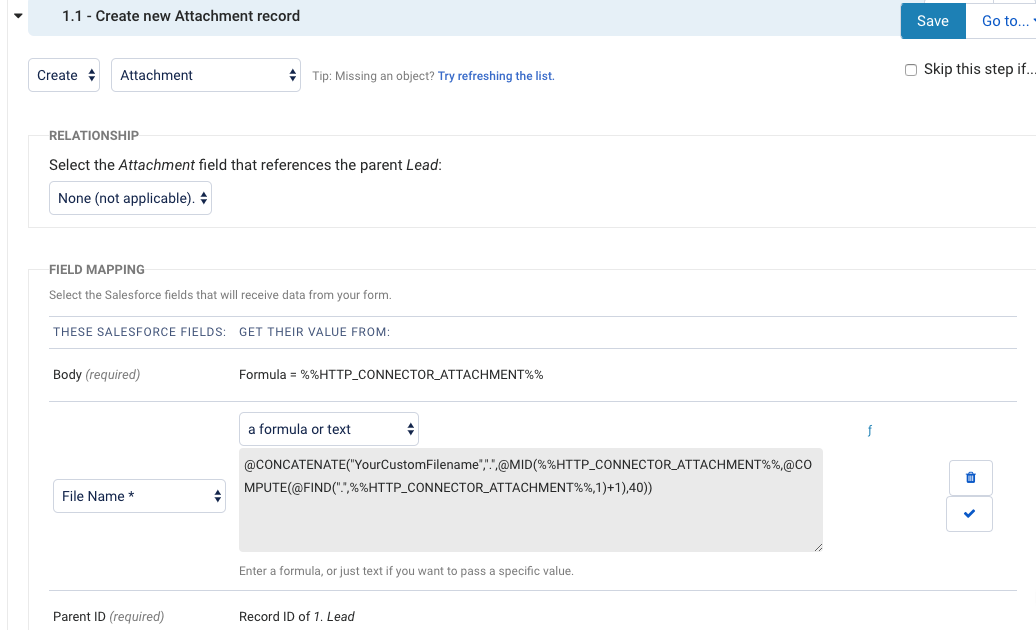
Send a PDF response to Salesforce with a Custom Filename
@CONCATENATE("Your Custom Filename",".",@MID(%%HTTP_CONNECTOR_ATTACHMENT%%,@COMPUTE(@FIND(".",%%HTTP_CONNECTOR_ATTACHMENT%%,1)+1),40))You need to map %%HTTP_CONNECTOR_ATTACHMENT%% in both the filename and body in your connector. The above formula will allow you to send a response in PDF to Salesforce with a custom filename.

Send a PDF response to Salesforce via Salesforce Files
Aside from sending the PDF returned from WebMerge as an attachment, you can also send it via Salesforce files. You would need to add a Content Version step in your connector.
1. Create a new "ContentVersion" step in your Salesforce Connector.
2. Map the Version Data and Path on Client fields to a formula with the value %%HTTP_CONNECTOR_ATTACHMENT%% - this is the alias of the file returned from WebMerge.
3. For the First Publish Location ID, map it to the ID of the object you want to associate the file with.
For example, if you were going to associate the file with a contact, the Contact creation step would need to come before the ContentVersion connector step, so that its ID could be referenced here.
4. Map the Title field to the upload field of your form. Alternatively, you can map it as a formula with a custom value for the title. This will rename your file when it is sent to Salesforce. This is explained in the example above this section.
5. Map the Content Origin field to a formula with a value of "C." Mapping a "C" means that the Content is from a library (or an external source).
6. Finally, for the Content Location, map to a formula with a value of "S." This means that the the file will be within Salesforce.

Visit our help document on Sending a form upload to Salesforce files for more information.
Download Link and File Aliases
If you would like to send a download link to the PDF through an email response or a connector, you can use the following alias, however, this will only provide a link, not the actual PDF file.
%%HTTP_CONNECTOR_ATTACHMENT_UNPROTECTED_URL%%
To send the actual PDF to Salesforce or through another connector, you will need to use this alias, which will attach the file:
%%HTTP_CONNECTOR_ATTACHMENT%%
Working with Authorize.Net
If you would like to send an Authorize.net transaction ID to your WebMerge PDF, you will need to map the %%AUTHORIZE_DOT_NET_TRANSACTION_ID%% alias in the HTTP connector. Please make sure that it is written exactly as it is shown here.
In your WebMerge template, you will need to add the alias as AUTHORIZE_DOT_NET_TRANSACTION_ID without the double percent signs surrounding the alias.
