Overview
With FormAssembly's iATS Connector, you can easily process one-time credit card payments, set up recurring credit card payments through subscriptions, process ACH or Direct Deposit payments, and create new customers in iATS.
This connector is available for Professional Plans and above, and must be set up on a form-by-form basis.
If you have an iATS account, you can follow the steps below to configure the connector and begin processing payments.
We also recommend reading more about how you can use reCAPTCHA to prevent spam submissions, as well as our Connector Labels to keep your connectors organized.
Sensitive Data Notice
Credit Card Numbers and CVV Codes must be marked as Sensitive Data. Please click here to read more about these fields.
Getting Started
There are no definite restrictions on what your form may contain or what you may sell with it, but this service is better suited for simple situations, where:
- You do not have a fixed inventory to manage.
- Shipping & handling fees and taxes are applied to the total price.
Here are a few examples:
- Accepting donations (both one-time and recurring).
- Selling intangible goods such as music (MP3s), software, eBooks, etc.
- Charging a membership or an admission fee.
- Charging a flat fee for consulting services.
- Selling physical goods, to the extent that inventory is not an issue.
Requirements
You'll need an iATS account and FormAssembly's Payment Connector Add-on.
Required Fields
As you build your form, make sure to collect the following credit card information:
- Credit card number
- Credit card expiration date (month and year in two separate fields)
- Credit card security code
- Cardholder's full name
- Cardholder's email address
If you are planning on processing ACH payments, you'll also need to collect the following bank account information:
- Bank Account Number
- For US accounts, this is equal to the routing number + the account number
- For Canadian accounts, this is equal to the bank number + the transit number + the account number
- Bank Account Type (Checking or Savings)
- Account Customer Name
If you are building your form from scratch, check out our predefined content to easily add a payment information section.
Configuration Steps
- Step 1. Your iATS Authentication
- Step 2. iATS Configuration & Payment Method
- Step 3. Credit Card Information
- Step 4. Billing Details
- Step 5. Subscription Information
- Step 6. One-Time Charges
Once your form has been created, and you know what types of items or services you'll be selling, you're ready to begin!
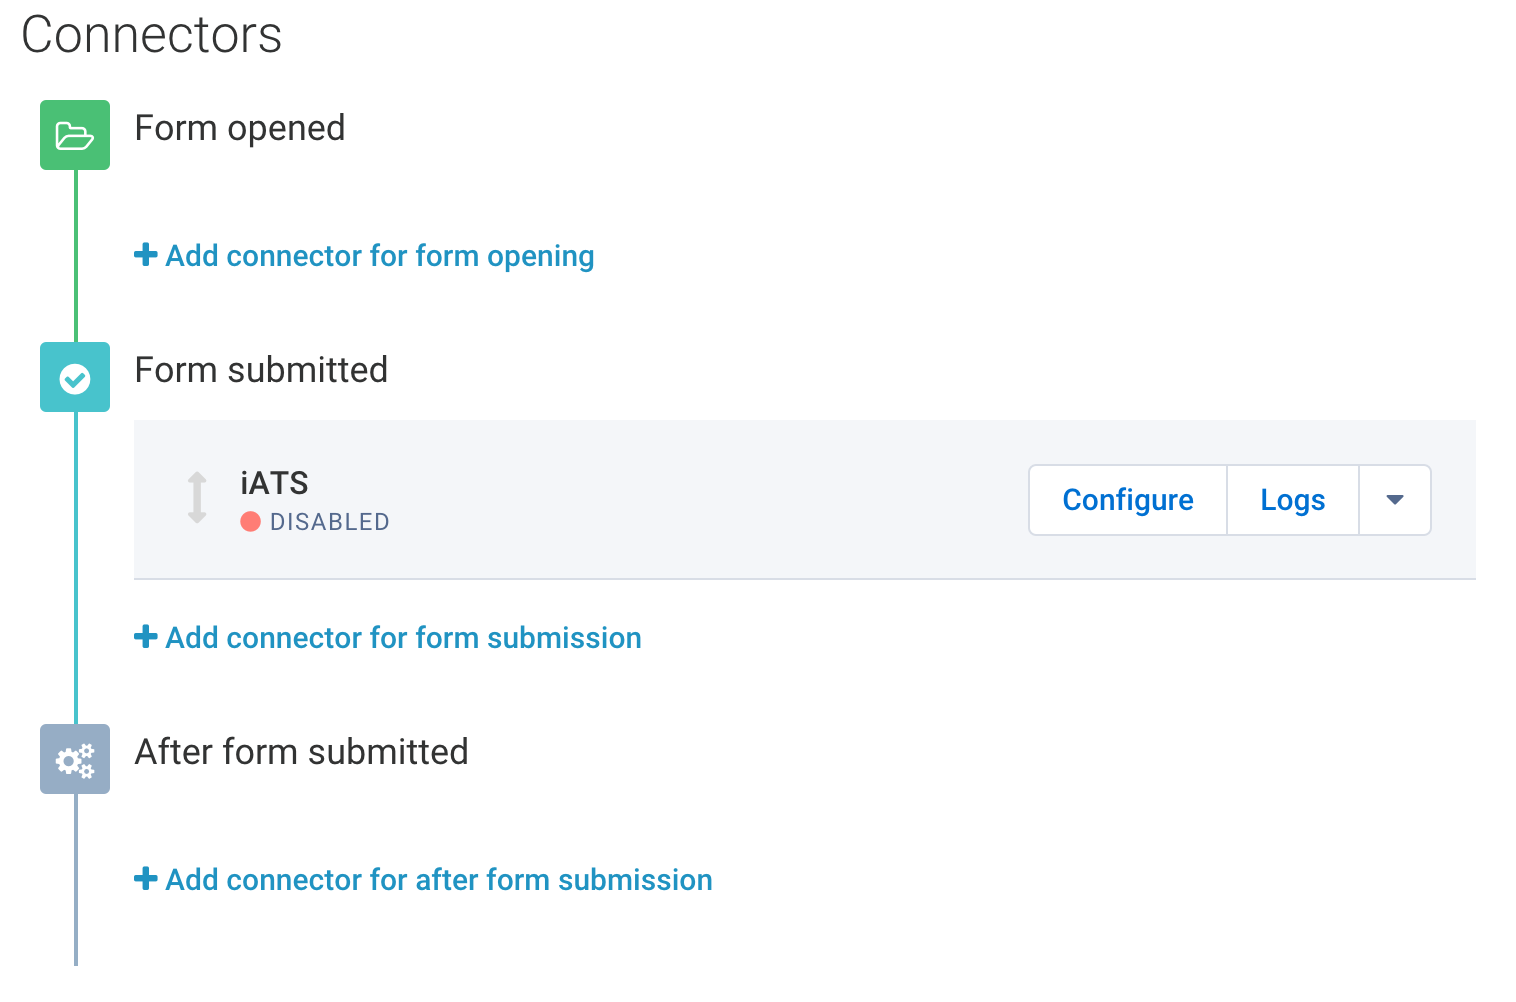
First, go to the Connectors page and add the iATS Connector to the Form Submitted portion of the timeline. Click Configure.
Step 1. Your iATS Authentication
The first pieces of information you will be asked for are your Region, Currency, Agent Code, and Password. For sandbox mode, you can use TEST88 for both the agent code and password.

Step 2. Your iATS Configuration
Once you have completed Step 1, you'll need to decide if you'll be accepting Credit Card payments or ACH / Direct Deposit payments.
If you plan to create a form that gives users the option of choosing between the two, you'll need to create a separate connector for each payment type.
It's also important to note that ACH / Direct Deposit is currently only available for the North American iATS server and not for the UK.
You can also use our Formula Editor while you are mapping information to any of the fields in the iATS connector. If you are mapping to any repeated fields, please read this article to learn more about how they will work in conjunction with the iATS connector.
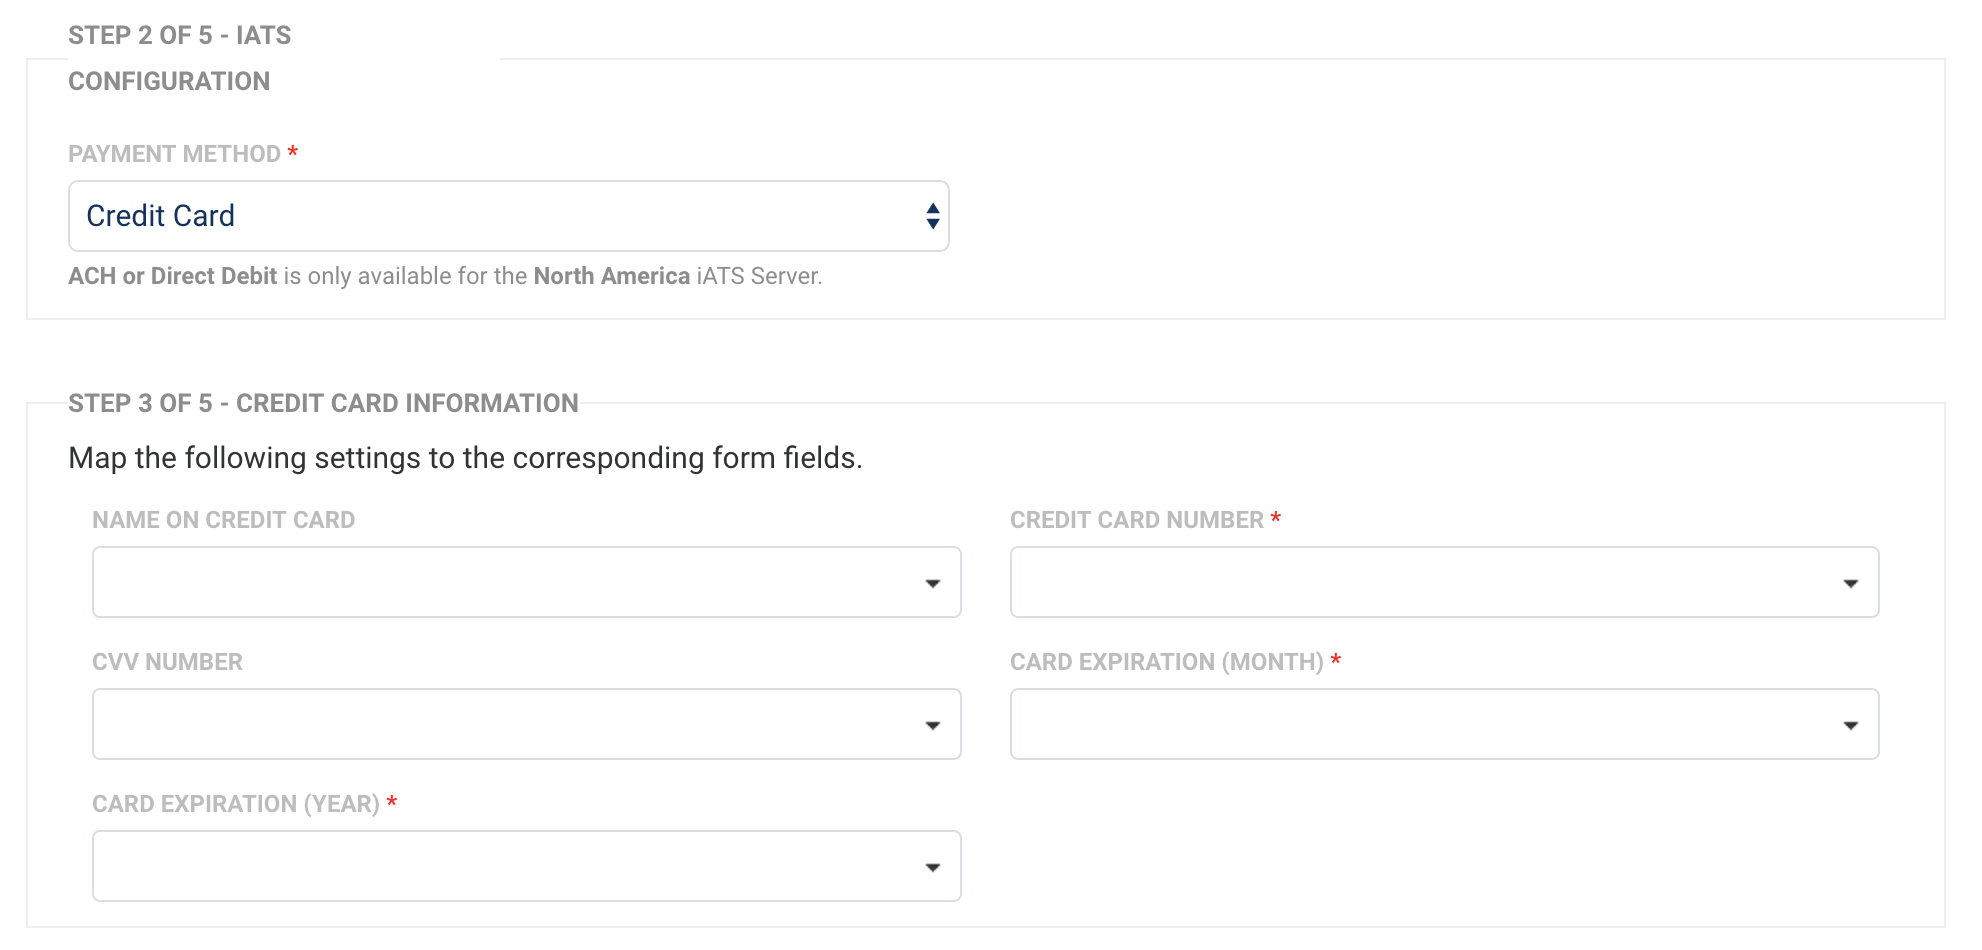
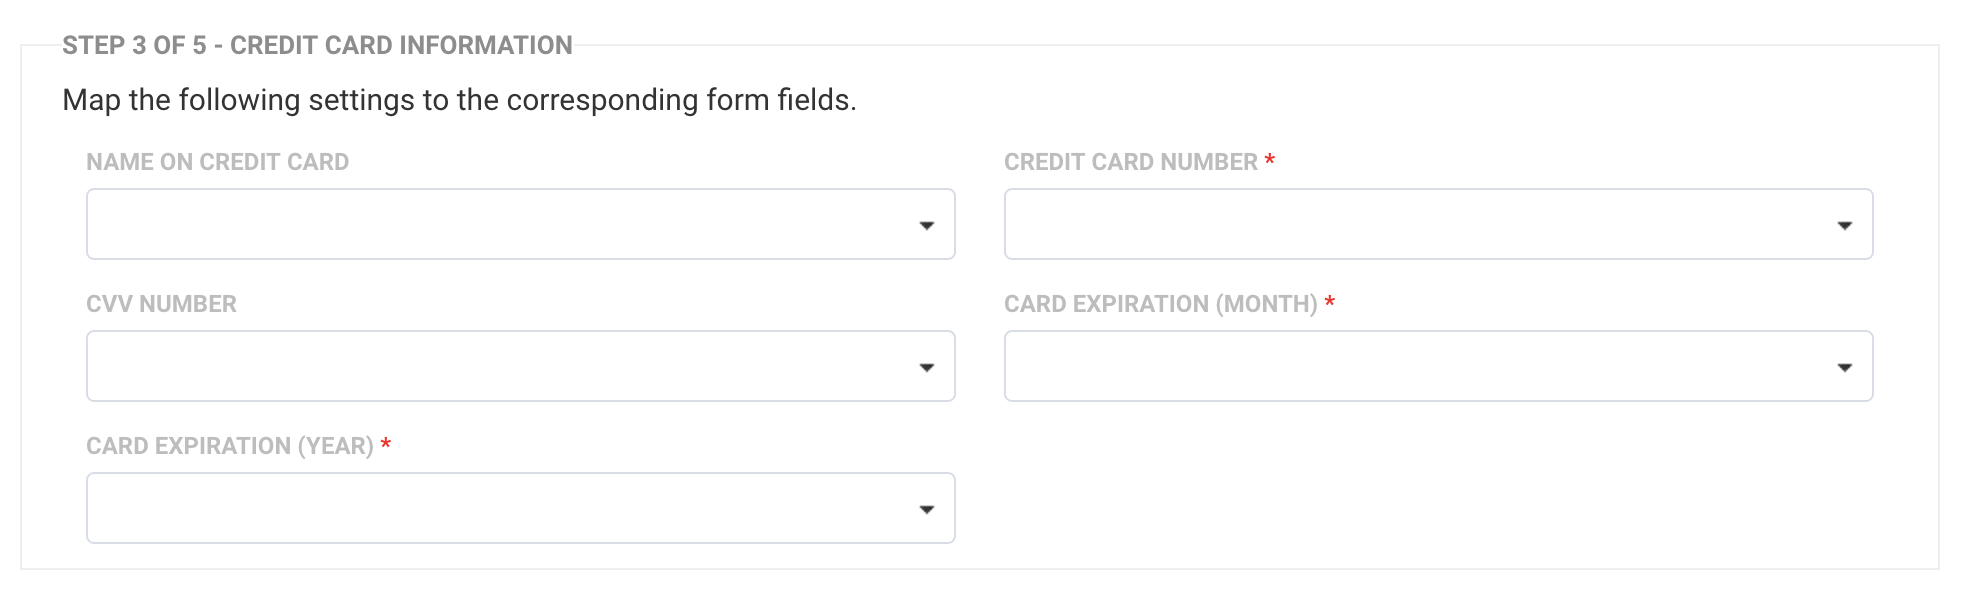
Step 3. Credit Card or Bank Account Information
Once you've entered your authentication and configuration information, you'll need to begin your field mapping so that the connector will know which fields in the form to pull credit card or bank account information from.
To do this, click on the dropdown menu next to each field and select the field in your form where this information will be entered.
Please note that expiry dates may only be two digits. If you are using a dropdown menu to select an expiration date with a full year value (e.g. 2018), you will need to map that as "18" in the connector.
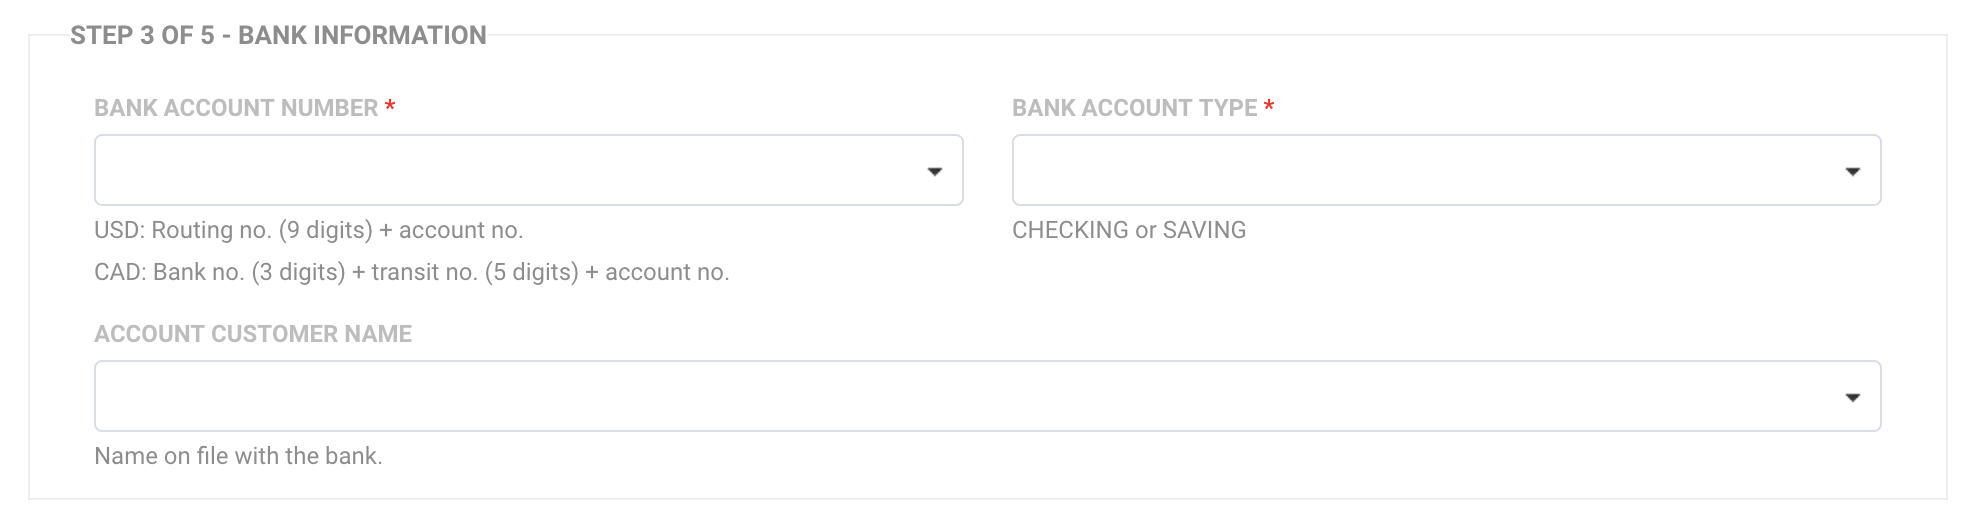
When setting up your connector to process ACH payments, you will need to use one of the solutions below in order to create the Bank Account Number field. This is because the Bank Account Number field is composed of multiple form fields (as seen in the small gray hint text under the Bank Account Number field).
For example, for USD currency, the field is composed of 2 numbers: routing number + account number.
Unfortunately, formulas are not available for this connector mapping (due to issues with sensitive data collection), and a form field must be mapped directly to this connector field. Since formulas cannot be used there are two solutions that you can use to create the mapping for this field.
Solution 1. Have a single field in your form which asks the respondent to enter both their routing number and their account number in that field. You can then map that field directly in the connector.
Solution 2. Have two fields in your form: one for your respondent's routing number and one for their account number. This approach is more logical from the respondent's point of view, however, it requires additional configuration on your end in order to combine those fields using a calculation in your form.
Unfortunately, it is not possible to concatenate the fields using a calculation, as that will simply add the routing number and account number together. In order to resolve this issue you should:
1) In the form builder, mark your routing number field as a variable and name it "routing". Also, mark your account number field as a variable and name it "account".
2) Create a hidden field in your form, mark it as a variable field named "prefix" and set its default value to "p"
3) Create a hidden Bank Account Number field, mark it as a calculated field, and use one of the following formulas:
For CAD: ('000'+banknum).substr(-3)+('00000'+transit).substr(-5)+(prefix+account).substr(1)
For USD: ('000000000'+routing).substr(-9)+(prefix+account).substr(1)
4) Map your hidden Bank Account Number field to field in the connector.
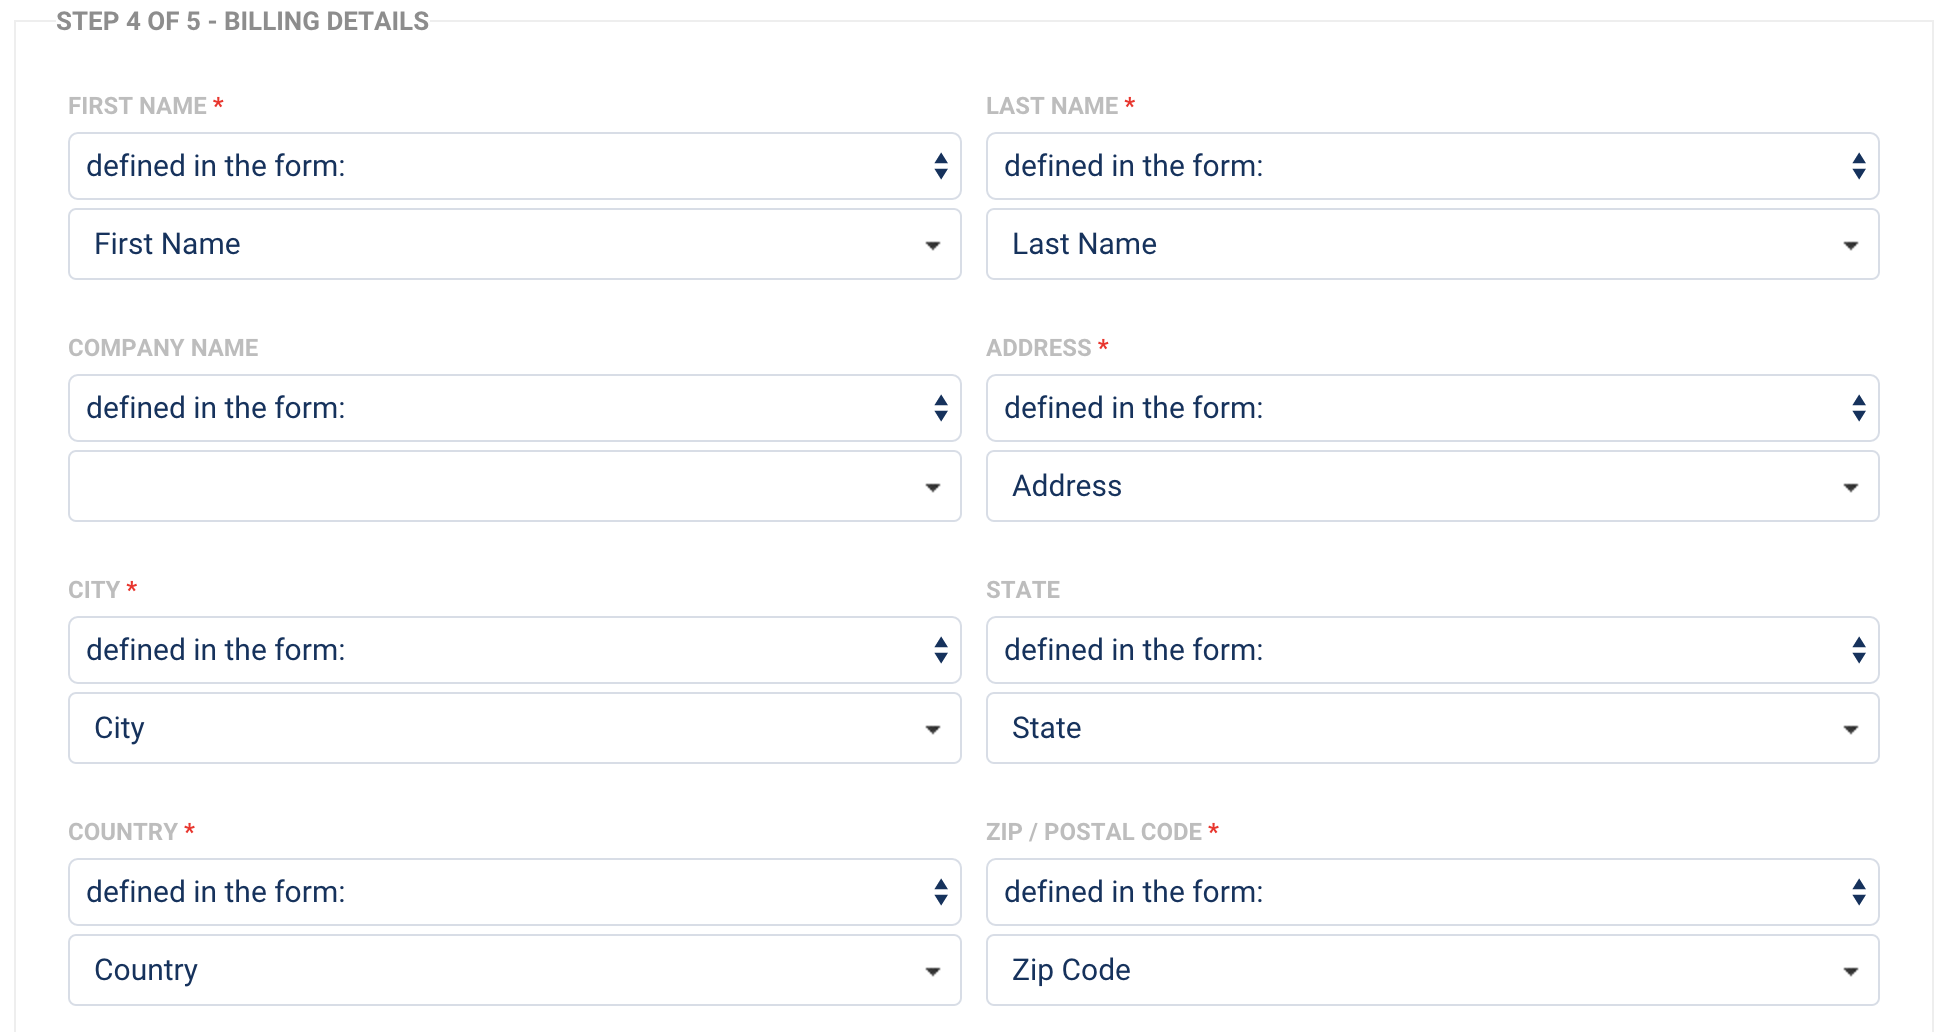
Step 4. Customer Billing Information
Once you have mapped the credit card or bank account information, you can do the same for the customer's Billing Information.
Again, you can click on the dropdown menus next to each field and select where you will define your values. In general, these values will be defined by fields in your form, and if you choose to map this information, you will need to select which field corresponds with which value.
You will also need to make sure that all required fields have been mapped, which includes First Name, Last Name, Address, City, State, and Postal Code.
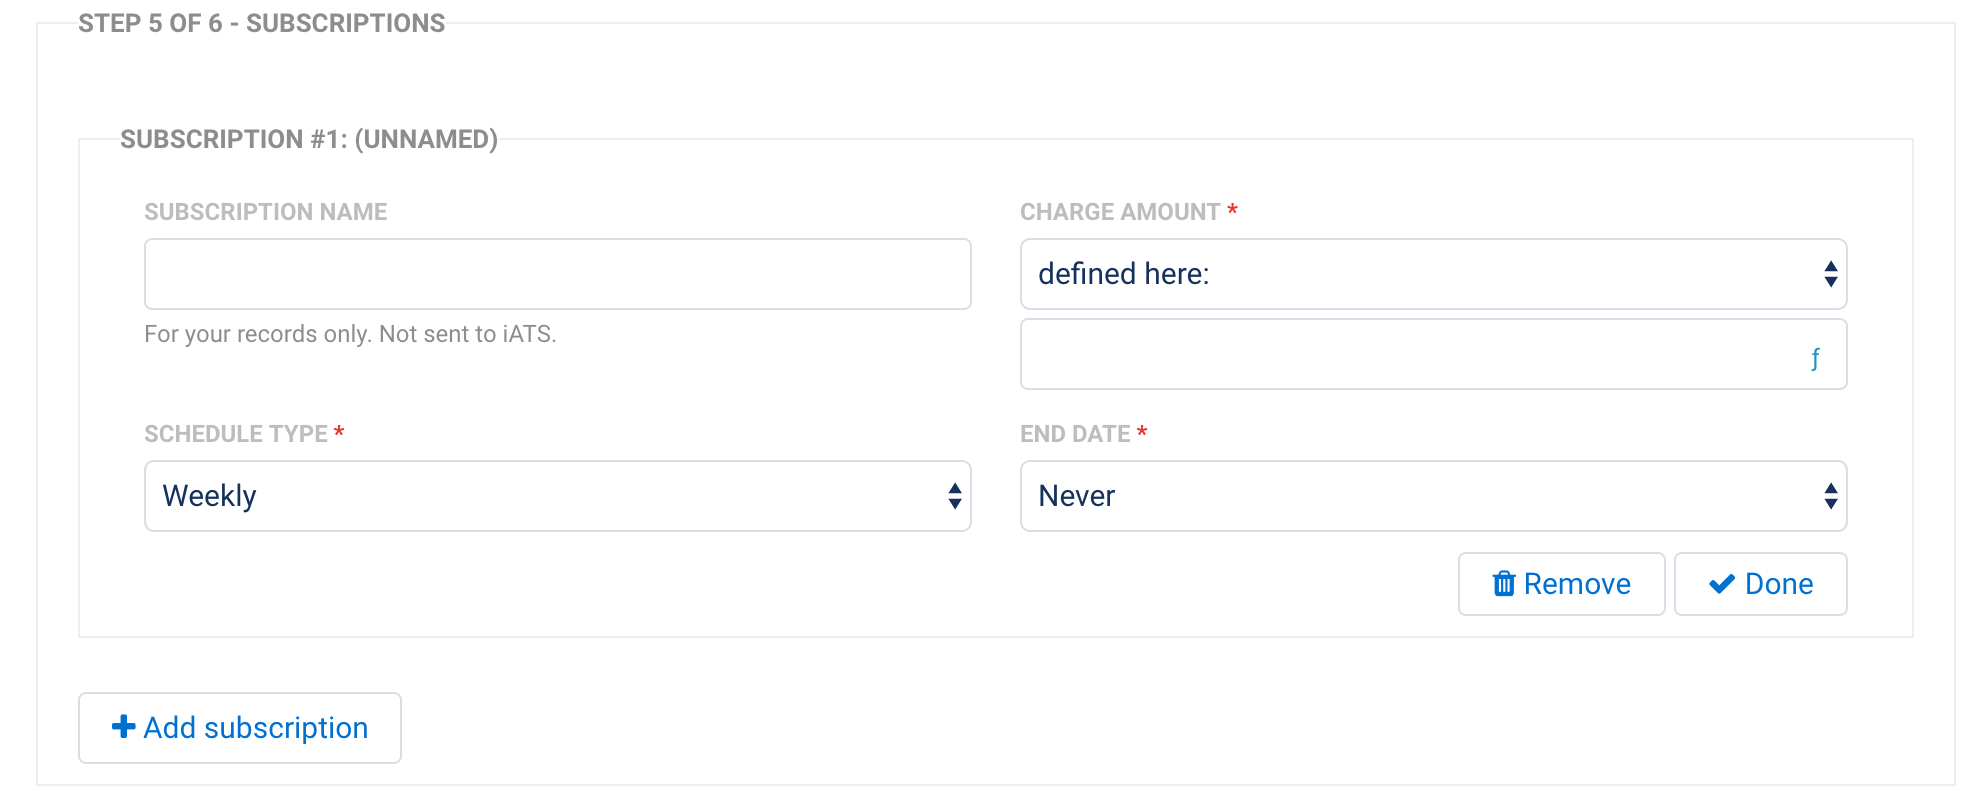
Step 5. Subscriptions
If you plan on setting up recurring payments, these can be handled here as subscriptions.
You can begin by providing an optional subscription name, which will not be sent to iATS.
You will also need to fill in the required fields of Schedule Type, Start Date, Charge Amount, and End Date all of which are discussed in detail below.
As with the mappings above, you have the option of defining these values here inside the connector, using formulas, or they can be values that are defined in a particular field in your form.
There are two ways of setting up a subscription when working with iATS
- Setting the Start Date in the future will cause the connector to make the initial charge by issuing an additional API call (with using the same token)
- Setting the Start Date to any date (the form submission date is also accepted), will cause the initial charge to be made by iATS automatically.
When a subscription is created, a customer code token will always be created, but you have the option of creating a recurring token with its start date set to the next billing date. The initial charge is then made immediately using the same token. This option is explained in detail below.
This means that the subscription token will show the first transaction in its list of transactions, but the start date will be set to a later date.
For example, if a subscription is created on 12th Nov and is set to charge monthly:
- The initial charge is made on 12th Nov
- The subscription start date is set to 12th Dec
Start Date Field
When defining a value for the Start Date field, there are a few important considerations to keep in mind.
Immediately Option
If this option is selected, the behavior is as follows: when a subscription is created, a recurring token is created with its start date set to the next billing date. The initial charge is then made immediately using the same token.
Pros: Immediate credit card validation. If a credit card can't be charged, the form won't submit.
Cons: This can't be set to future date, it's essentially "hardcoded' by the form creator to start the subscription immediately and make the first charge upon form submission.
Use a Formula Option
If Use a Formula is selected, you can choose the Start Date by entering a formula.
Defined in the Form Option
If Defined in Form is selected, you can set the Start Date based on a field in the form.
Contrary to the "Immediately" option, the other two options will work as follows: on this date, the card will be authenticated, and if successful, the first charge will occur. Any subsequent transactions will happen at each scheduled interval. There will be no initial charge made by the connector making a separate API call to iATS; the first charge will be processed by iATS automatically.
Accepted date formats:
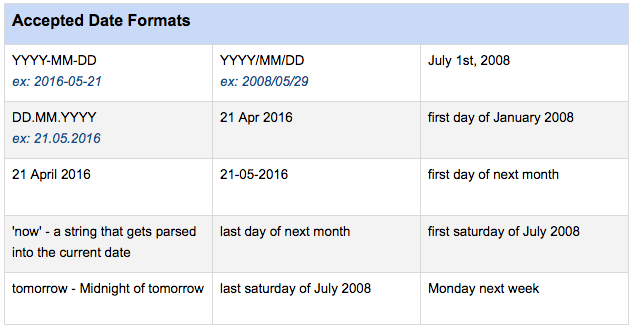
Please note, you can also use the standard US MM/DD/YYYY format when sending dates to the iATS connector. Based on the localization setting for your form, the connector will determine whether to send the date in standard US format (i.e. MM/DD/YYYY) or UK format (i.e. DD/MM/YYYY).
For configuration flexibility, both the result of a formula or the value that comes from a form field can also return the "immediately" value (with no quotes, case-insensitive), in which case the behavior will be the same as if the "Immediately" option is selected from the dropdown list.
End Date Field
The End Date Field is used to determine when a recurring subscription will end. From the dropdown menu, you can choose to either use a formula to define this value or have this value be defined in the form. If you choose to use a formula, it may be:
- A date (please see the accepted date formats above)
- an integer number (e.g. 30) for the number of days after the Start Date
- "never" (case-insensitive, without quotes) for no end date
If Defined in Form is selected, you can set the End Date based on a field in the form. The field value should take the same values as listed above for the formula.
Schedule Type Field
When choosing a schedule type for a recurring payment, you have four options: Weekly, Monthly, Quarterly, Annually.
These four values can either be pre-selected by you in the connector, returned by a formula, or defined by a field selection in the form.
This allows you as the form creator to either preselect the schedule type or allow the respondent to choose from a list of the options in the form (e.g. by using a dropdown menu).
Step 6. One-time Charges
Finally, you also have the option of adding one-time charges. It is possible for a single form to handle both recurring subscriptions and one-time charges.
In this section, you will need to provide an Item Name as well as the Unit Price and Quantity Ordered. You can also provide an optional description for your personal use.
As with the steps above, you'll need to decide if these values will be defined within the connector, or pulled in from fields in your form.
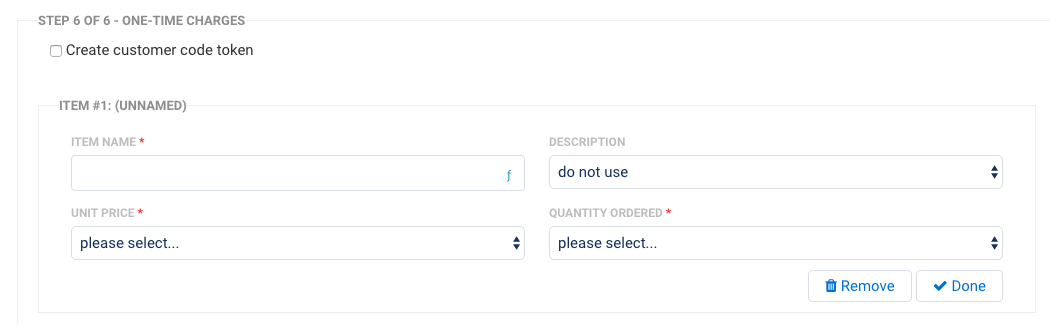
As soon as at least one item for sale is added, a checkbox controlling customer code token creation will be shown (see below). By default, this box will be unchecked. This allows you to control whether a customer code token will be created for the corresponding one-time charge transaction.

Once you are finished with your mappings, make sure to hit the Save Button, and then you're ready to begin testing!
Use-Case Examples
Below you will find three common setup examples for various payment scenarios that are commonly used with the iATS payment connector.
Example 1 - Never-Ending Annual Subscription
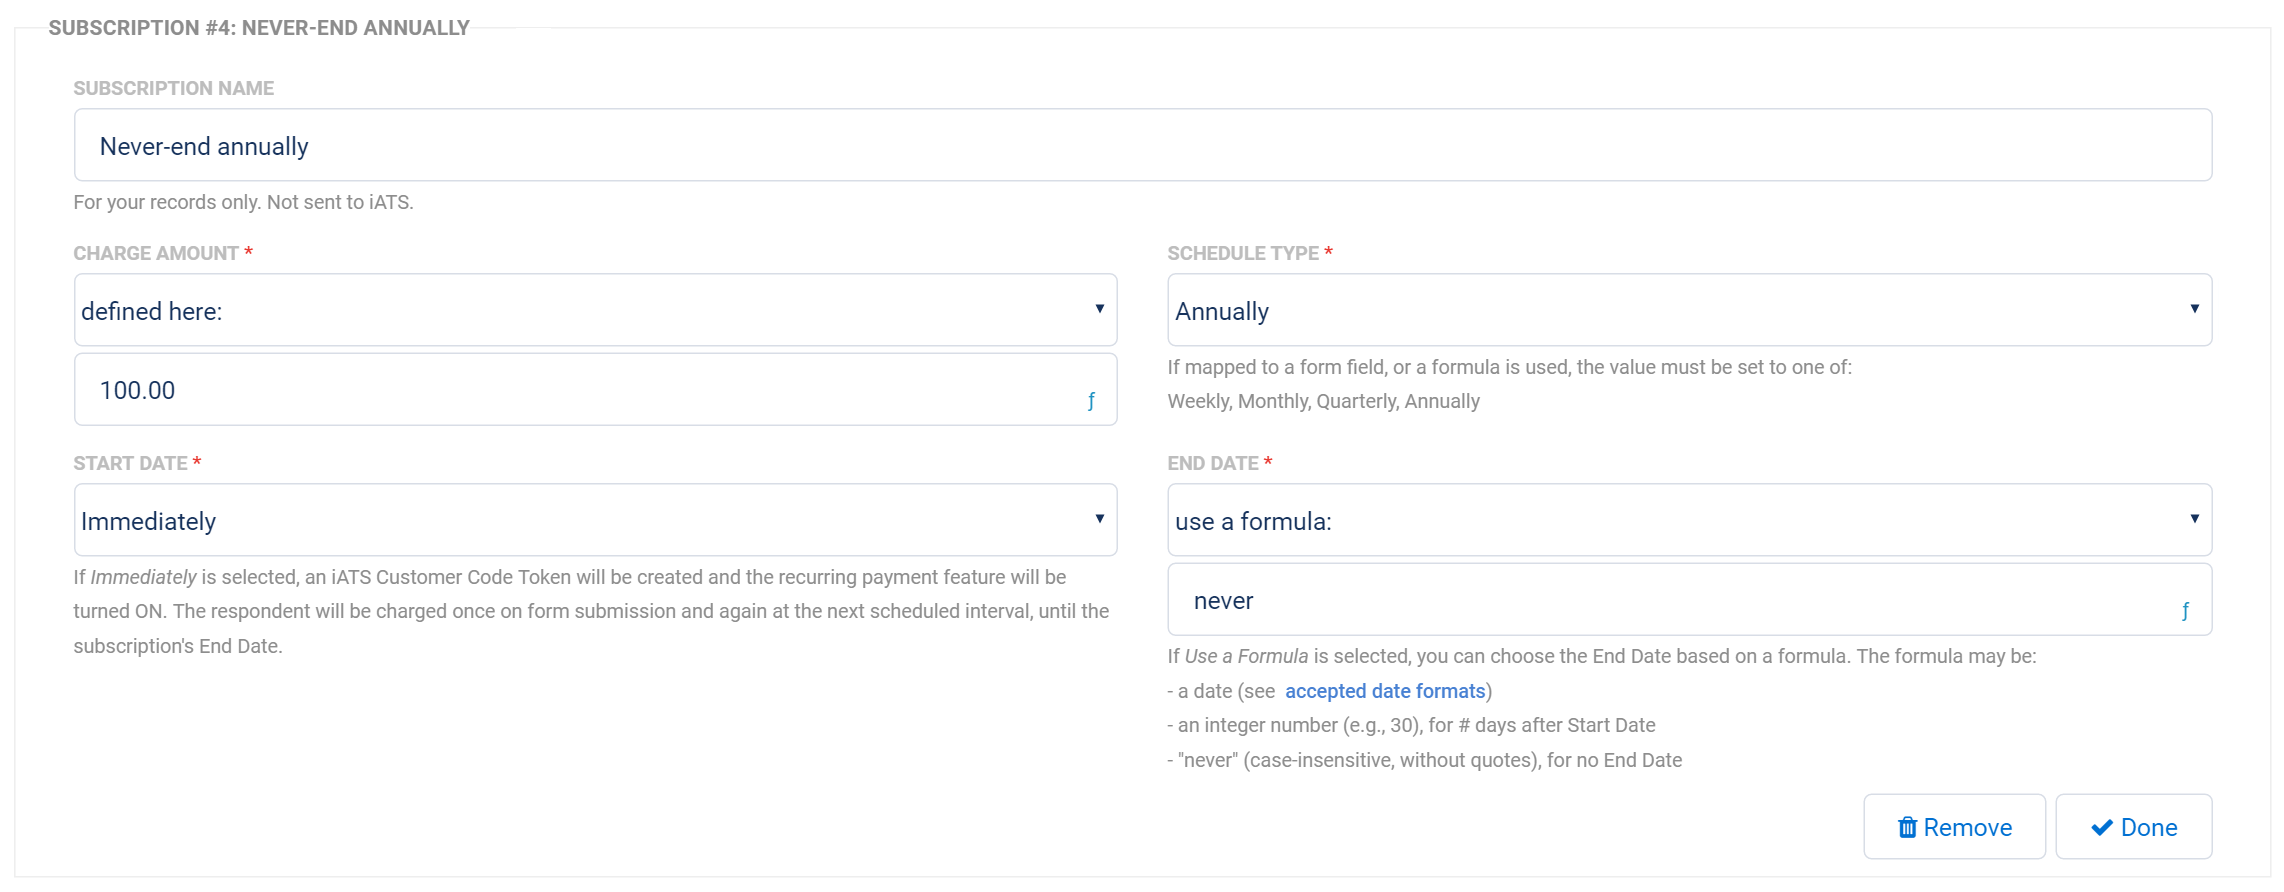
In this example:
- The credit card token created with the Start Billing Date will be set to the same day in the following year
- $100.00 will be charged immediately
- The subscription will never end
Example 2 - Donor Specified Subscription Frequency and Amount
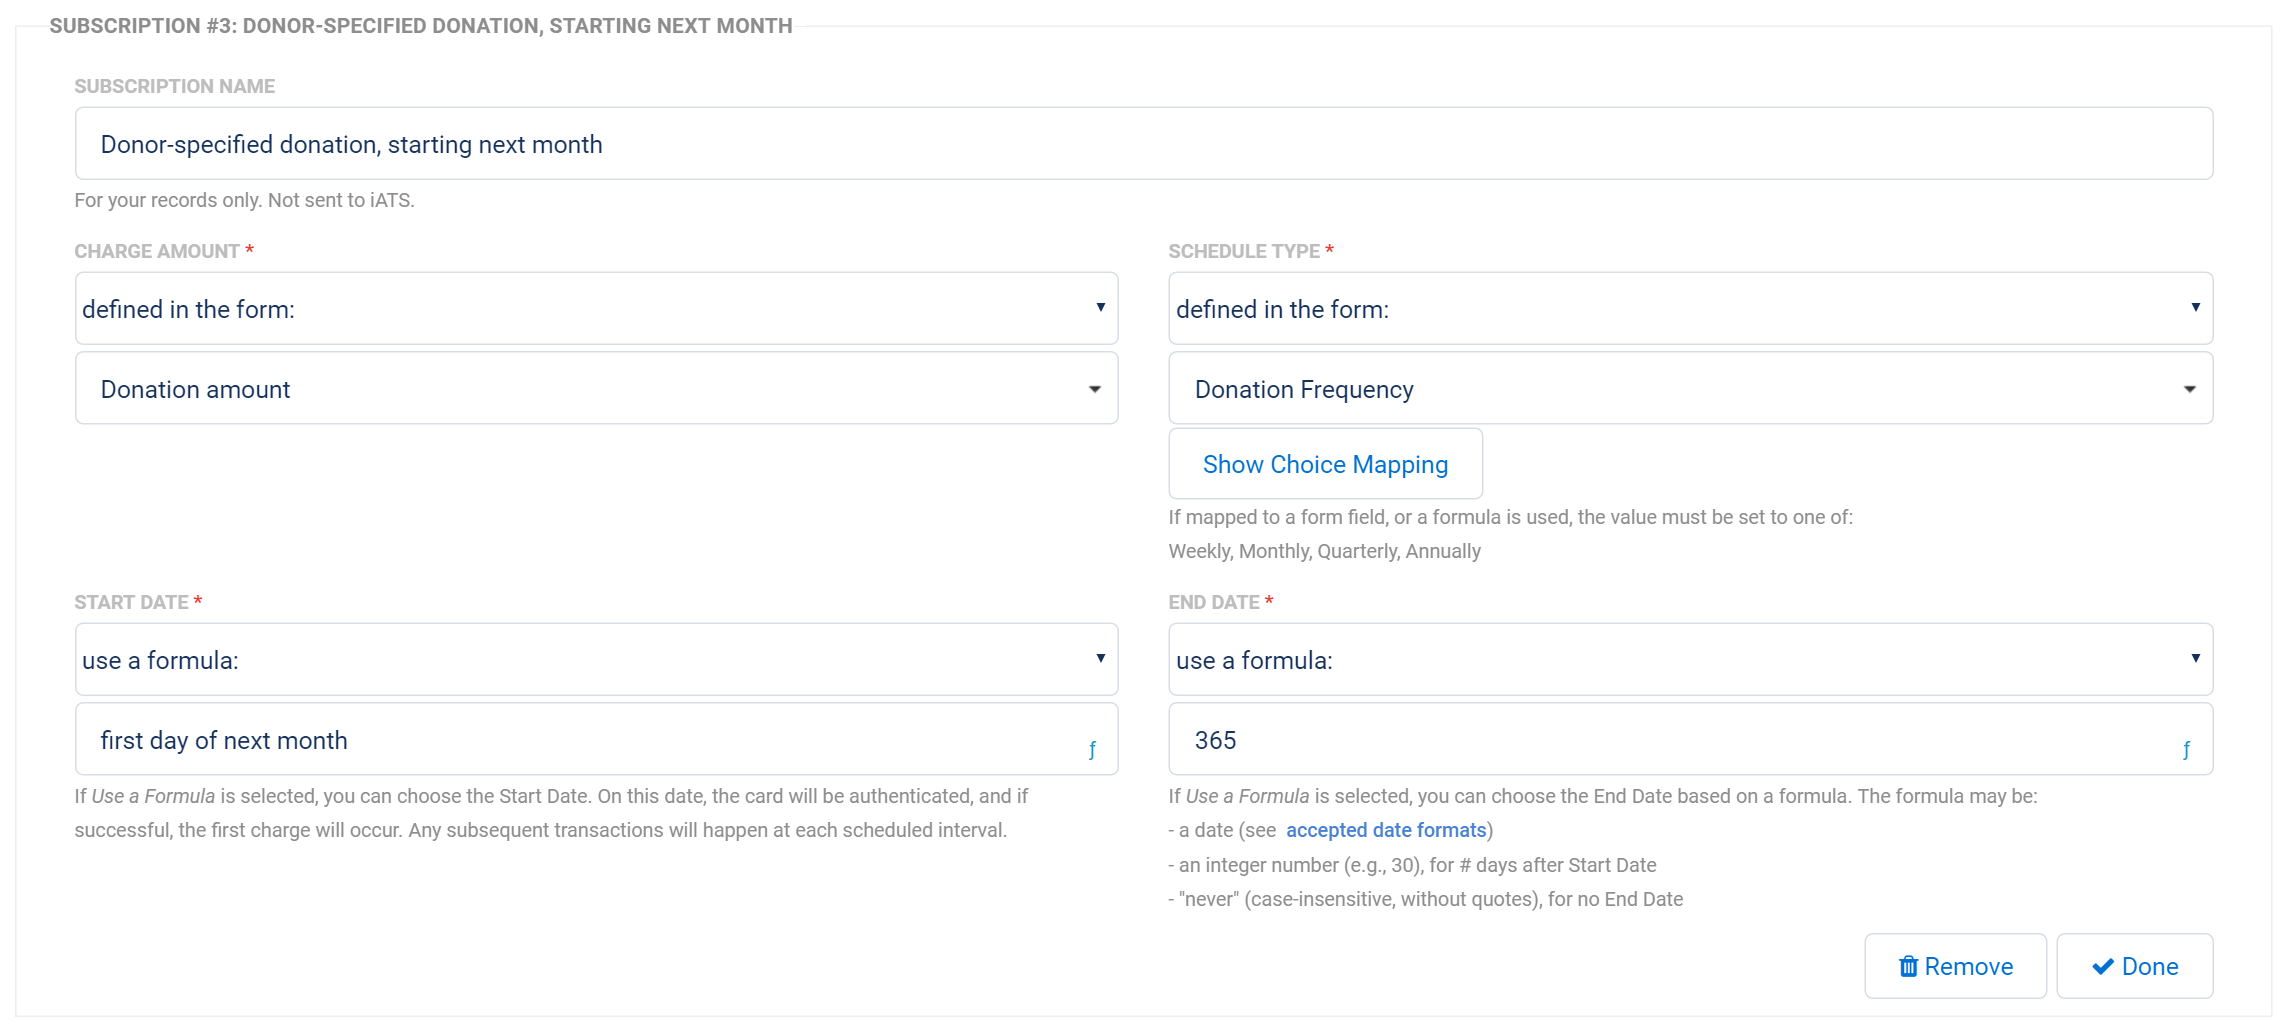
In this example:
- The donor will enter the donation amount
- A Customer Code Token with recurring ON will be created, with the starting billing date on the 1st of next month
- The donation period lasts for 1 year (= 365 days) after it starts
- The donor selects the donation frequency; the setting is mapped to a menu from the form and configured as follows:

Note how you can show a choice named "Yearly" to the donor, but convert its value to "Annually" in the connector, which is the correct value for the subscription frequency.
Example 3 - The Donor Selects the Subscription Length from a List
In this example, we would start with a dropdown menu and give our users three options to choose from: Never ends, 1 year, 2 years.
Then, we would map that field to the End Date in the connector:
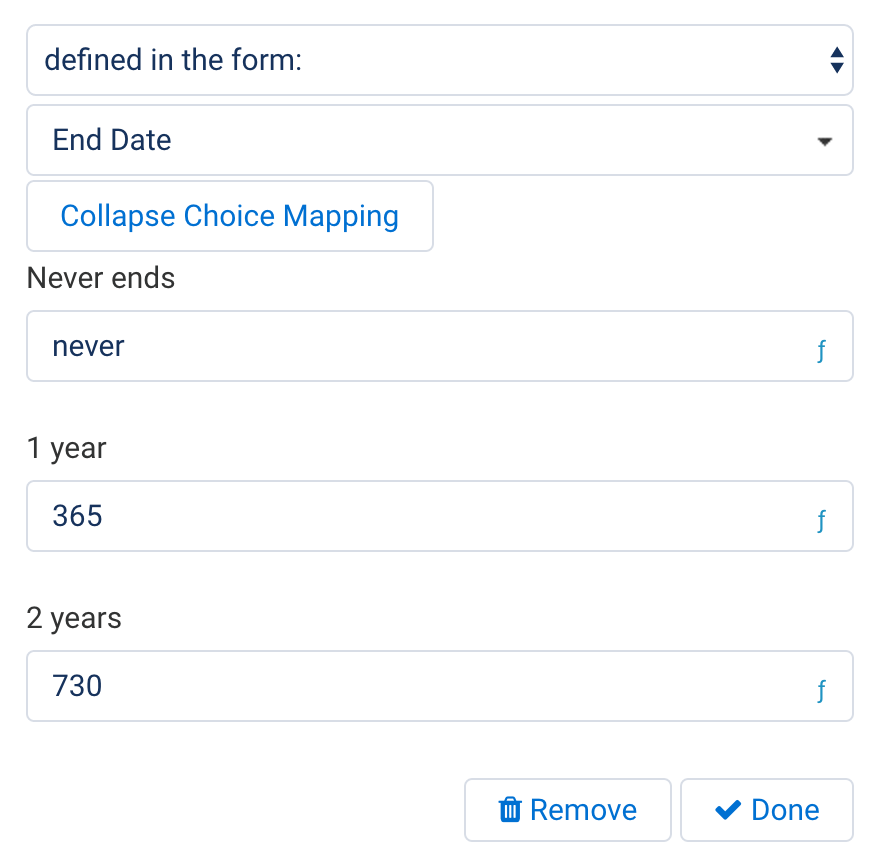
If the donor chooses "1 year", we set the setting value to 365. Because it is a number, the End Date will be set to the day that many days after the Start Date.
Alternatively, you can create a date input in the form for Start / End Date and let the respondent pick a date in a calendar.
Processing Single and Recurring Payments with a Form
It is possible to process both single and recurring payments within a single form and a single connector. You can read more about this setup here.
Customer Tokens
A customer token in iATS is always created with each recurring transaction. With a one-time transaction, you have the option of creating a customer token as outlined above in the one-time charges section.
Automatically Created Hidden Form Fields
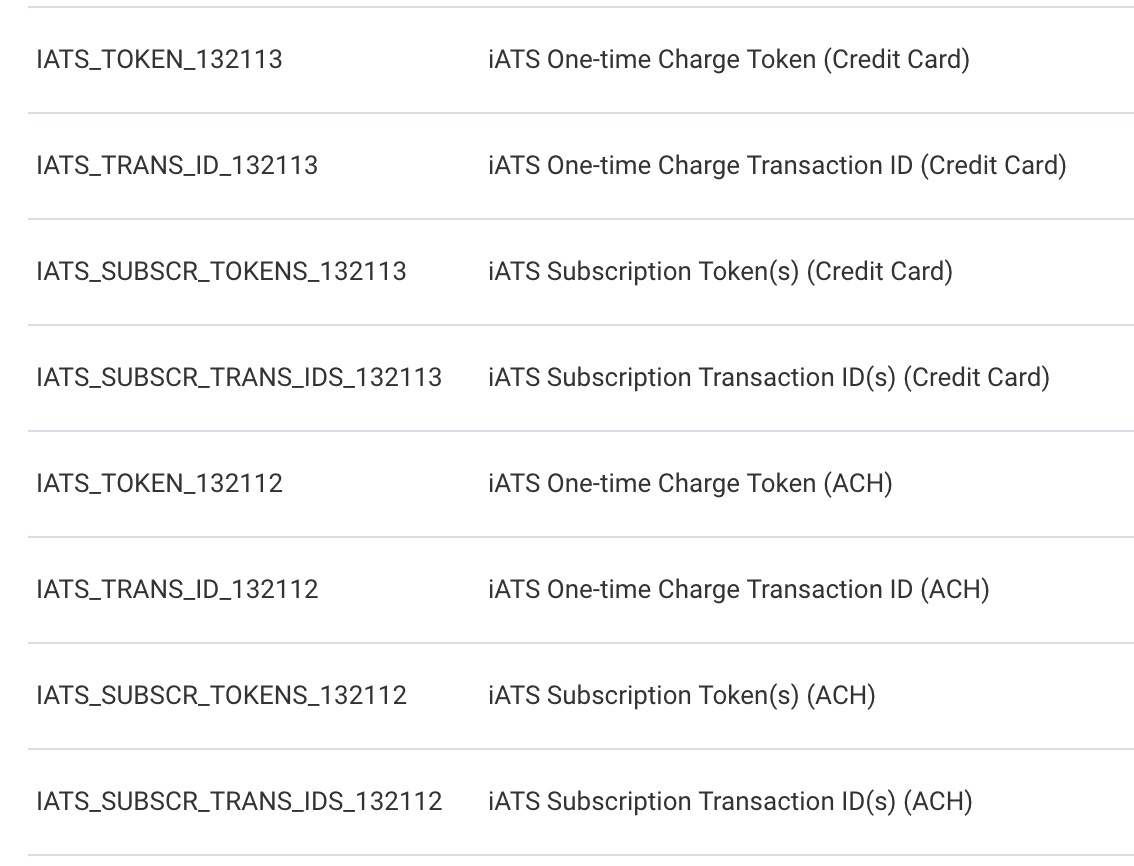
As soon as you add in the iATS connector, the following hidden fields are automatically added to your form:
- iATS One-time Charge Token
- iATS One-time Charge Transaction ID
- iATS Subscription Token(s)
- iATS Subscription Transaction ID(s)
These fields are filled automatically for every response and hold necessary values that the connector will send to iATS.
If you have multiple iATS connectors configured for your form, you will see these fields created for each connector separately, and all of them will be visible for every response.
If there are multiple recurring tokens created, they will be listed in the following two fields as comma-separated values (for example A17327480, A17327481, A17327482):
- iATS Subscription Token(s)
- iATS Subscription Transaction ID(s)
While there will always be a token created for every subscription, this may not be the case for Transaction IDs. For those transactions which do not have their start date set to "Immediately", the connector won't make the first charge immediately upon form submission, so there won't be a Transaction ID for such subscriptions. If this is the case, an empty string will be added to the comma-separated list.
For example, the following comma-separated values for Transaction IDs:
A90D9FC8, , A90D9FC9
would mean that the 1st subscription was created and the respondent was charged immediately with Transaction ID = A90D9FC8. The 2nd subscription had not been configured to make an immediate first charge (Start Date is not set to "Immediately"). The 3rd subscription, again, had been configured to start immediately and make the first charge instantly, the Transaction ID was A90D9FC9.
Finally, connector labels will be appended to the field names in parentheses, if there are any.
iATS API Uses
For both recurring transactions and one-time charges, the following API calls are executed:
- createCreditCardCustomerCode / createACHEFTCustomerCode
- processCreditCardWithCustomerCode / processACHEFTWithCustomerCode
For subscriptions with no Start Date set to "Immediately," only a single API call will be made to create a recurring customer code token: createCreditCardCustomerCode / createACHEFTCustomerCode
Finally, if the "Create Customer Token Code" checkbox is unchecked for a one-time purchase, only a single API call will be made: processCreditCard OR processACHEFT
Sending Transaction IDs and Token Values to Salesforce
It is possible to send values created by the iATS connector to Salesforce for your records. For example, if you would like to send the transaction ID created by a one-time charge, you can do this from within the Salesforce connector.
When setting this up, the Salesforce connector will need to be below the iATS connector in the connector timeline, so that the Salesforce connector runs after the iATS connector.
In your Salesforce connector mappings, you will need to set the Salesforce field values to be equal to a "formula or text" and use the field aliases for the fields you would like to send over. These field aliases can be found by using the link at the bottom of the notifications page, and will need to be wrapped in double percent signs (for example %%IATS_TRANS_ID_132113%%).
Once you have set up your mappings in the Salesforce connector, make sure to save, and then you're ready to try some test submissions.
These field aliases can also be used in conjunction with skip-if formulas to skip certain connector steps if a charge is not made when the form is submitted.
Configuring Opportunity Creation in Salesforce
If you are using the iATS connector in conjunction with Brickwork, it is important to note that Brickwork will automatically create an opportunity within your Salesforce instance. Therefore, if you are creating an opportunity using FormAssembly's Salesforce connector, you will end up with duplicate opportunities being created.
At this time, there is no way to turn off Opportunity creation within Brickwork, so to avoid duplicates you should not create Opportunity records on the FormAssembly side within your Salesforce connector.