Overview
As an administrator of an Essentials plan or higher, you have control over your users' forms.
Search for a Form
You can search for a specific form by navigating to Admin Dashboard | Forms | All Forms.

You can search for a form by the Form ID, Form Name, Form Content, Form Owner (username), Email (of the owner), User ID (of the owner), Form Spam Filter, Builder Version, and Status.
If you choose to search by form content, this will search all field labels, all HTML content, and all text content.
Refine Searches with Filters
If you choose to search by status, you can filter by "Active", "Archived", or “Deleted” status.
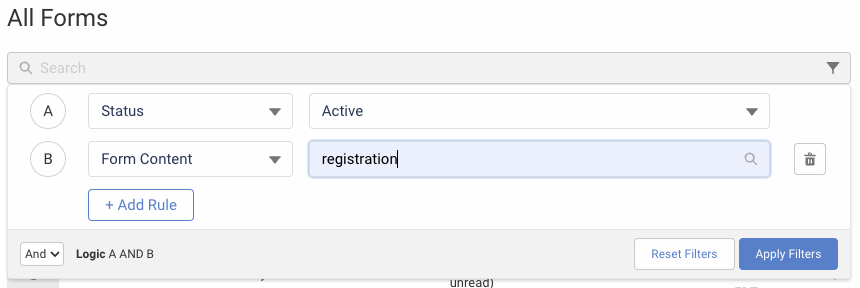
These search options can be applied as Filters and combined with either ‘AND’ or ‘OR’ logic to further refine your search queries. To apply filters, select the Filter (funnel) button within the search bar and configure your choices.

Customize the All Forms Table
The All Forms table can be sorted by each column using the arrow icons next to each column header (Form ID, Form Name, Form Owner, Response Count, Active Connectors, Connector Errors, and Last Edited Date).
To customize the columns displayed on the All Forms table, select the Customize Table Columns button, and move options between the Available Options and Selected Options columns. If there are fewer than two options in the Selected Options column, the Apply button will be disabled. Reorder the columns with the up and down arrow buttons.
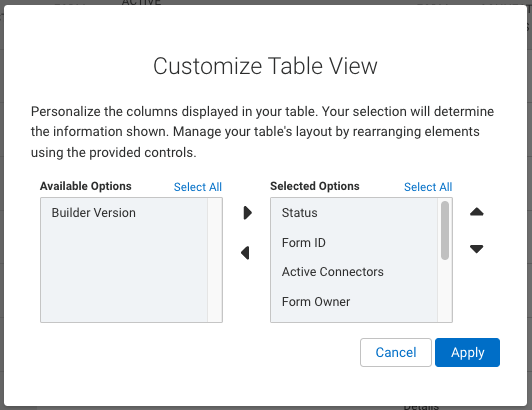
Click Apply to finalize your selections or Cancel to abort. The customized view is retained and does not need to be reconfigured the next time you log in. Each user’s customized view is their own and does not impact any other user on the instance.
Download the All Forms Table
Select the Export as CSV (download) button to download the All Forms table as a .csv. Any filters, searches, or sorts applied to the table are reflected in the download; however, column customizations are not, so all columns are included in the download.
Change Form Owner
You may transfer the ownership of a form to another user. This is useful when a user is leaving the organization or when the creator won't be maintaining the form. To change ownership of a form:
- Look up the User ID of the new owner with the User tab search
- Look up the Form ID of the form you'll be transferring, under the All Forms search
- Browse to: Admin Dashboard | Forms | All Forms
- Search for the Form ID you found above
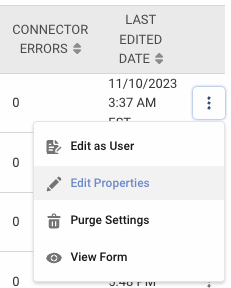
- Click the vertical ellipsis on the right to select Edit Properties
- Select the new owner's User ID (step 1) from the Owner Username dropdown menu
- Click Apply

Delete Forms
To delete a form:
- Browse to: Admin Dashboard | Forms | All Forms
- Search for the form you want to delete
- Click the vertical ellipsis on the right to go to Edit Properties
- Under Expired, check the "Check to delete this form" box

- Click Apply

You can undo this action and restore a form. See below for details.
Restore a Form
To restore a form:
- Browse to: Admin Dashboard | Forms | All Forms
- Search for the form you want to restore
- Click the vertical ellipsis on the right to go to Edit Properties
- Under Expired, uncheck the "Check to delete this form" box
- Click Apply
The form will become available again, and the collected data will be restored.
Preview Forms
You can preview forms that you have selected to be templates.
- Browse to: Admin Dashboard | Templates
- Click on the Preview button next to the form.
Forms will not submit a response from this page.
Edit Properties Options
Here’s an overview of what you can change as an administrator on the Edit Properties page:
- Change Form Name
- Update Moderation Status
- Change Form Language
- Update Status
- Enable/Disable SSL
- Enable/Disable Captcha
- Enable/Disable Save & Resume
- Enable/Disable Confirmation Page
- List as a Template
- Set Category and/or Subcategory
- Change Form Owner
- Delete and Restore Form
You may view the form's version number, the date of creation, and the last modified date.
Changing Form and Workflow Ownership as a User without Administration Permissions
Any user account that is an owner of a form may transfer ownership of their form to any other user account within their FormAssembly instance without administrative restrictions. This means that a form ownership transfer is no longer required to be completed by an admin, freeing up administrators to complete other tasks.
- If you would like your users to transfer ownership of their own forms, please navigate them to our Form Collaboration article.
- If you would like your users to transfer ownership of their own workflows, please navigate them to our Workflow Collaboration article.